


Managing your business’s finances in QuickBooks Online starts with understanding the Chart of Accounts (COA). The COA is essentially the backbone of your accounting system, allowing you to organize transactions into meaningful categories for accurate financial reporting. Whether you're a seasoned accountant or a small business owner, having a well-structured Chart of Accounts is crucial for keeping your financial data organized.
This guide will walk you through everything you need to know about QuickBooks Chart of Accounts, from its basic definition to setting up and customizing it for your specific needs.
What is Chart of Accounts in Quickbooks?
The Chart of Accounts in QuickBooks is a complete listing of all the accounts your company uses to track its financial transactions. It includes assets, liabilities, income, expenses, and equity accounts. Each account plays a role in financial reporting and helps you make sense of where your money is going and how it’s being used. In short, it provides a financial map of your business.
How to Setup Chart of Accounts in Quickbooks Online?
Step 1: Navigate to the “Settings” icon in the top right corner. Next, click on “Chart of accounts” from the drop-down menu.
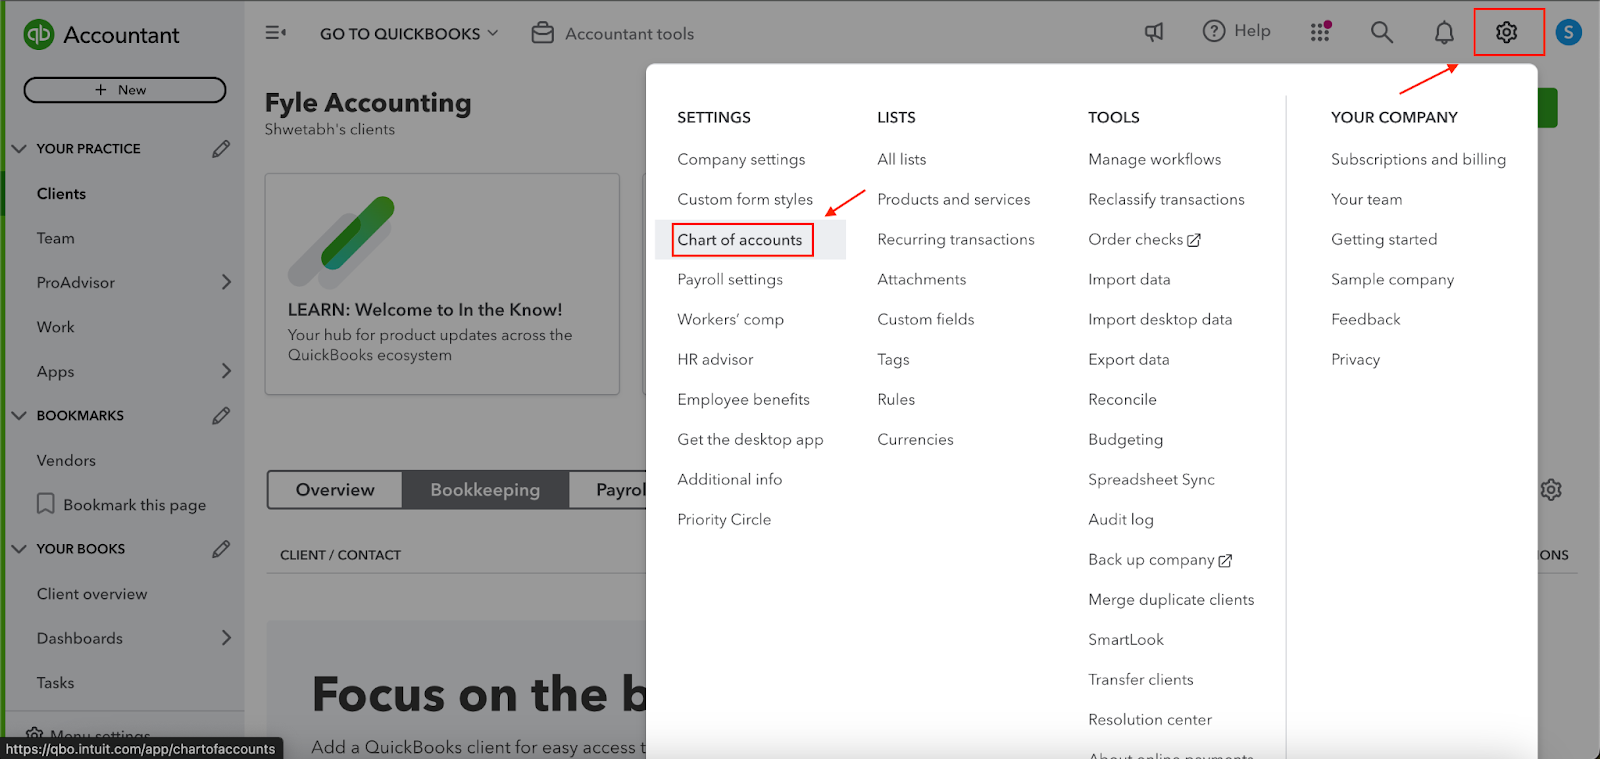
On clicking “Chart of accounts,” you will see this.
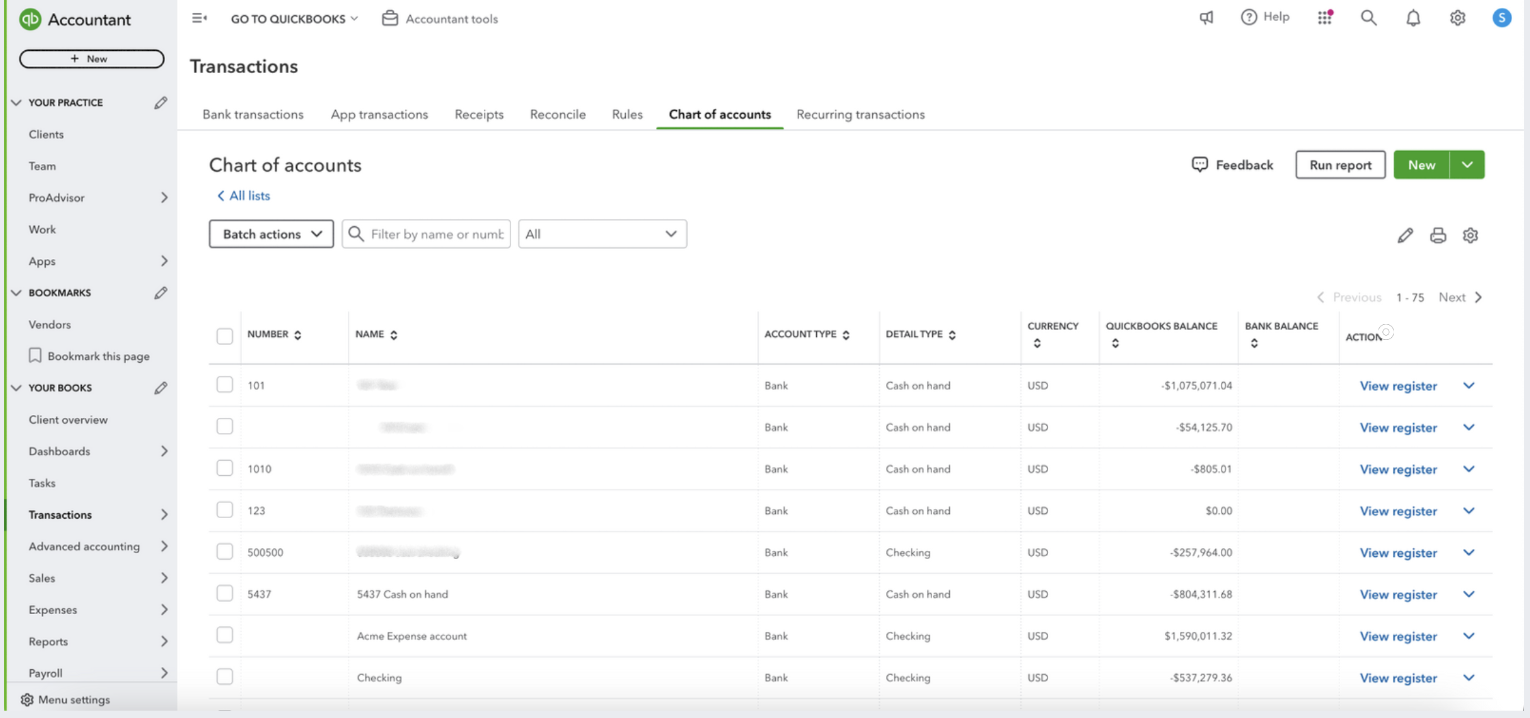
Once you land on this page, you need to ensure you have the correct chart of accounts for all the workflows so that you can report all the transactions in the right place.
An easy way to do this is to scroll on this page and look at all your income accounts. Some essential ones you would see would be ones like “Billable expense income,” “Sales,” “Services,” and such. These are mostly default items that come inbuilt with Quickbooks Online.
You can also create your own set of income accounts for your chart of accounts for your construction company.
How To Add New Chart Of Accounts In Quickbooks Online?
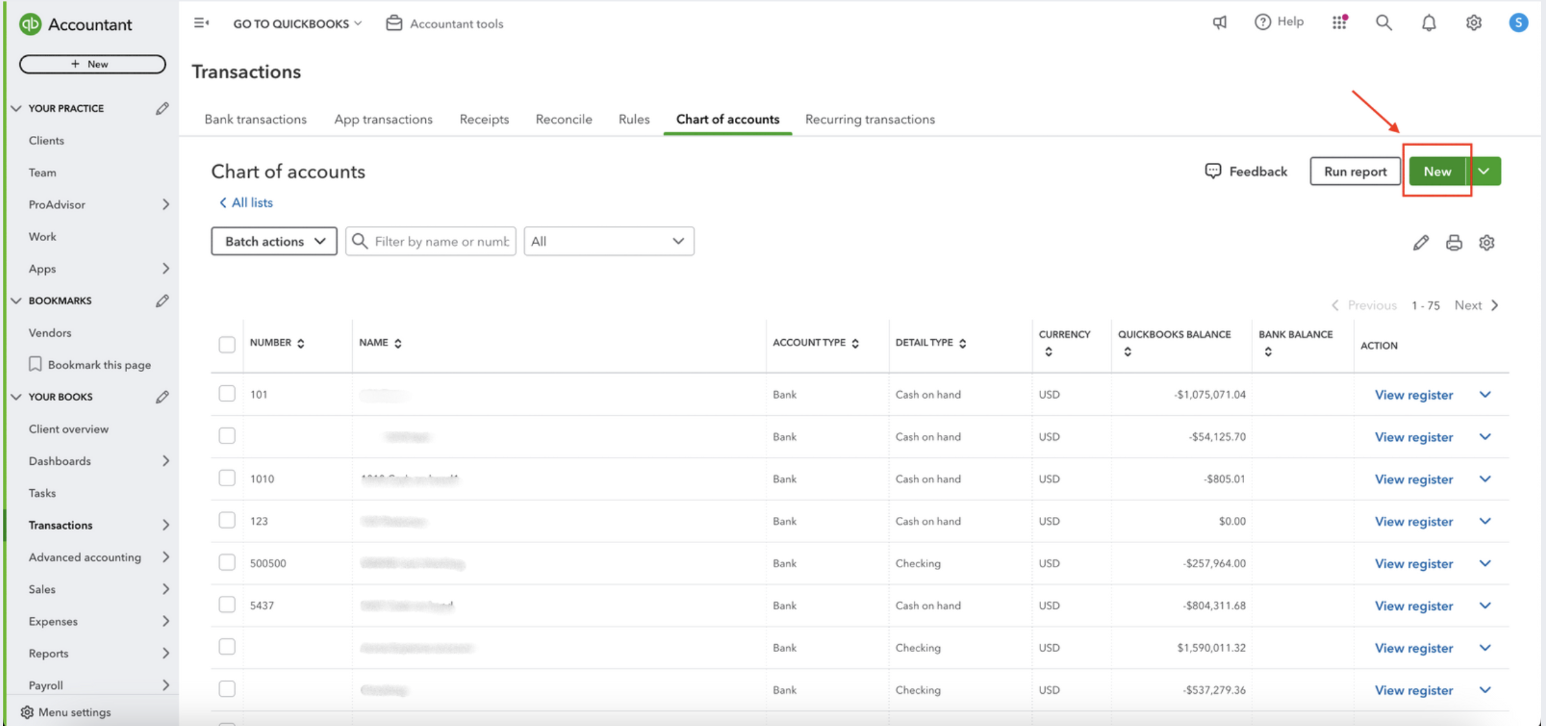
Step 1: On the “Chart of accounts” page, click “New.”
Step 2: On clicking “New” a new form will appear on the right side of the screen. Now, you need to fill in this form to create your new chart of accounts.
Here are some essential details you must fill in the form. Here's a breakdown of each field and how construction folks can use them:
1. Account name:
- Purpose: This is the preferred name you want to give the new chart of accounts. It should be descriptive and easily recognizable.
- Example for construction: "Construction income"
2. Account number:
- Purpose: This is a unique numeric identifier for the chart of accounts. It helps organize your accounts and is used for financial reporting.
- Example for construction: "4000" (You can choose a numbering system that makes sense for your business)
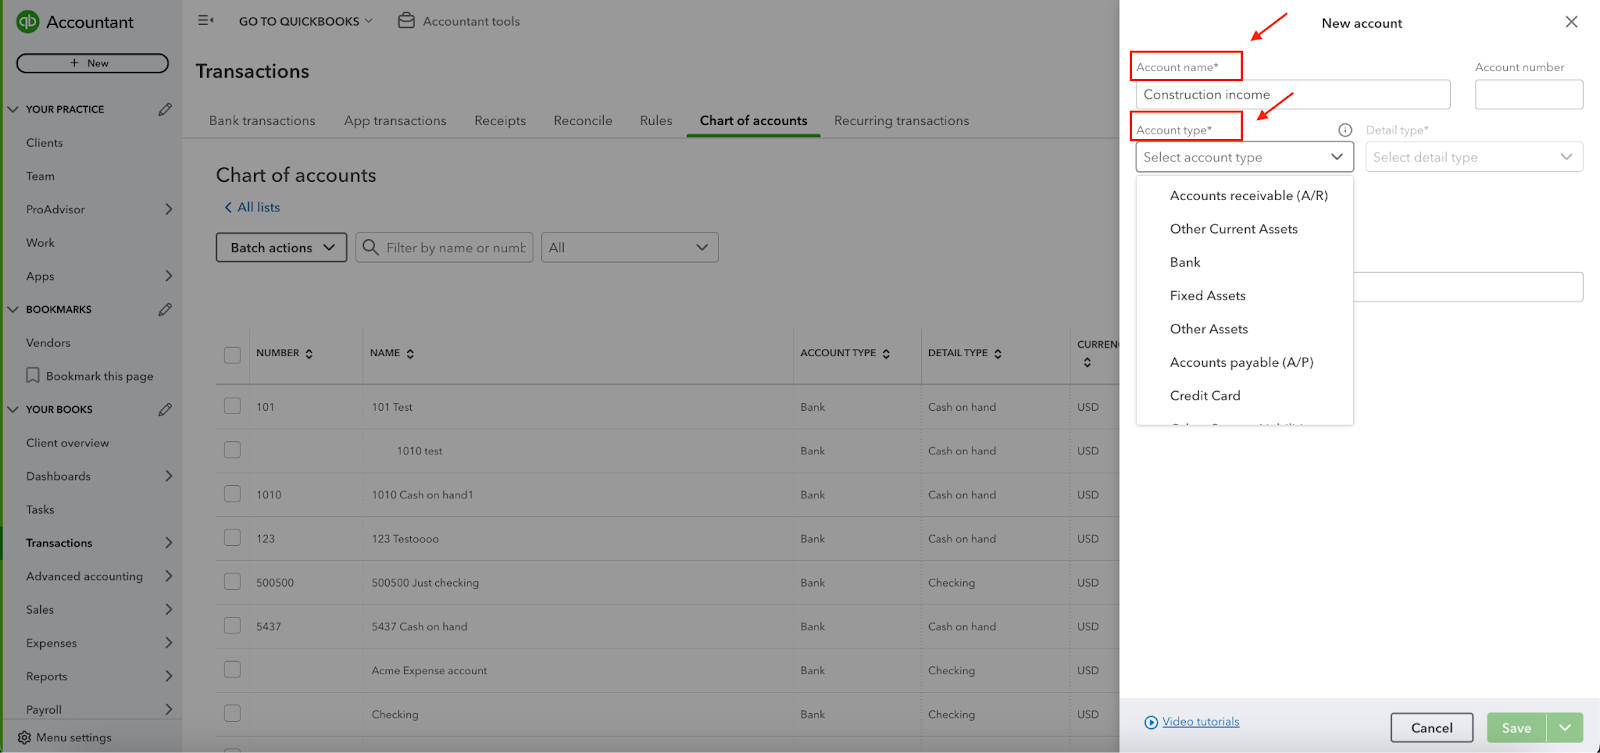
3. Account type:
- Purpose: This field indicates the general category or type of account. It helps classify accounts for financial reporting and analysis.
- Example for construction: "Income" or “Expense”
4. Detail type:
- Purpose: This field provides more specific information about the type of account within the broader category. It helps categorize accounts further for detailed analysis.
- Example for construction: "Service/Fee income" or “Discounts/Refunds given”
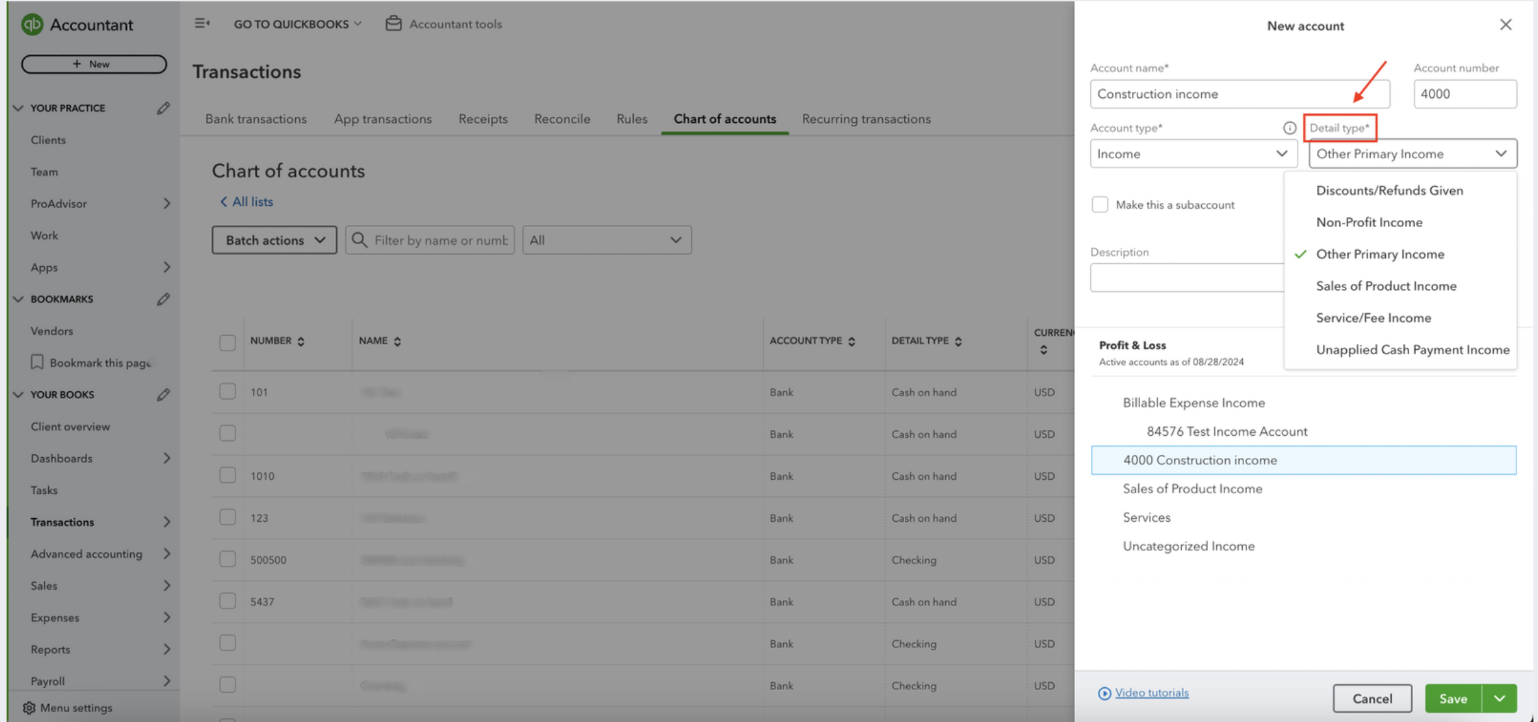
Step 3: Once you have added all the details, click “Save.”
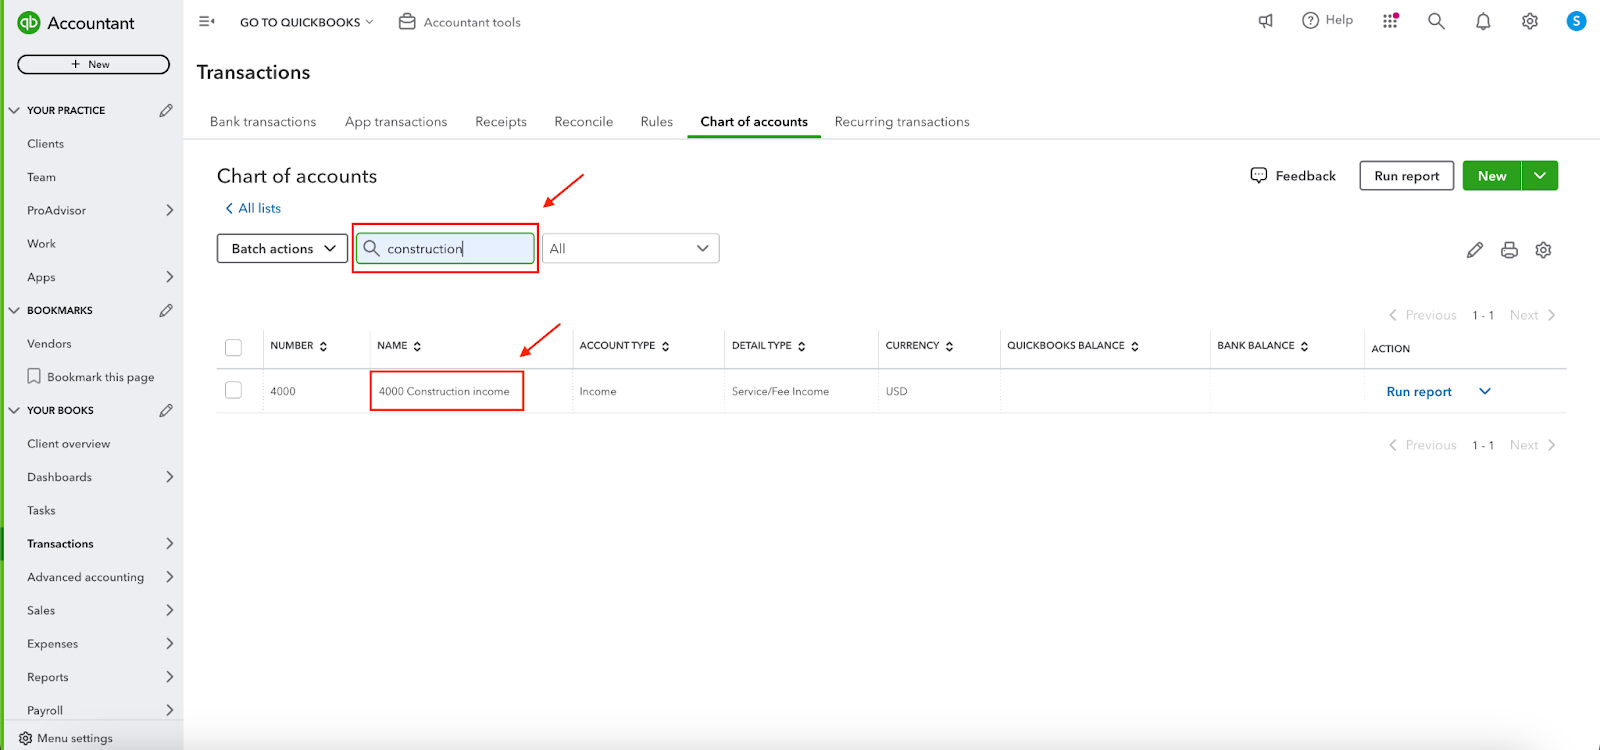
Now, you can access your new account chart by typing it in the search bar. As you type in the term, say construction, in our case, and you will see the chart of accounts appear in the tabular below.
How Sage Expense Management (Formerly Fyle) Can Help
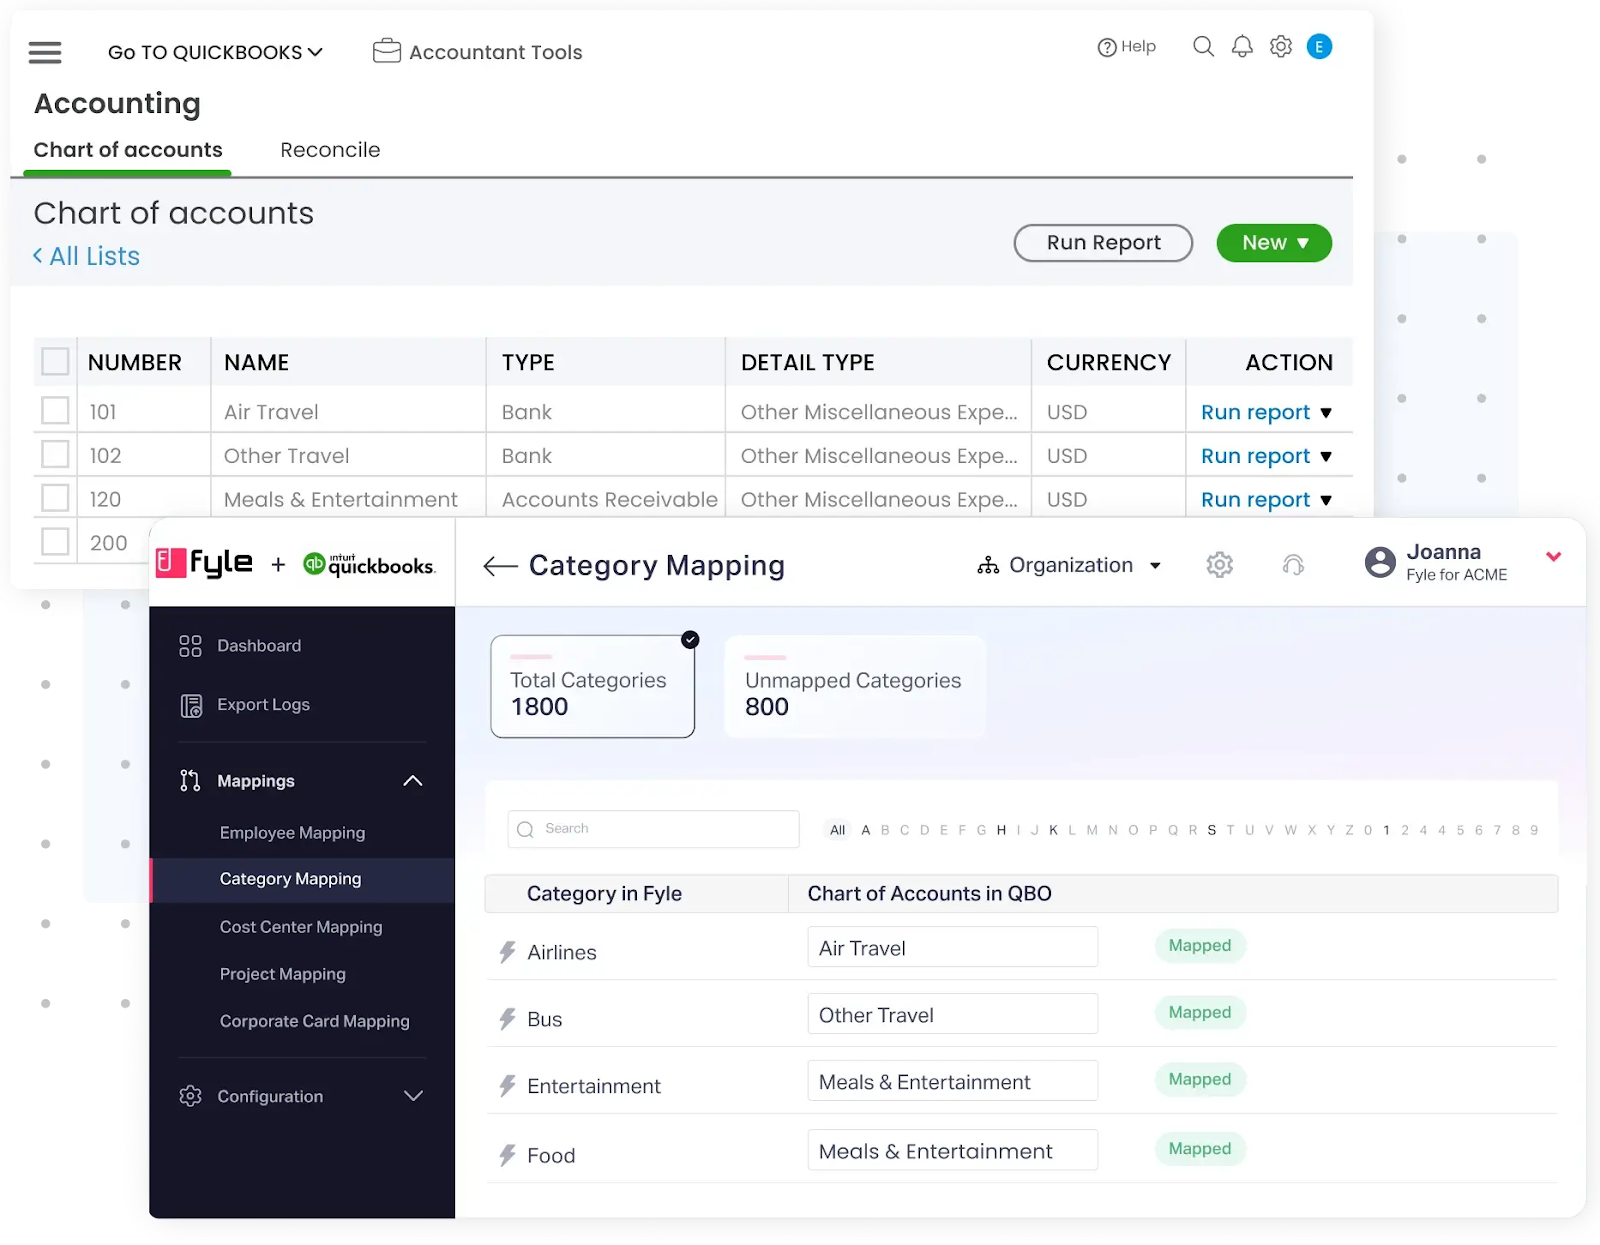
Our platform simplifies managing and integrating your Chart of Accounts (COA) in QuickBooks Online, making it easier to categorize and organize expenses. Here’s how Sage Expense Management helps with the QuickBooks Chart of Accounts:
1. Automatic Import of Accounts
- We automatically import your Expense Accounts from QuickBooks Online’s Chart of Accounts. This eliminates the need for manual data entry, ensuring that your expense categories in our platform align perfectly with the accounts in QuickBooks Online.
2. Comprehensive Account Mapping
- We doesn’t just import Expense Accounts. We can also import additional account types such as:
- Fixed Assets
- Current Assets
- Current Liabilities
- Long-Term Liabilities
- Cost of Goods Sold (COGS)
- This ensures a broader range of account mapping, allowing you to categorize expenses according to your business's unique financial structure.
3. User-Friendly Account Naming
- To make things simpler for employees, Sage Expense Management allows you to rename accounts or categories in non-accounting terms. This makes it easier for employees to select the correct accounts without needing to understand the intricacies of accounting, which ensures better accuracy when submitting expenses.
4. Custom Mapping for Products and Services
- Sage Expense Management enables you to map Products and Services from QuickBooks Online to Categories in our platform . This feature allows businesses to track expenses related to specific products or services in QuickBooks while ensuring that employees can easily code their expenses in our platform.
5. Classes, Departments, and Projects Integration
- We can import additional dimensions from QuickBooks Online such as Classes, Departments, and Projects. This allows you to map these fields in the platform, making it easier for employees to assign their expenses to the appropriate cost centers or projects in QuickBooks Online.
6. Granular Control Over Account Mappings
- Sage Expense Management gives you control over how different accounts are mapped from QuickBooks Online to the platform. You can configure these mappings to suit your organization’s structure, ensuring that the data is categorized correctly before being exported back into QuickBooks Online.
7. Sync and Update with Auto-Sync
- We ensure that your Chart of Accounts stays updated with auto-sync every 24 hours. This means any new accounts added to QuickBooks Online will automatically be reflected, keeping both systems in sync.
By integrating seamlessly with QuickBooks Online’s Chart of Accounts, Sage Expense Management ensures that expense data is accurately categorized, mapped, and kept up to date, simplifying expense management and accounting processes.

How To Deactivate Chart Of Accounts In Quickbooks Online?
As a business owner or accountant using QuickBooks Online to manage your finances, you might need to delete a chart of accounts to maintain organized and up-to-date records.
This could be necessary if your business structure has changed or if certain accounts are no longer required. Understanding how to remove a chart of accounts in QuickBooks Online will help you keep your financial records tidy and accurate.
QuickBooks Online allows you to deactivate accounts by simply following the instructions below:
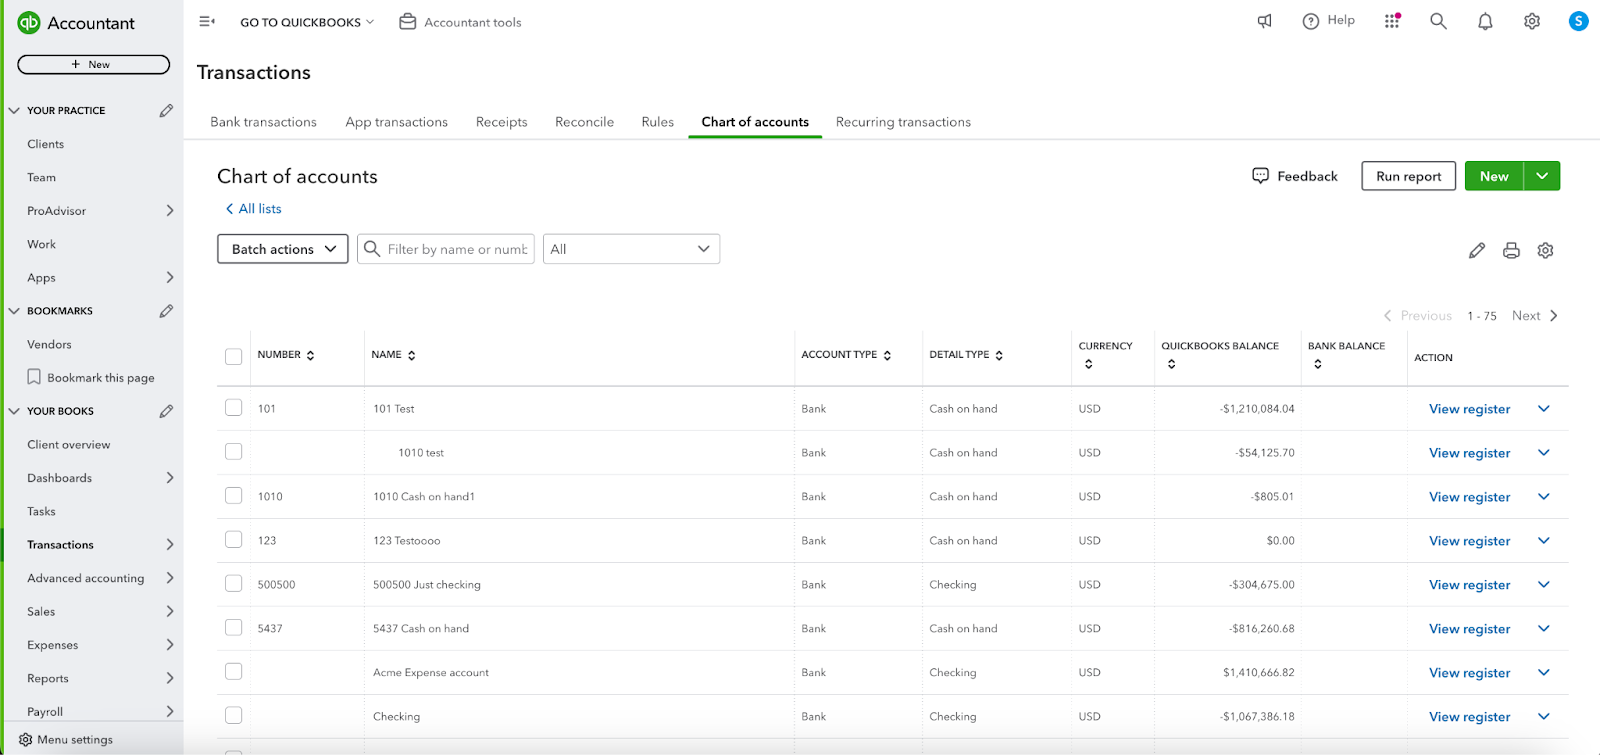
Step 1: Go to “Transactions” and choose the “Chart of Accounts” tab.
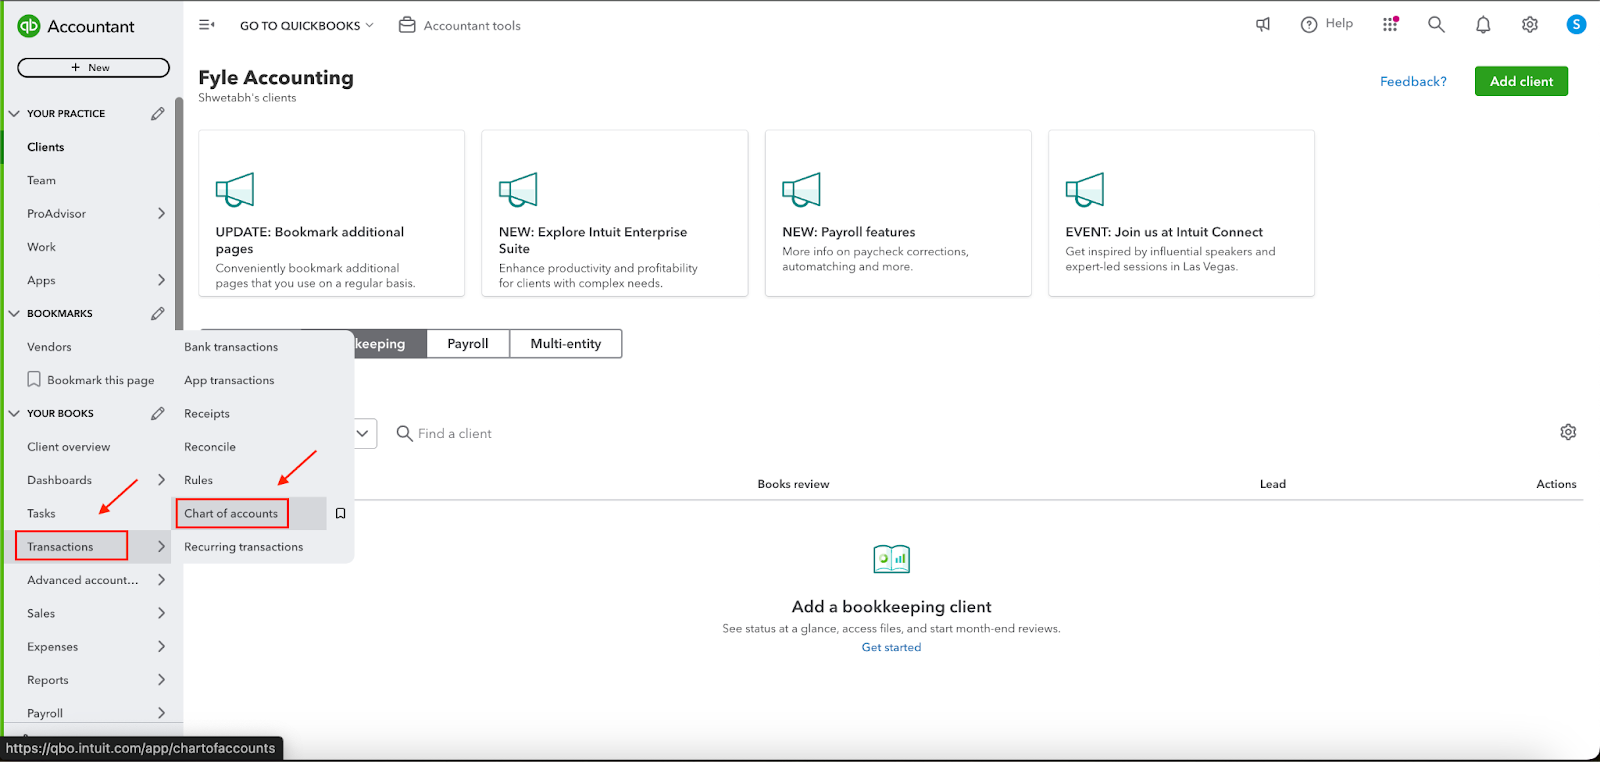
This is the screen you will see.
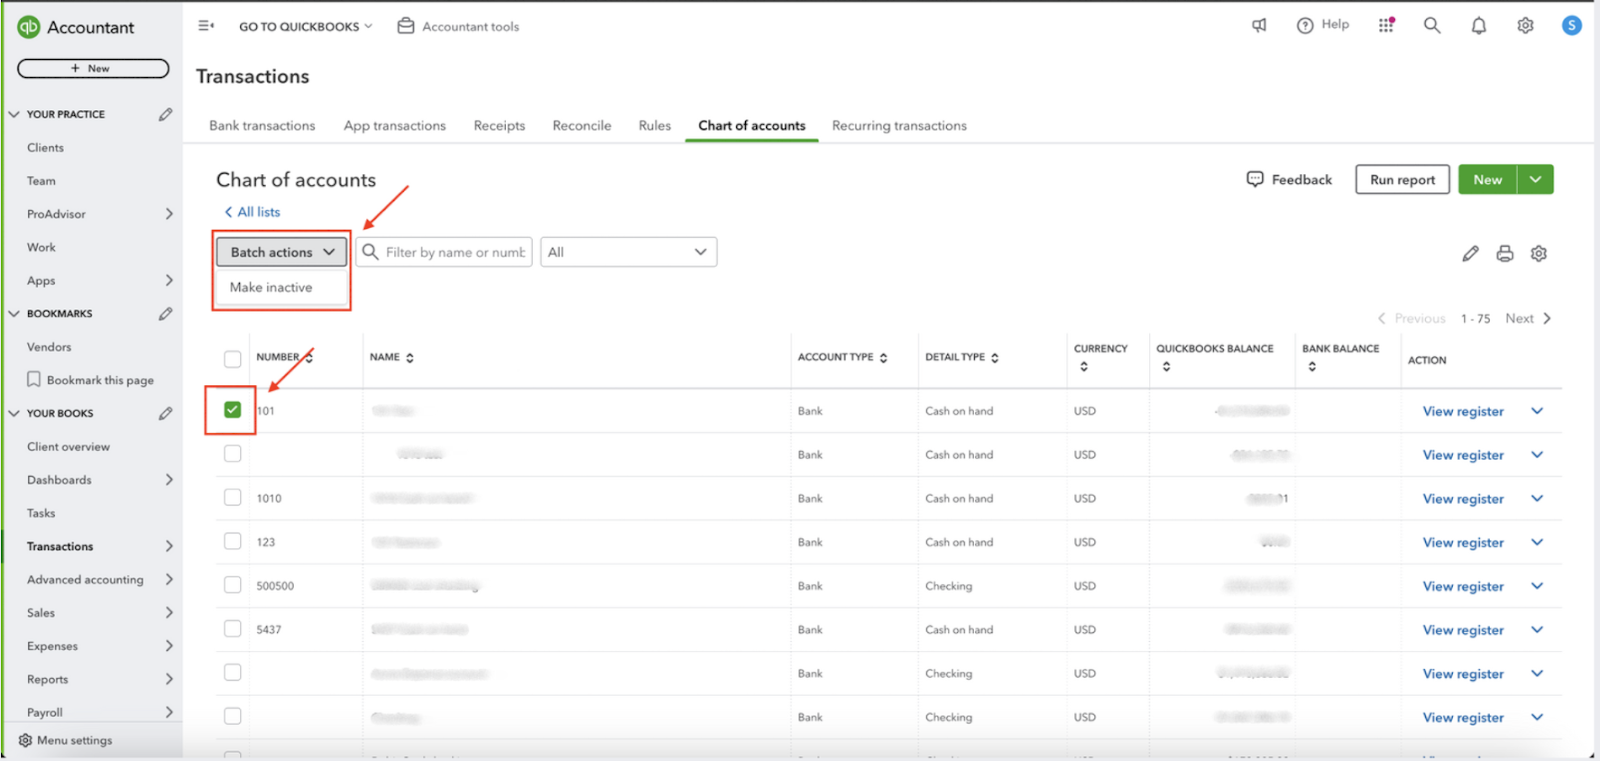
Step 2: Select the particular account you want to deactivate on the left-hand side of the screen. Click on “Batch actions” and then click on “Make inactive.”
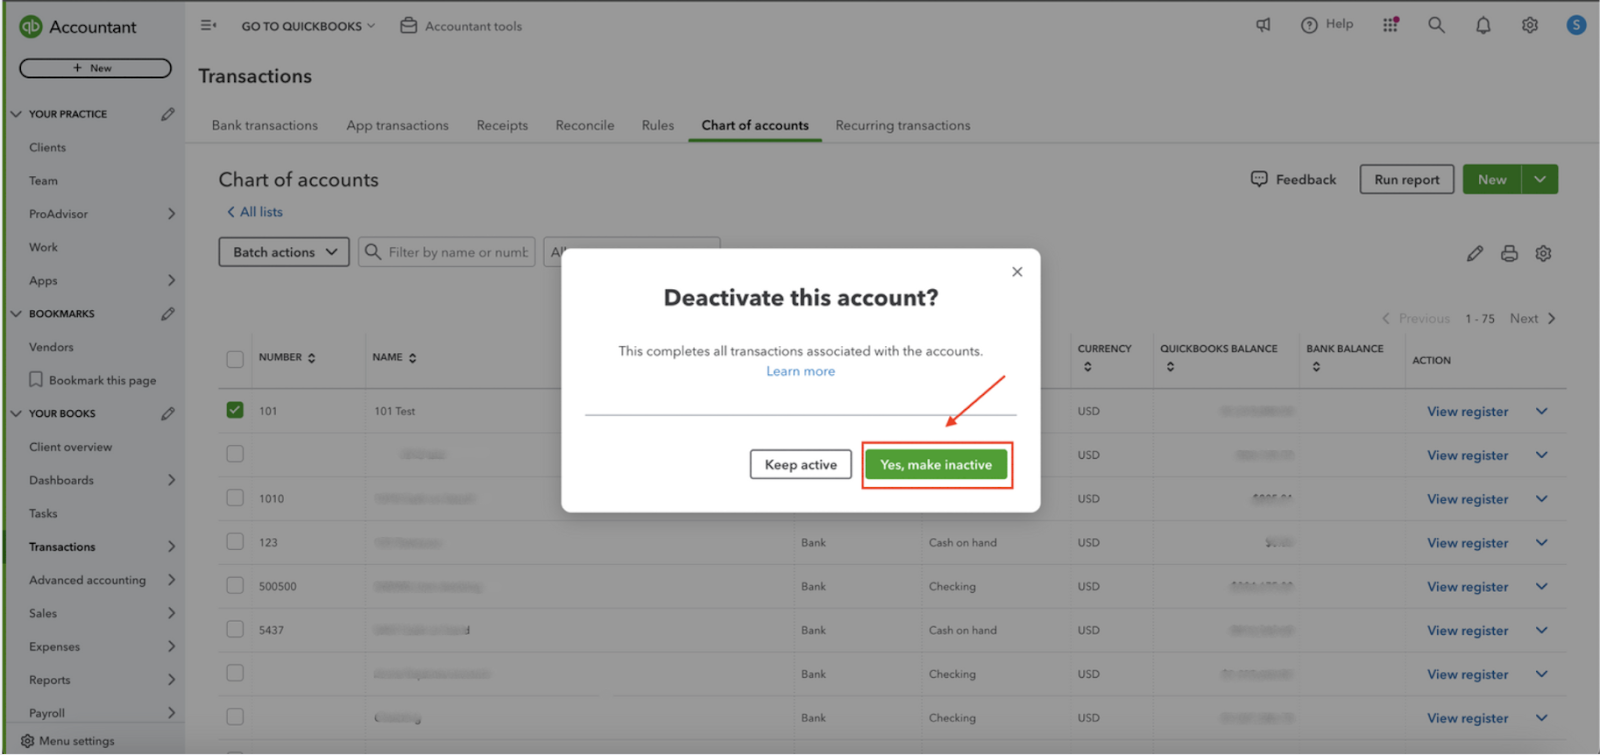
On clicking on “Make inactive,” this is the prompt screen you will see. Click on “Yes, make inactive” if you are sure you want to deactivate the account. And done. You have successfully deactivated the selected QuickBooks chart of account.
How To Reactivate Chart Of Accounts In Quickbooks Online?
QuickBooks Online allows you to restore deactivated accounts by simply following the instructions below:
Step 1: Go to “Transactions” and choose the “Chart of Accounts” tab.
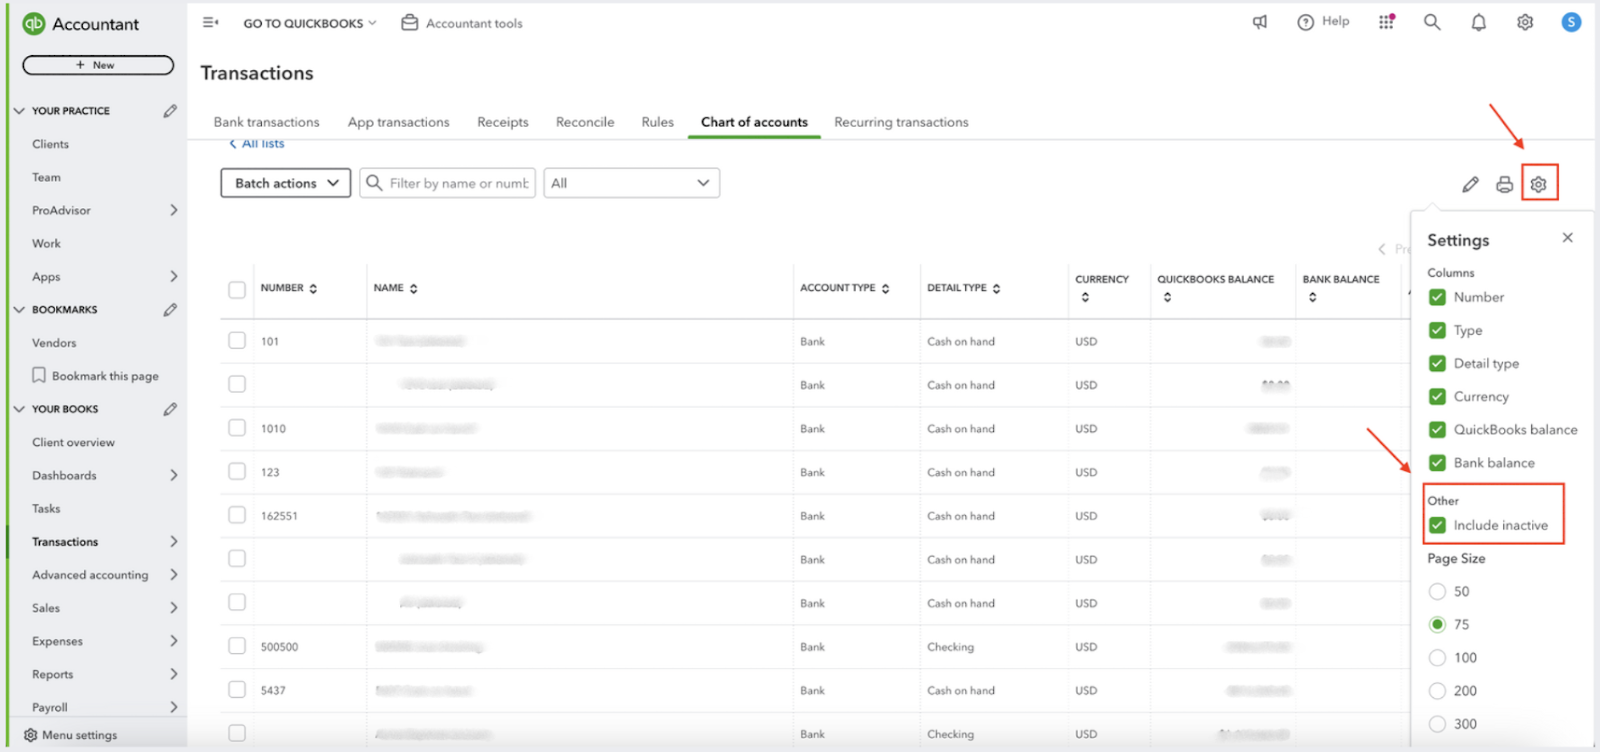
Step 2: Click the small Gear icon and put a checkmark in the Include inactive box.
Step 3: Look for the account in the search bar provided. Simply type in the name of the account you want to reactivate and the account should show up, ideally with a (deleted) tag right next to it..
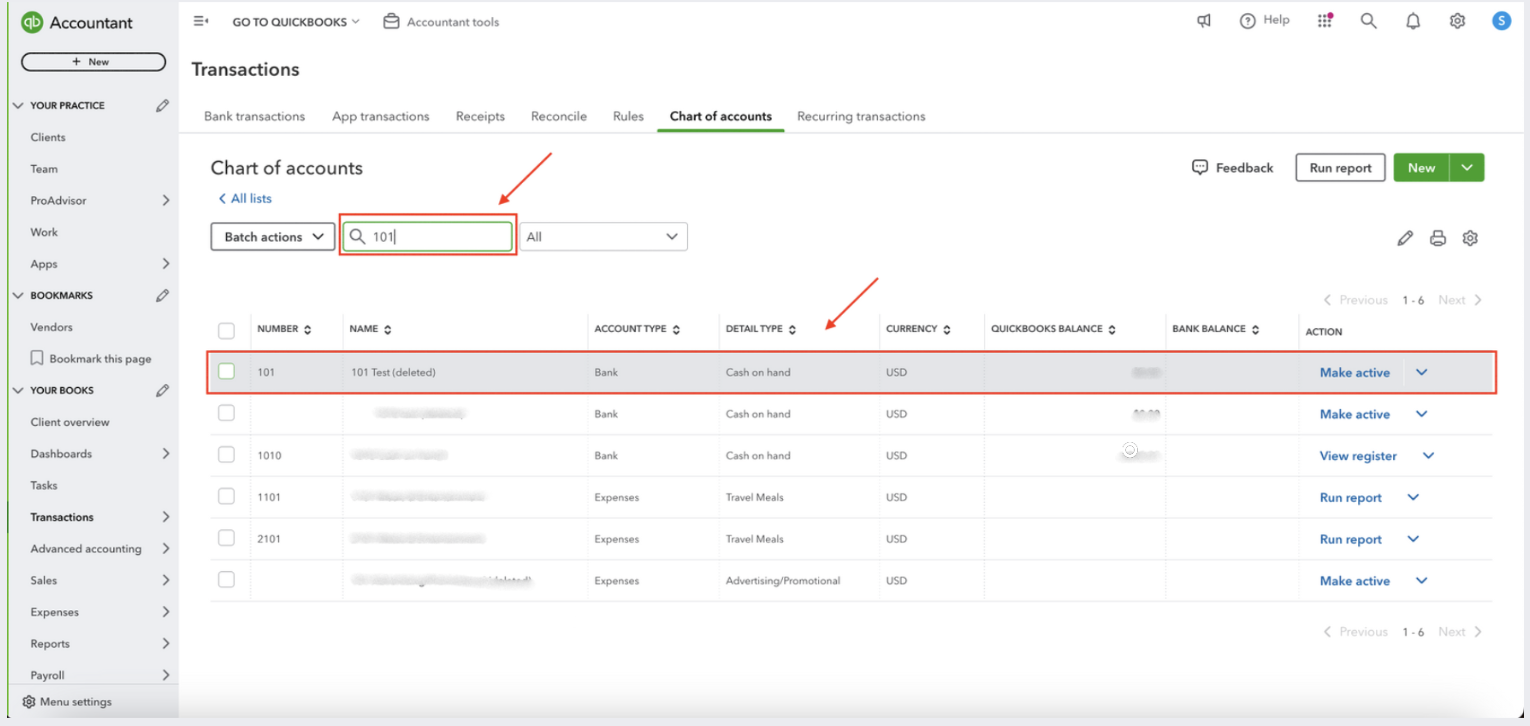
Click on the “Make active” option on the right side of the screen.. And done. You have successfully reactivated the selected QuickBooks chart of account.

How to Import Chart of Accounts in Quickbooks Online?
When setting up your business in QuickBooks, the platform automatically customizes the chart of accounts to structure your accounting system. Instead of manually adding accounts, you have the option to import them using a spreadsheet from another QuickBooks Online or Desktop file. Here’s the process.
Tip: It’s best to import accounts during the initial setup of your company in QuickBooks. If you only have a few accounts to enter, you can also create new ones manually.
Step 1: Prepare Your Spreadsheet
You can use Excel, Google Sheets, or a CSV file to import your chart of accounts. Follow these guidelines to format your file correctly:
- Open your existing spreadsheet or export the chart of accounts from another QuickBooks file, or create a new one.
- Ensure your spreadsheet contains the following columns:some text
- Account Number (optional if not using account numbers)
- Account Name
- Type
- Detail Type
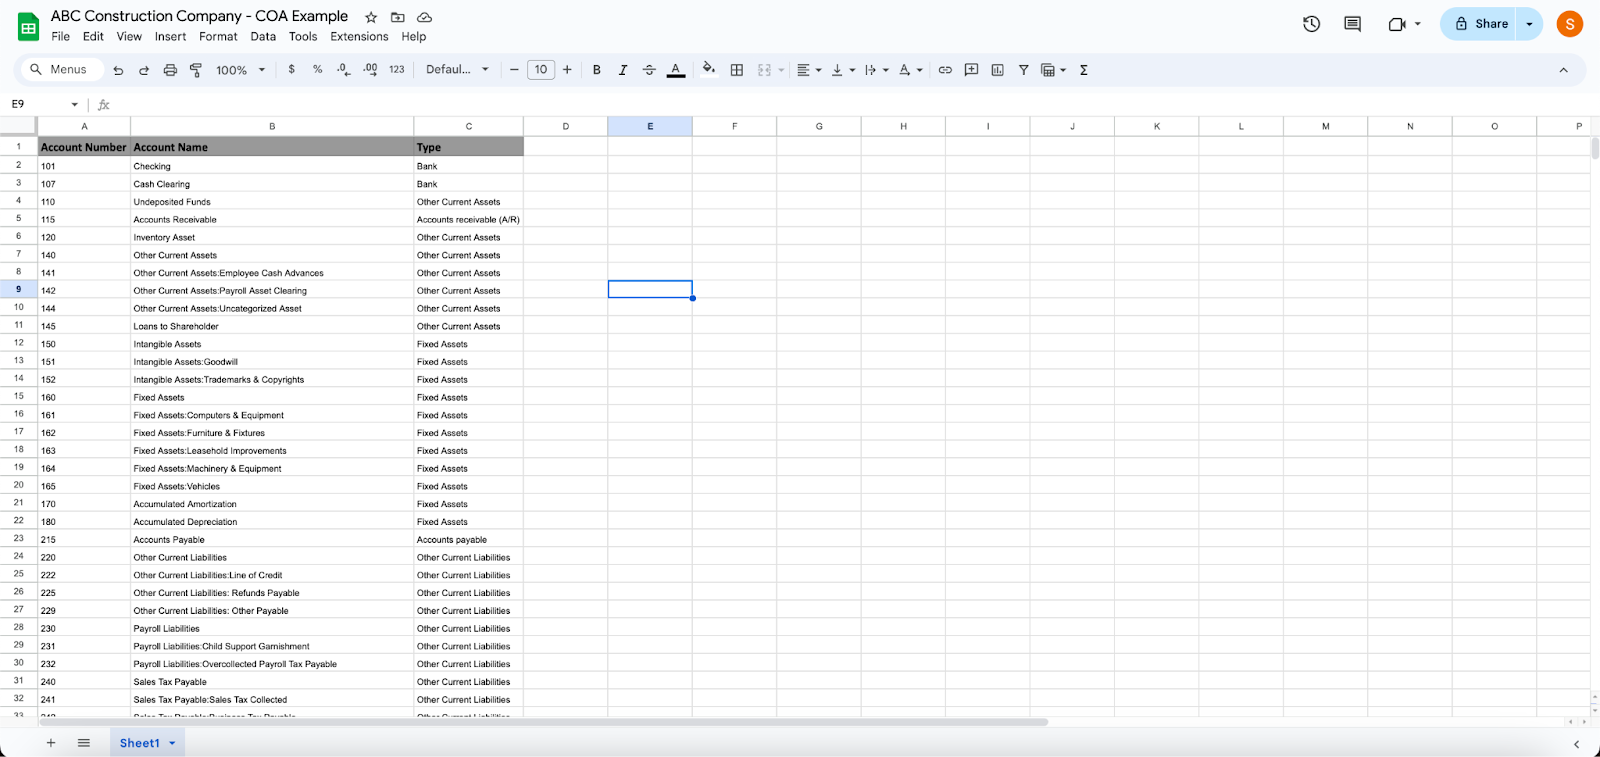
- For subaccounts, list them in the Account Name column using this format: Main Account: Subaccount (e.g., Utilities: Gas). Refer to the table for subaccount formatting examples.
- Once your spreadsheet is properly formatted, save it as an Excel, Google Sheets, or CSV file.
This is most likely how you Excel sheet would look:
Step 2: Upload Your Spreadsheet
- Log in to your QuickBooks Online account.
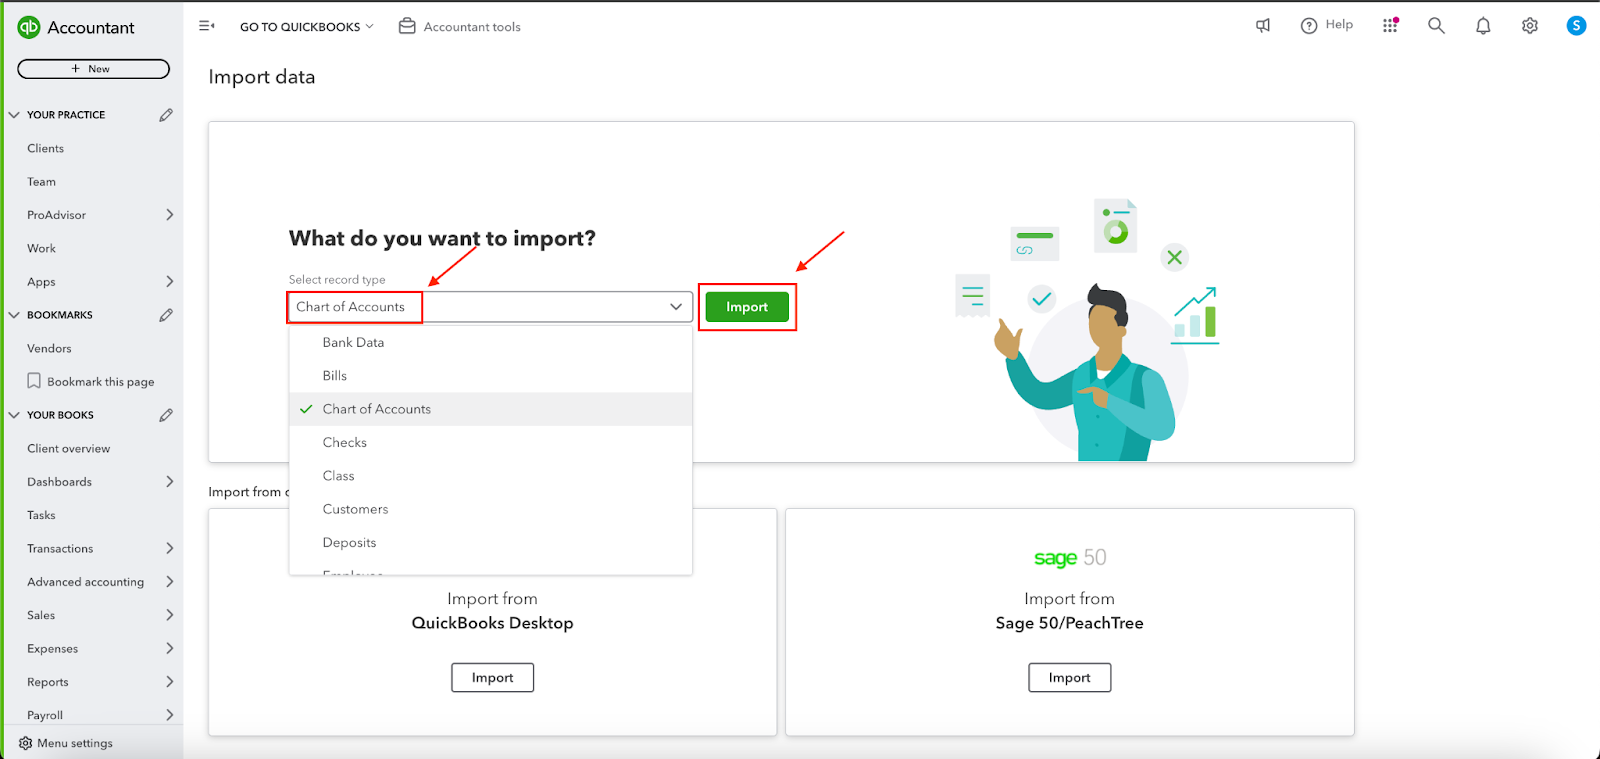
- Go to “Settings ⚙” and select “Import Data”.

- On selecting “Import Data,” you will see the following drop-down screen. Choose “Chart of Accounts” from the drop-down menu provided. Then click on “Import”
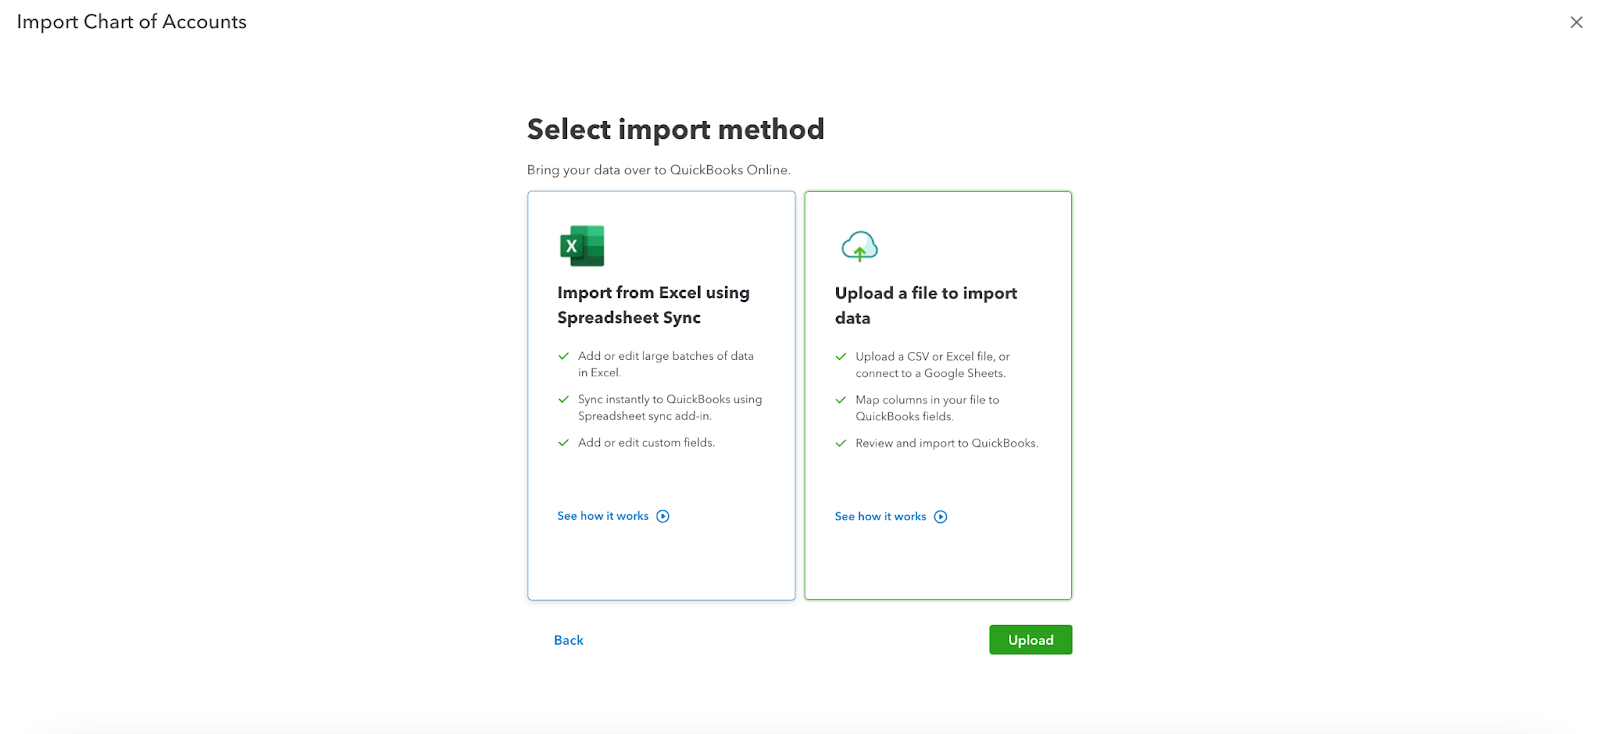
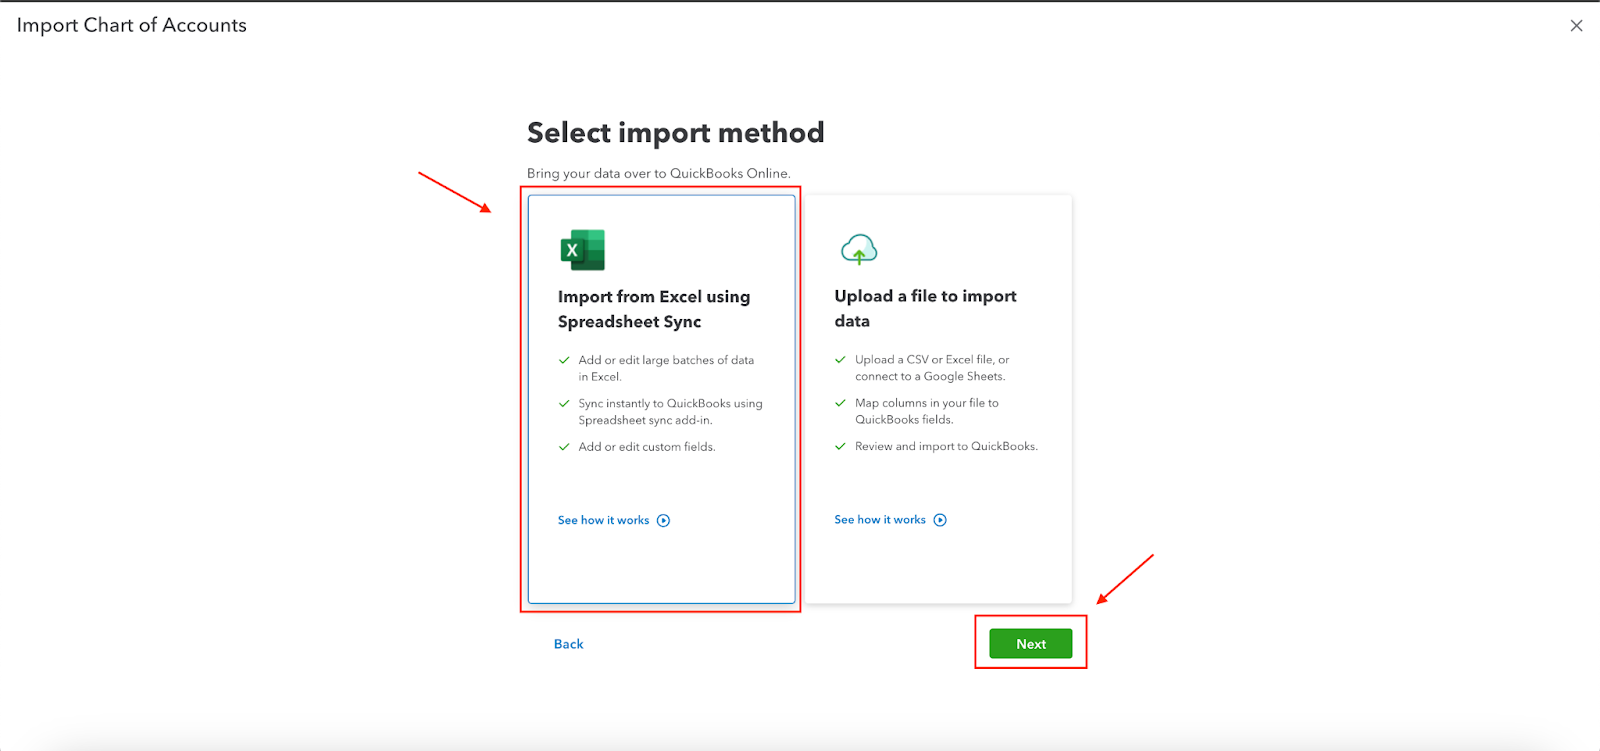
When clicking on “Import,” you will see the screen. Click on the option that best suits you.
To import chart of Accounts:
Way 1: Click on the “Import from Excel using Spreadsheet Sync,” then click “Next.”
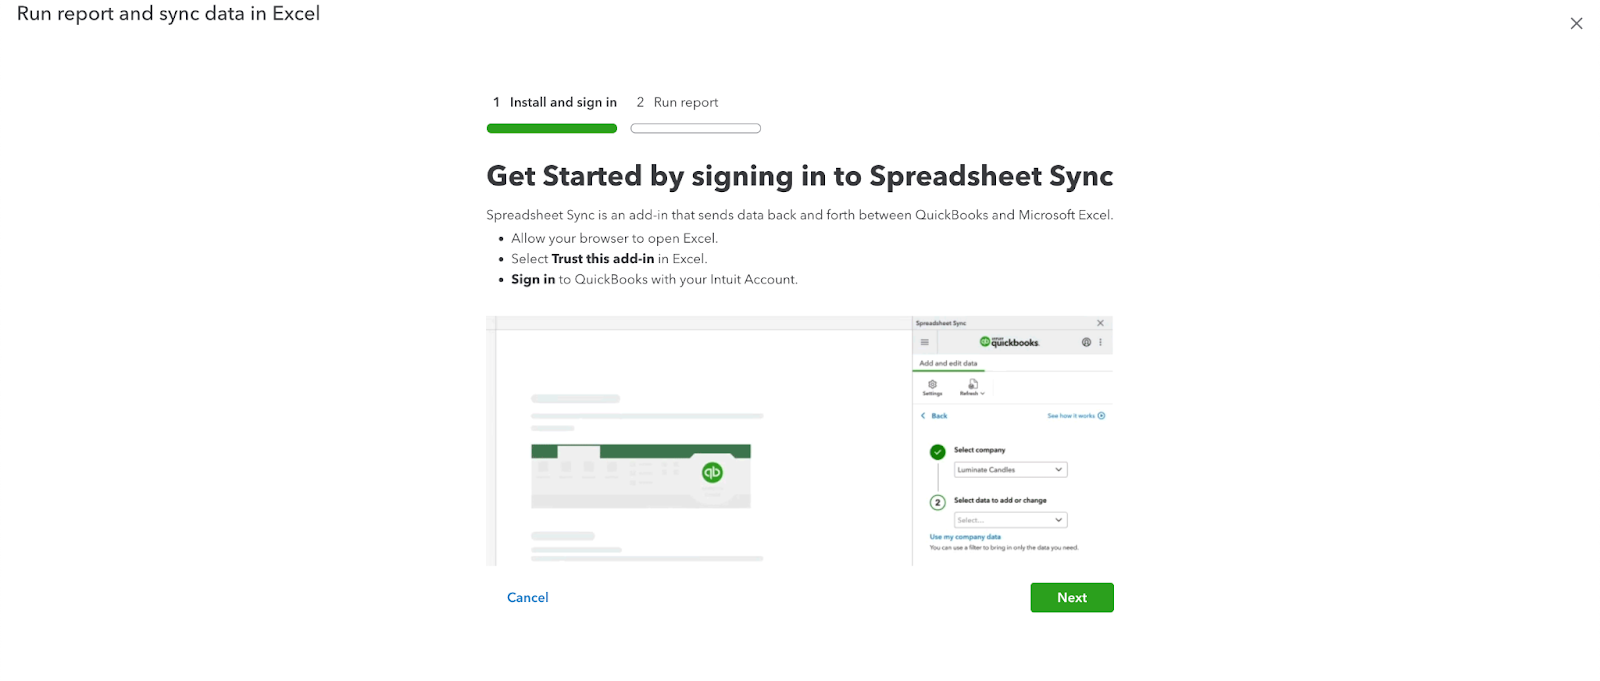
- This is the screen you’ll encounter. Spreadsheet Sync is an add-in that enables data exchange between QuickBooks and Microsoft Excel. The steps are as follows:some text
- Let your browser to open Excel.
- In Excel, select "Trust this add-in."
- Log in to QuickBooks using your Intuit Account.
- You also get a handy GIF explaining the steps you must follow to get started! Once done, click on “Next.”
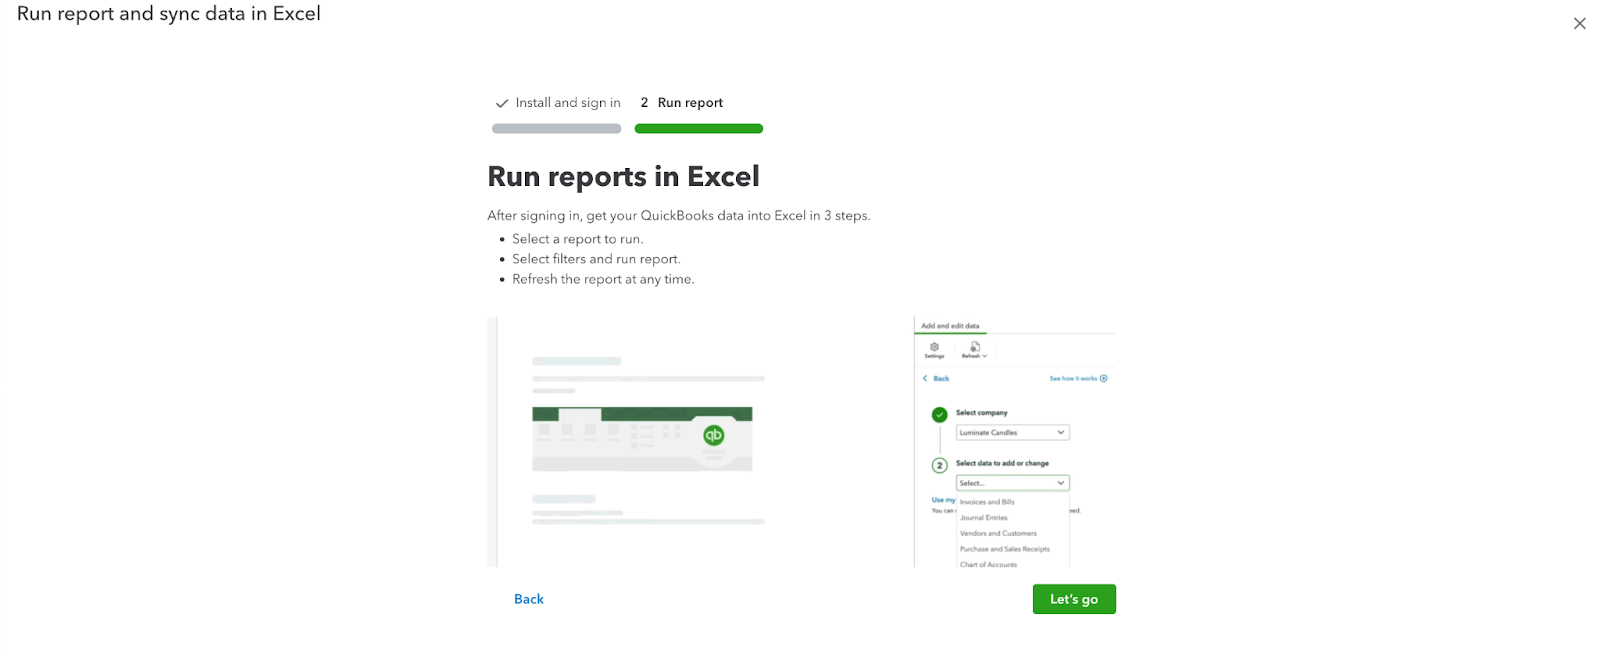
This is the next screen you will encounter. Once signed in, you can import your QuickBooks data into Excel in three simple steps:
- Choose a report to run.
- Apply filters and run the report.
- Refresh the report whenever needed.
- Once done, click on “Let’s go!” Follow the GIF and then sync your Spreadsheet to get started.
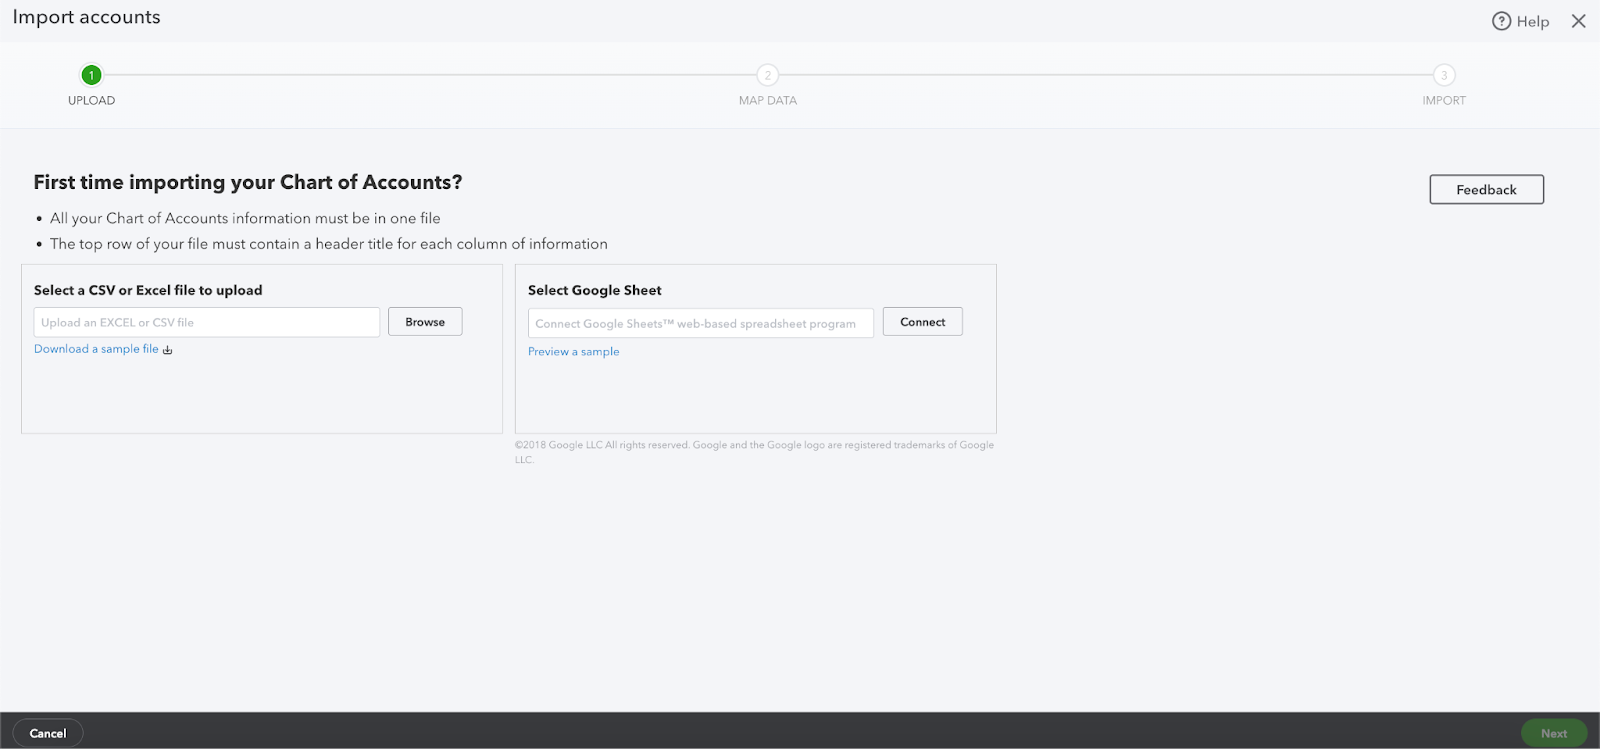
Way 2: To upload a Chart of Accounts:
Click on the “Upload a file to import data,” then click “Upload.”

On clicking “Upload,” you will see the following screen. There are two ways to upload your Chart of Accounts:
- Browse your desktop and add the CSV file you wish to upload.
- Connect your Google Sheets and then link the Sheet you wish to upload. This would require you to log in to your associated Gmail account.
Step 3: Match Your Spreadsheet Fields with QuickBooks Fields
After uploading, map the fields in your spreadsheet to the appropriate QuickBooks Online fields:
- Use the Your Field ▼ dropdown to match your columns with QuickBooks fields:some text
- Detail Type
- Account Name
- Account Number
- Type
- You can select No Match for any field that doesn’t align with QuickBooks. For example, if you’re not using account numbers, you can leave that field unmatched.
- Click Next.
Step 4: Import Your Chart of Accounts
Before finalizing the import, review everything:
- Ensure account types and detail types are correctly entered.some text
- Start by focusing on account types, and then choose the detail types based on the transactions you plan to track.
- If a field is highlighted in red, hover over it to see the issue. Double-check spacing in spreadsheet cells if needed.
- Deselect any account you don’t want to import.
- If everything looks good, click Import.
Step 5: Enter Opening Balances
After importing your accounts, you’ll need to enter opening balances. You can do this by creating a journal entry once all accounts are imported.
Step 6: Connect Your Accounts and Download Transactions
To download and categorize your transactions, connect your bank or credit card accounts to QuickBooks. QuickBooks will automatically download your transactions, allowing you to review and approve them.
How to Run Report and Export Chart of Accounts in Quickbooks Online?
Step 1: Access Your QuickBooks Account
Log into your QuickBooks account. From the left-hand menu, go to “Transactions” and select Chart of Accounts.

Step 2: Generate a Report
In the upper right corner, click the Run Report button.
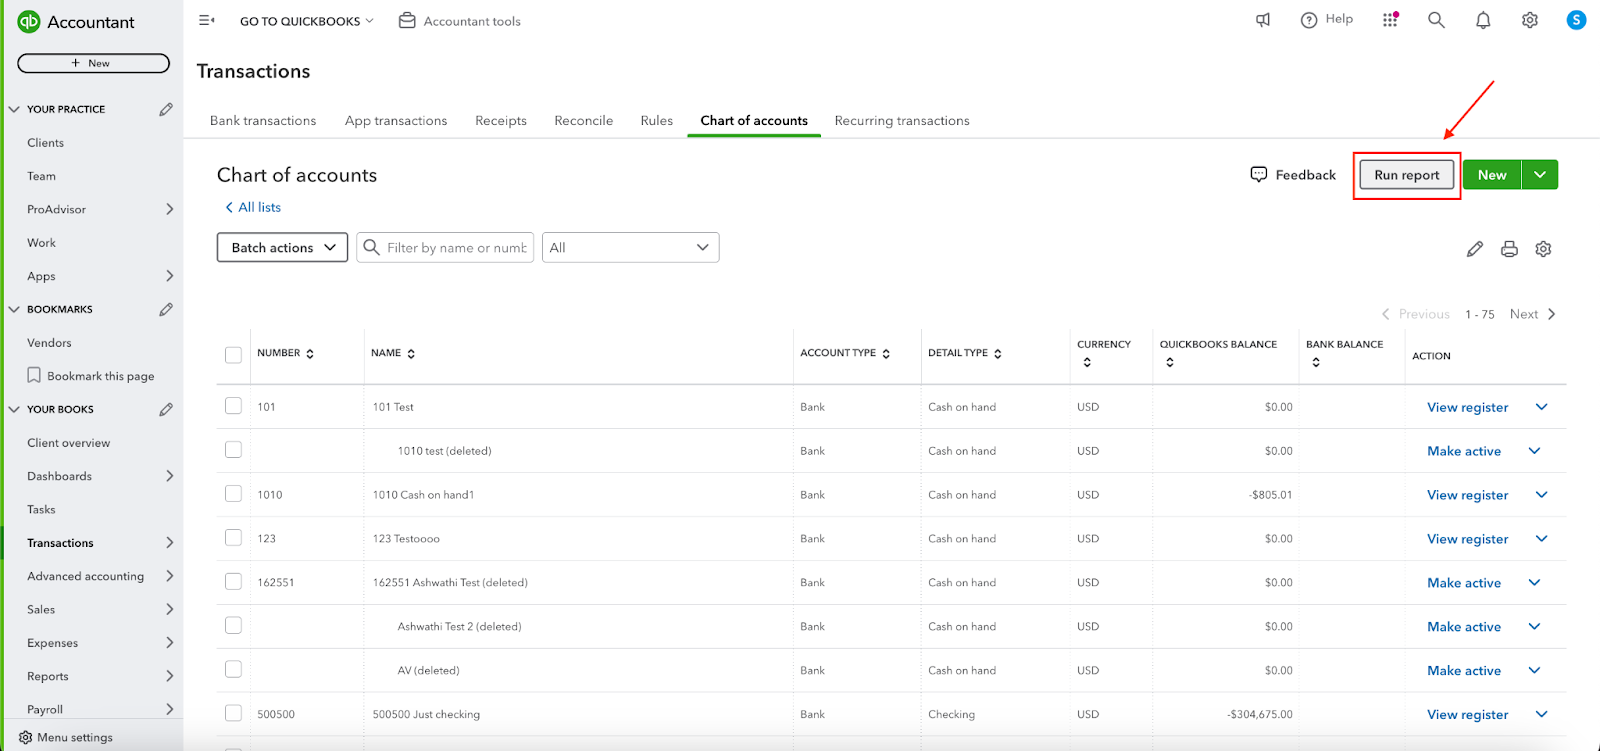
On clicking “Run report” this is what you will see.
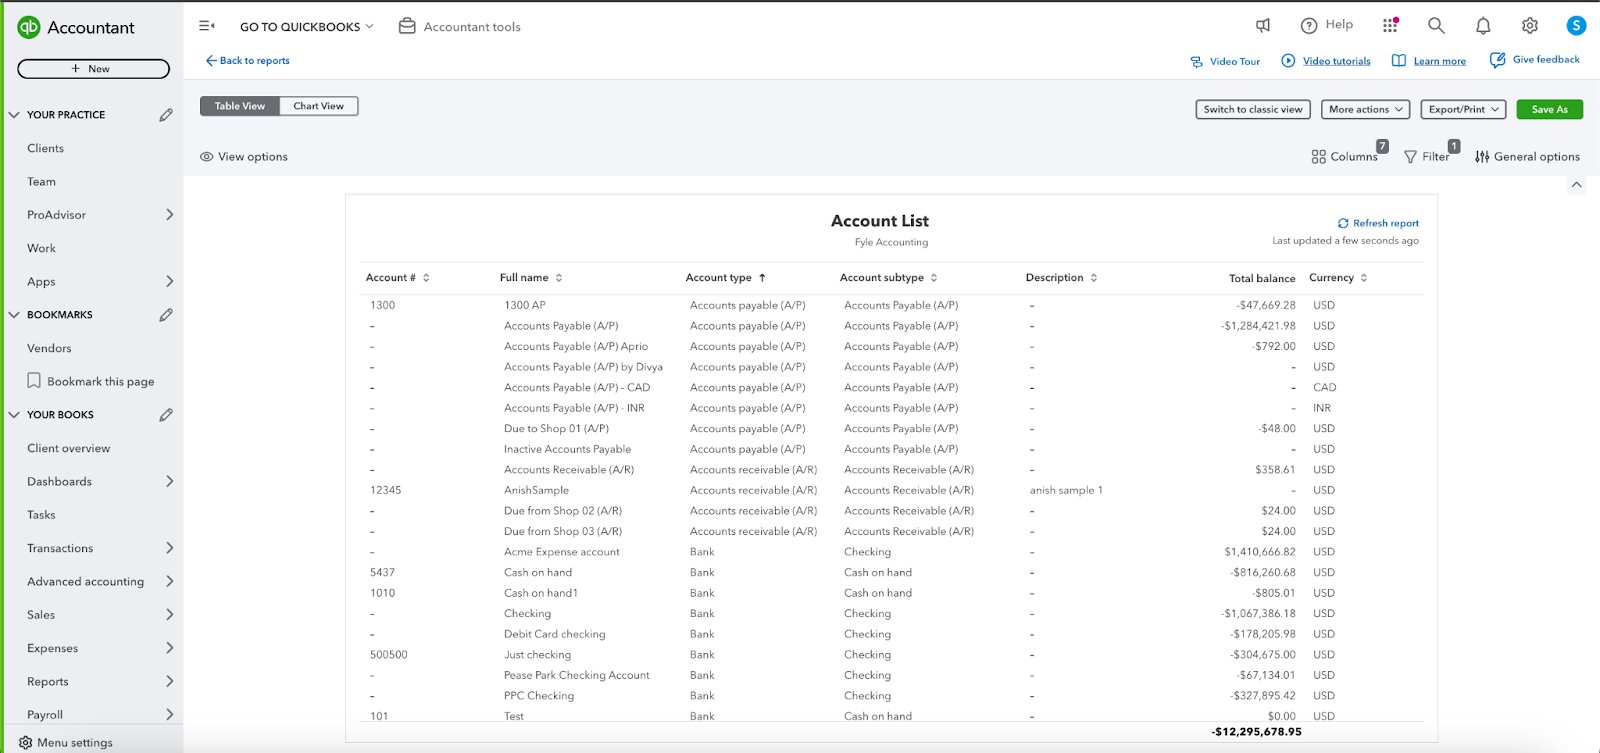
Step 3: Export Your Chart of Accounts
Next, click the Export icon and choose your preferred format for the chart of accounts—either as a PDF or an XLSX file. If you select the XLSX option, the file will automatically download.
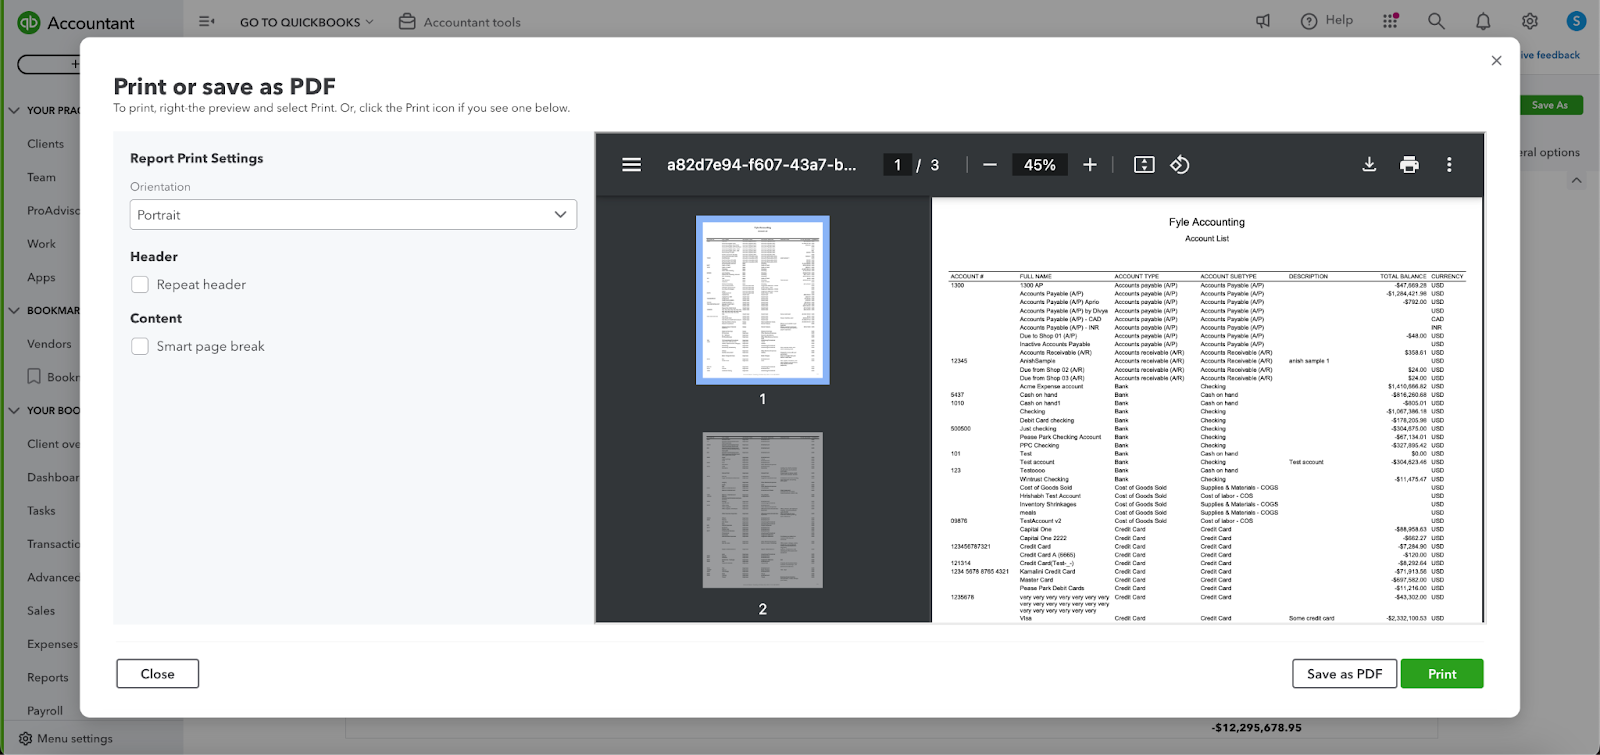
If you choose PDF format, you’ll be shown a preview, allowing you to adjust settings such as orientation. You also have the option to email your chart of accounts directly from this screen.
While QuickBooks makes it easy to export your chart of accounts with this built-in feature, if you need to perform this task frequently, consider using an automated solution. It’s user-friendly and requires no technical expertise.
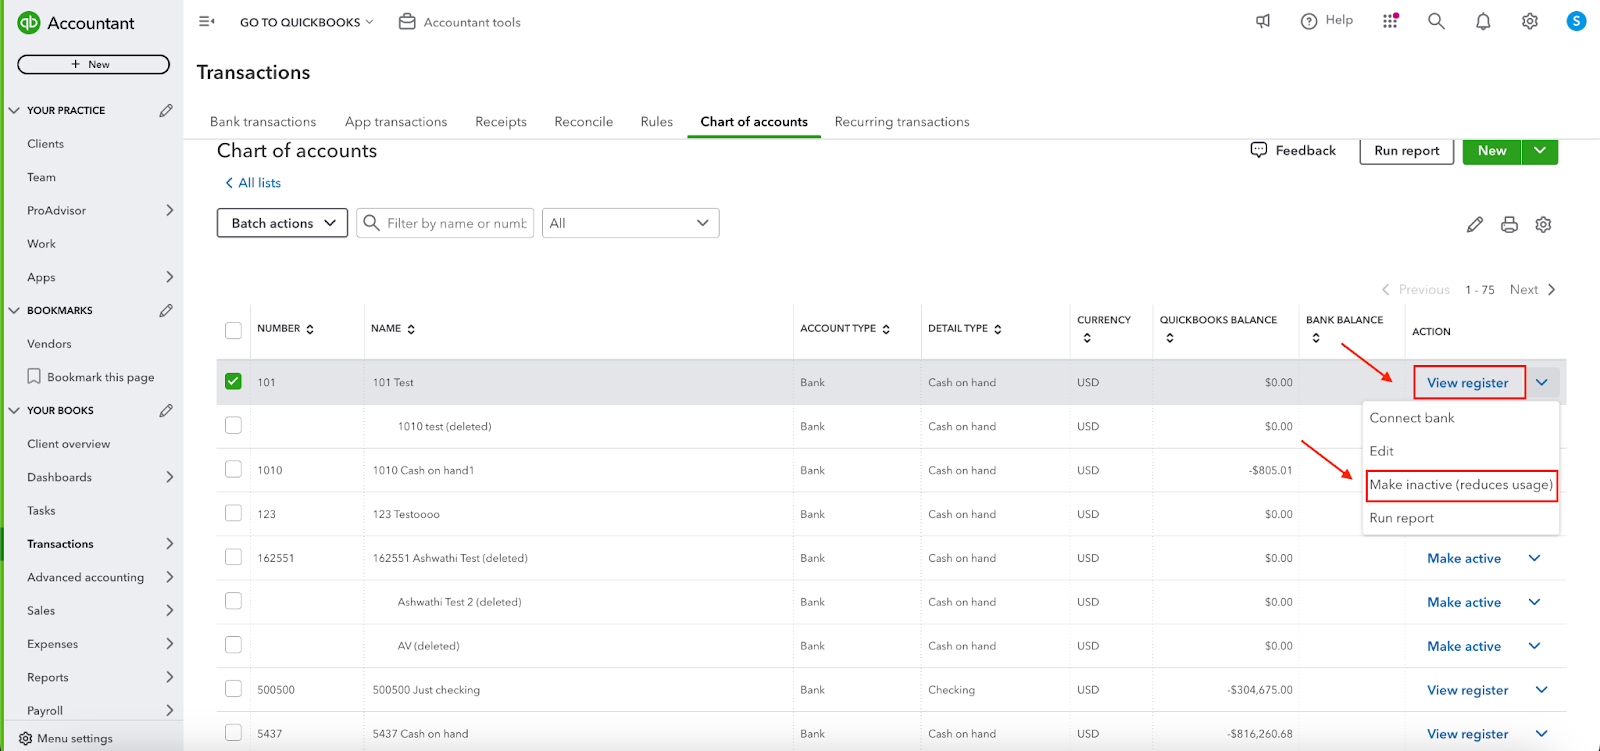
How To Delete Chart Of Accounts In Quickbooks Online?
In QuickBooks Online (QBO), you can delete an account by marking it as inactive. The Action column in your Chart of Accounts offers navigation options, but it's not the primary button to delete an account. Instead, I recommend using the View register dropdown below the Action bar and selecting Make inactive to remove the account.
Follow these steps to complete the process:
Step 1: Log into your QBO account.
Step 2: Go to the “Transactions” menu on the left. Select “Chart of Accounts.”
Step 3: Find the account you want to delete and click on the checkbox next to it.
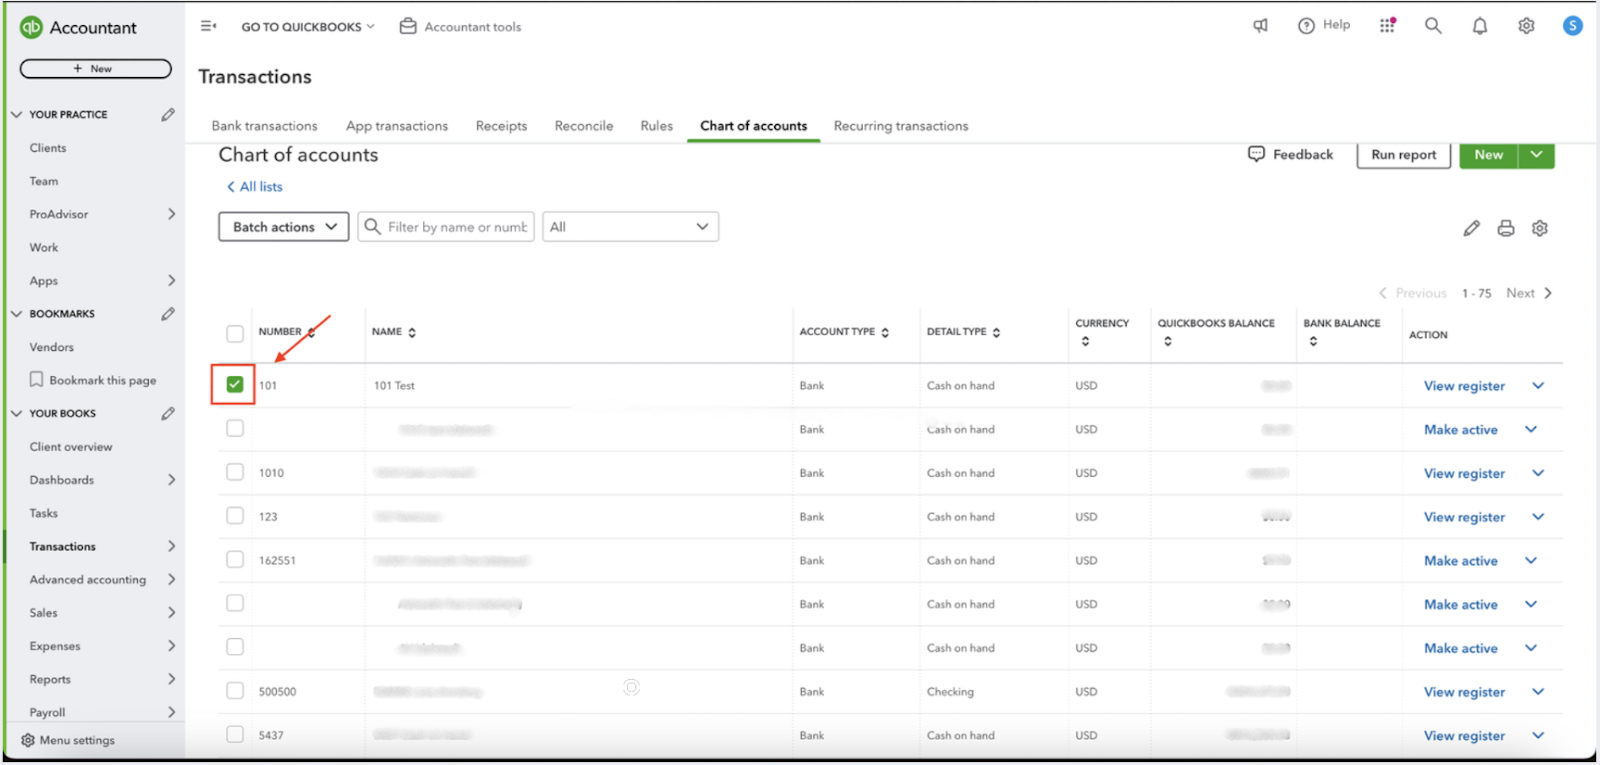
Step 4: Click the “View register” dropdown under the Action column. Select “Make Inactive.”
How To Merge Chart Of Accounts In Quickbooks Online?
As a business owner or accountant, it's important to understand how to merge accounts in QuickBooks to keep your financial records accurate and well-organized. Merging accounts allows you to combine multiple accounts into one, helping you simplify your bookkeeping and making it easier to manage your finances. This process also helps eliminate duplicate entries and ensures the accuracy of your financial data.
Here’s how to merge accounts in QuickBooks:
Step 1: Visit QuickBooks.
Step 2: Go to the Gear menu. Select All lists.
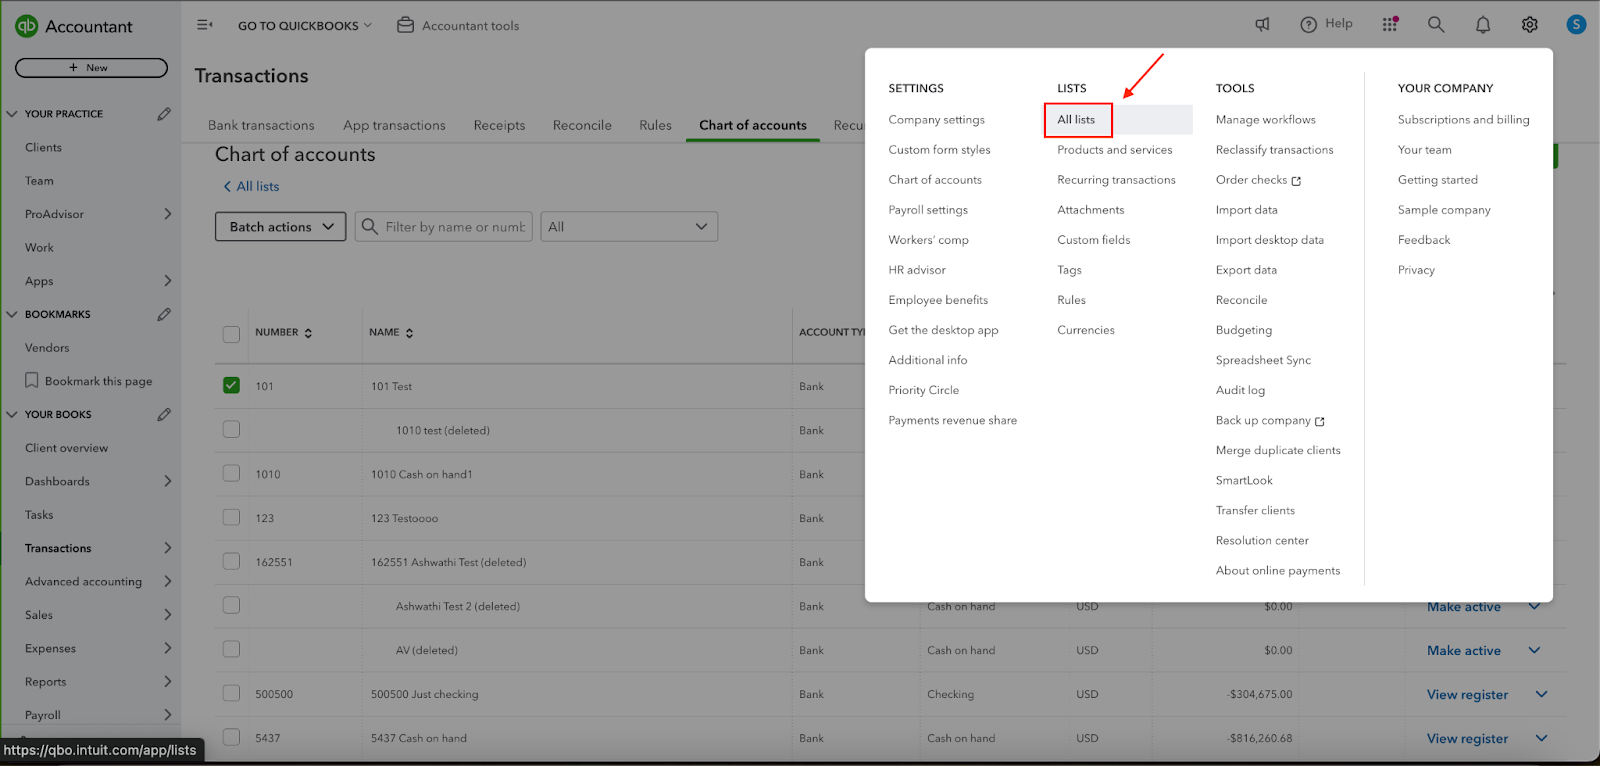
Step 3: Click on Chart of Accounts.
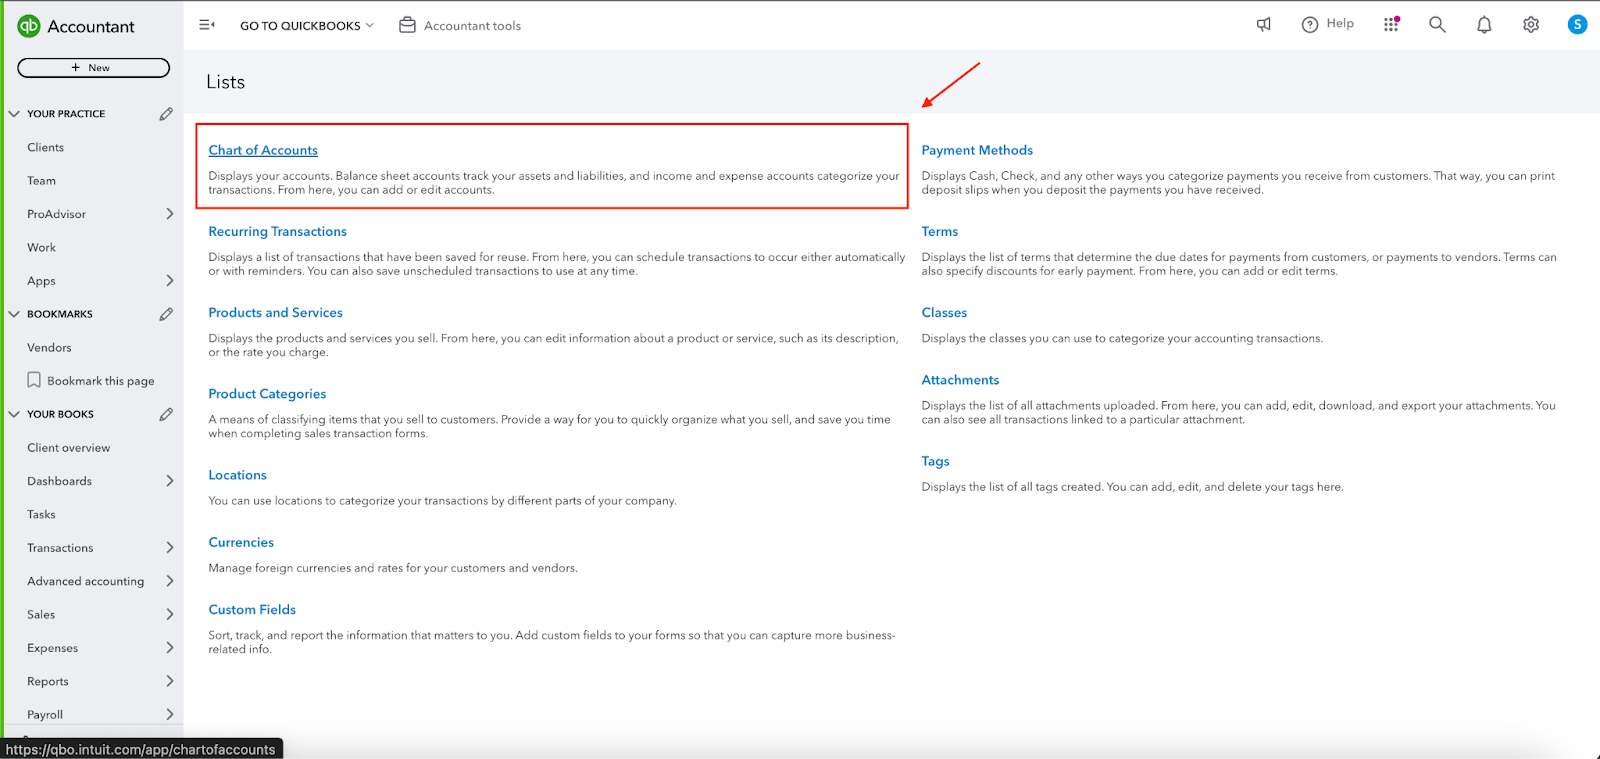
Step 4: Choose the account you want to keep.
Step 5: Rename the account you want to merge to match the name of the account you wish to keep.
Step 6: Click Save.
Step 7: Confirm the merge by selecting Yes, merge accounts.
Step 8: Click Save again to complete the process.
Here are a few important points to remember when merging accounts in QuickBooks Online:
- Merging accounts is a permanent action and cannot be undone.
- Accounts linked to online banking cannot be merged or deleted.
- Before merging accounts with reconciliation reports, ensure to save those reports.
- When merging parent accounts, verify that neither has any sub-accounts.
- For merging sub-accounts, confirm that both are under the same parent account.
- If only one account is a sub-account, adjust the Account Type to match the parent account exactly.
How To Print Quickbooks Chart Of Accounts?
Printing your list of accounts in QuickBooks is simple and straightforward. Just navigate to the Accounting menu and select Chart of Accounts. Here’s a step-by-step guide:
Step 1: Go to the “Transactions” menu on the left. Select “Chart of Accounts.”
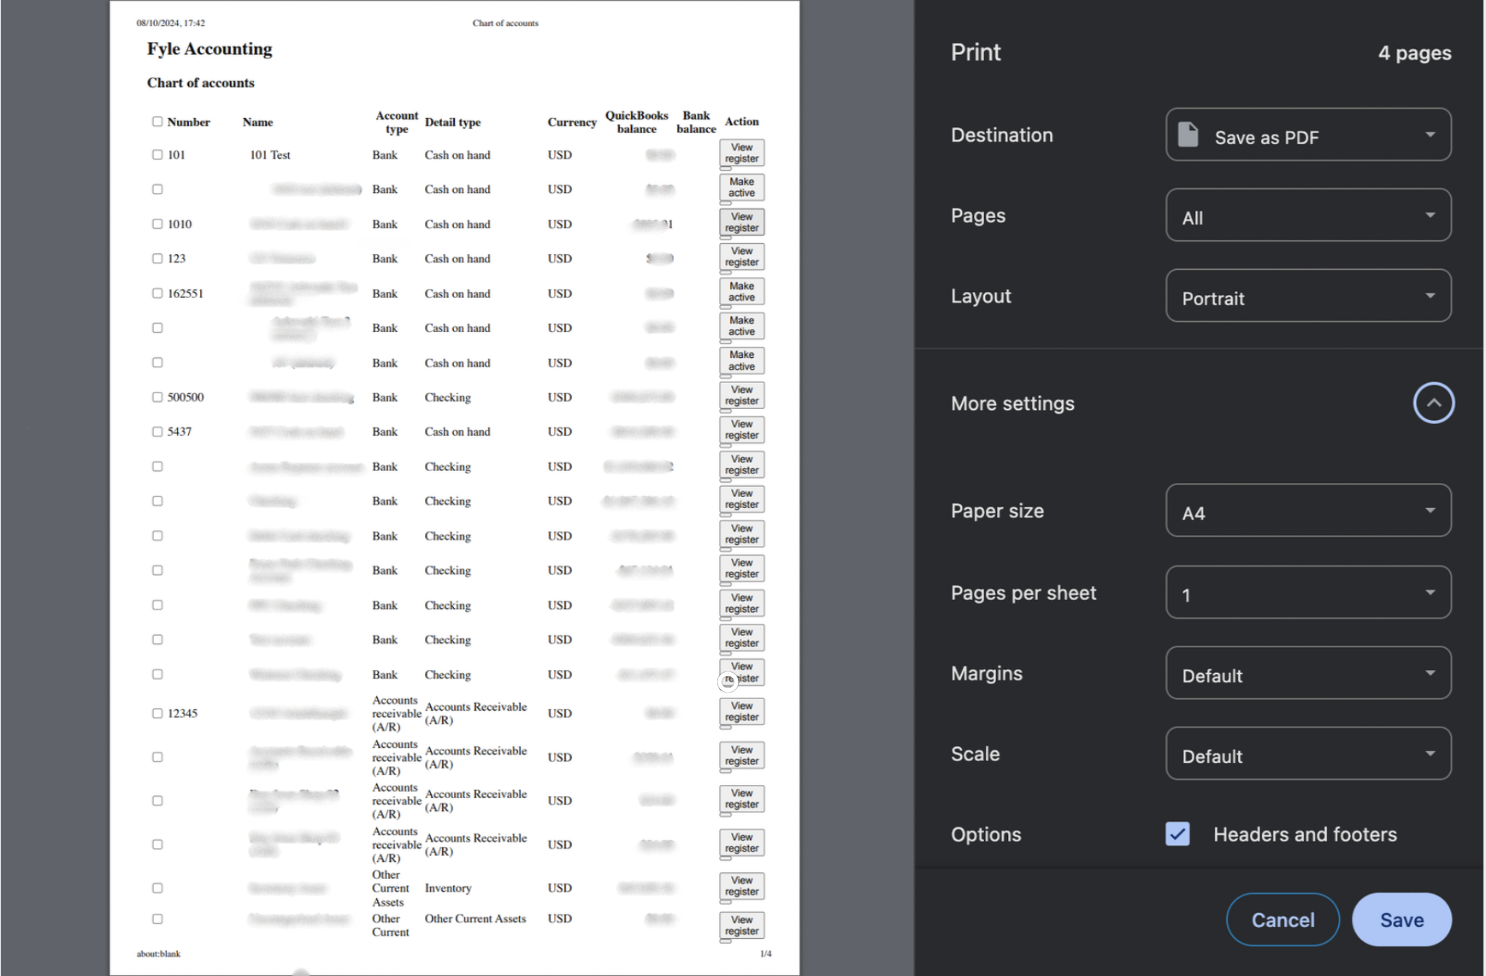
Step 2: Click the Print icon above the “ACTION” column.
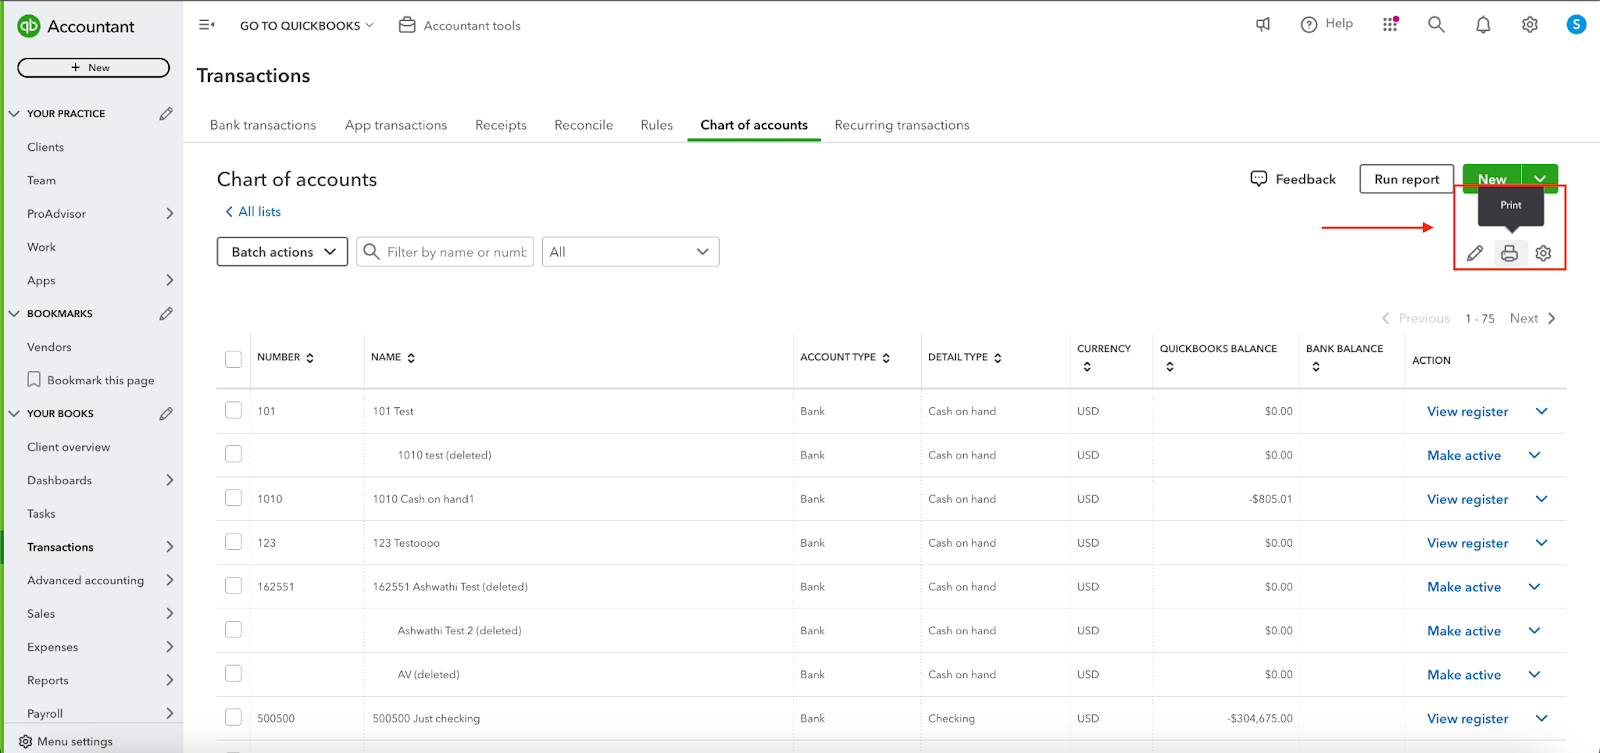
Step 3: On the Print page, confirm the number of copies you need. Press the Print button.
FAQs Around Quickbooks Chart of Accounts
Why Is QuickBooks Chart Of Accounts Important?
The Chart of Accounts is important because it organizes your financial data in a structured way that aligns with generally accepted accounting principles (GAAP). This organization enables you to:
- Easily monitor business performance
- Prepare accurate financial statements
- Comply with tax regulations
- Efficiently categorize income and expenses
With QuickBooks, the Chart of Accounts simplifies these tasks by automating much of the work, leaving you more time to focus on growing your business.
Best Practices for Managing Your Quickbooks Chart of Accounts
Managing your Chart of Accounts effectively is key to keeping your financial reports accurate. Here are some tips:
- Keep it Simple: Only create accounts you genuinely need. Too many accounts can clutter your reports.
- Regularly Review: Periodically review your COA and deactivate accounts that are no longer in use.
- Be Consistent: Use consistent naming conventions for easy tracking and reporting.
- Utilize Account Numbers: Assign unique numbers to each account to make financial reporting faster and easier.
Common Mistakes to Avoid in QuickBooks Chart of Accounts
Some common mistakes can lead to inaccurate financial data. Avoid these pitfalls:
- Duplicating Accounts: Ensure you're not creating duplicate accounts, as this can complicate your reporting.
- Improper Categorization: Incorrectly categorizing transactions leads to misleading financial statements.
- Not Using Sub-Accounts: Failing to utilize sub-accounts for more detailed tracking can result in less insightful reporting.