


Managing credit card charges in QuickBooks Online can be overwhelming, especially when you want to ensure every transaction is accurately recorded and categorized. Whether you're manually entering charges, uploading receipts, or using automated tools, QuickBooks provides multiple ways to streamline the process. In this guide, we'll walk you through step-by-step instructions on how to record credit card charges efficiently in QuickBooks Online, so you can keep your finances organized and up-to-date.
How To Enter Credit Card Charges Into Quickbooks Online?
Option 1: Manually Entering Transactions and then Matching to Bank Feed
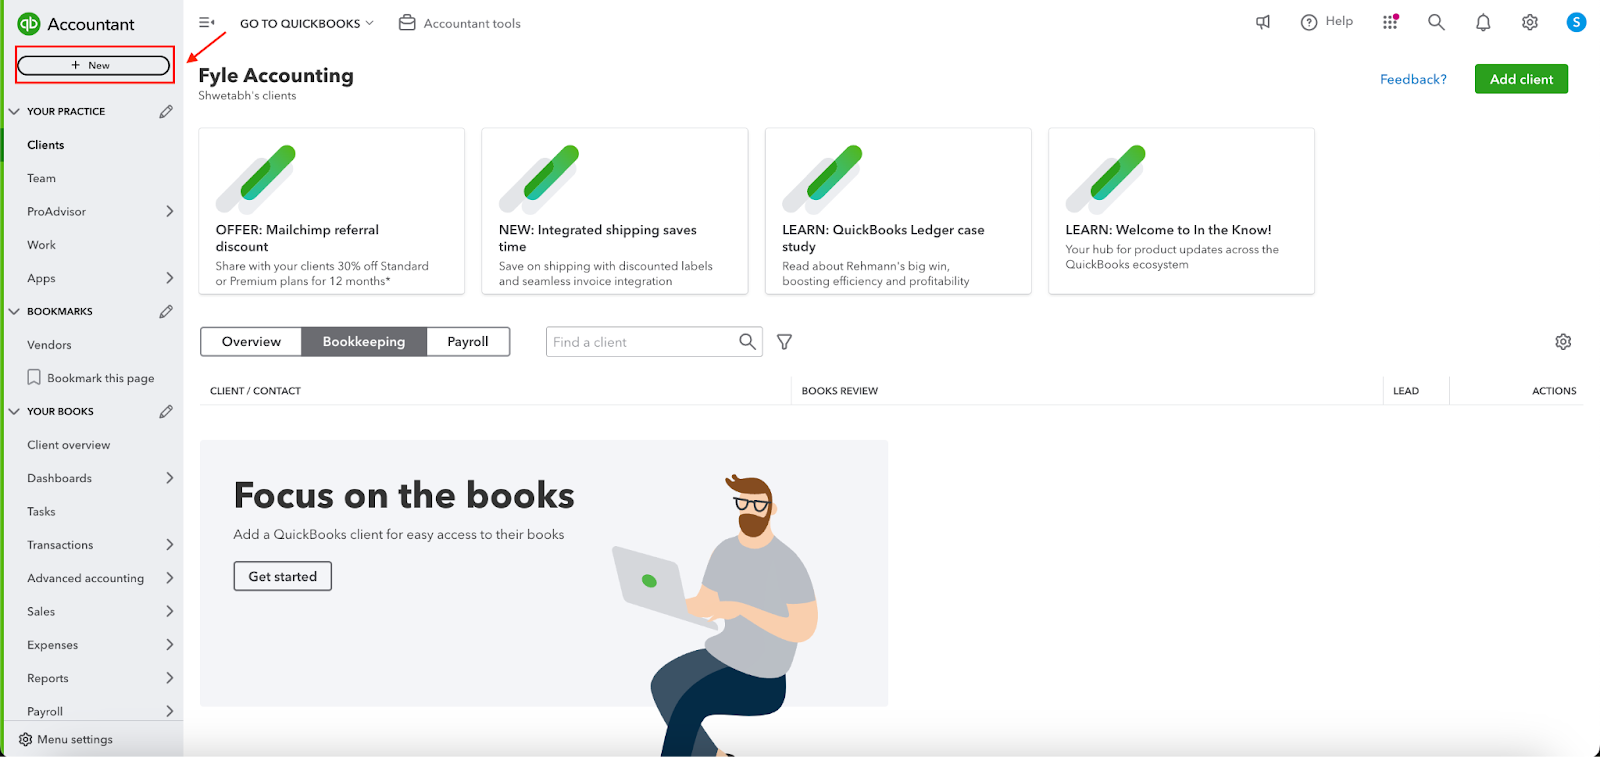
Step 1. From the Dashboard, click the “New” button.
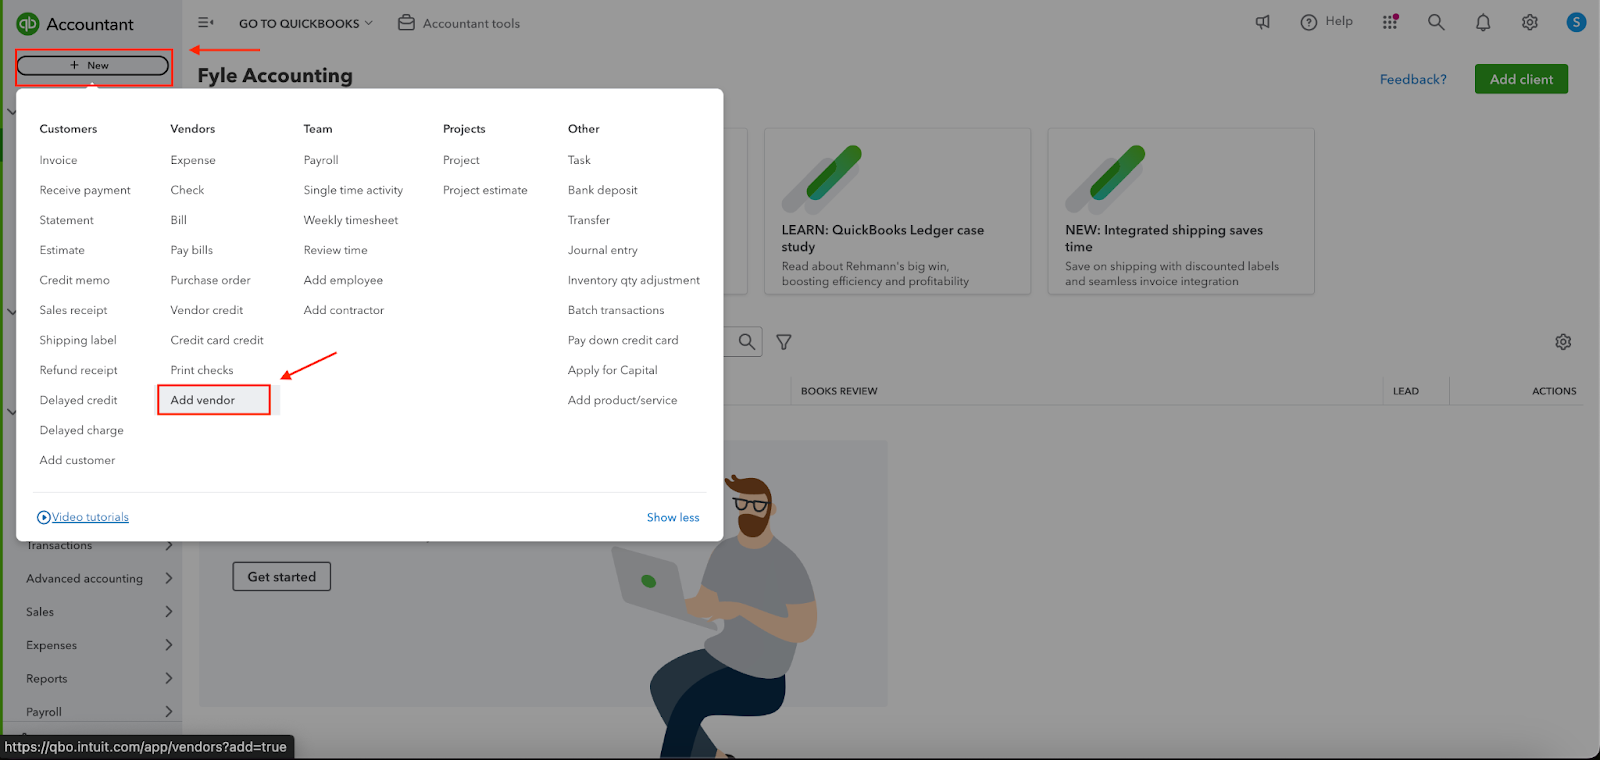
Step 2: On clicking “New” option, you will see a bunch of options as below. Click on “Expense” under the “Vendors” tab.

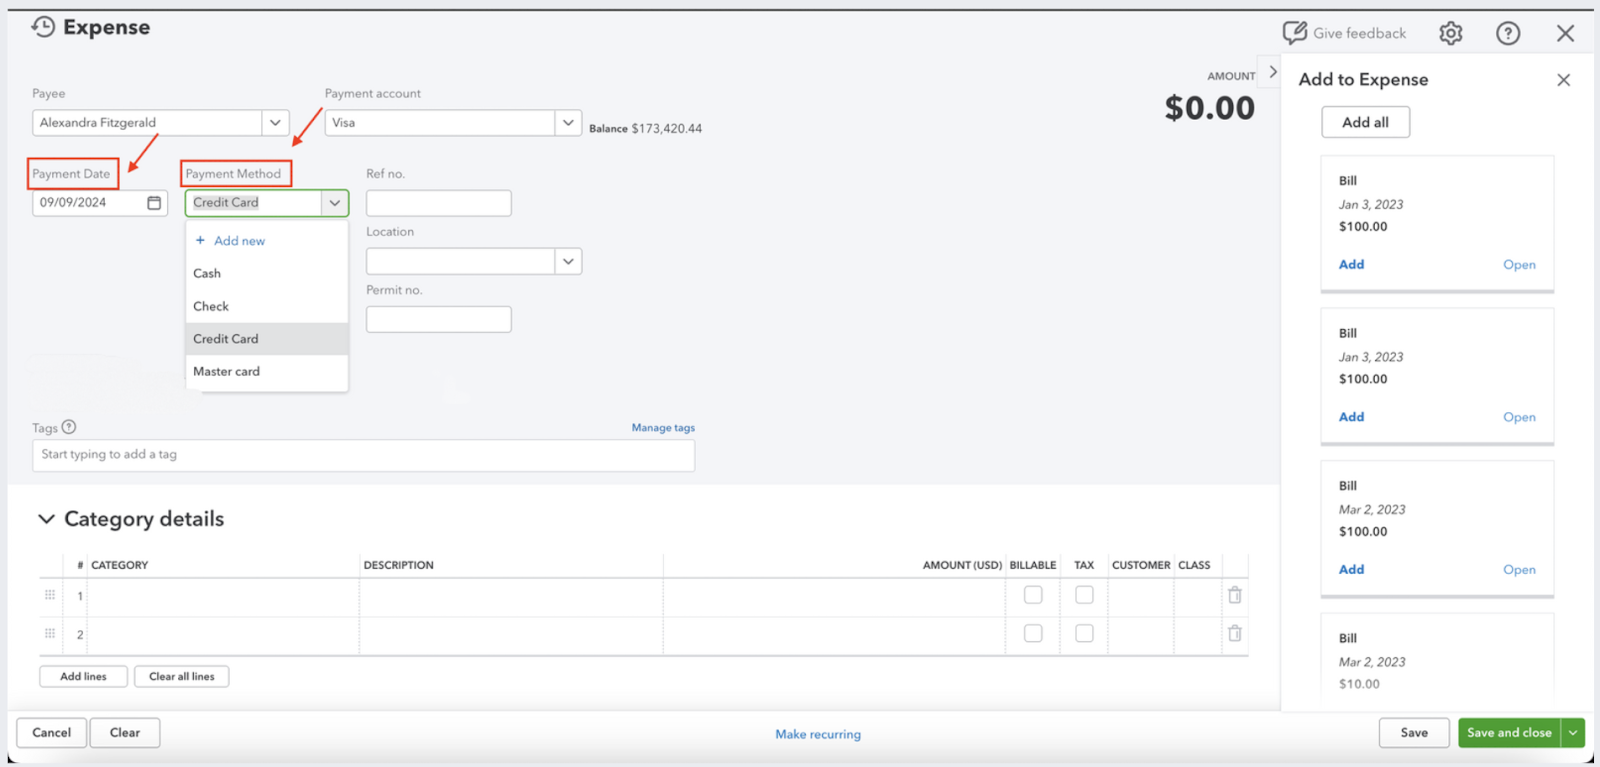
On clicking “Expense” this is the screen you should see.
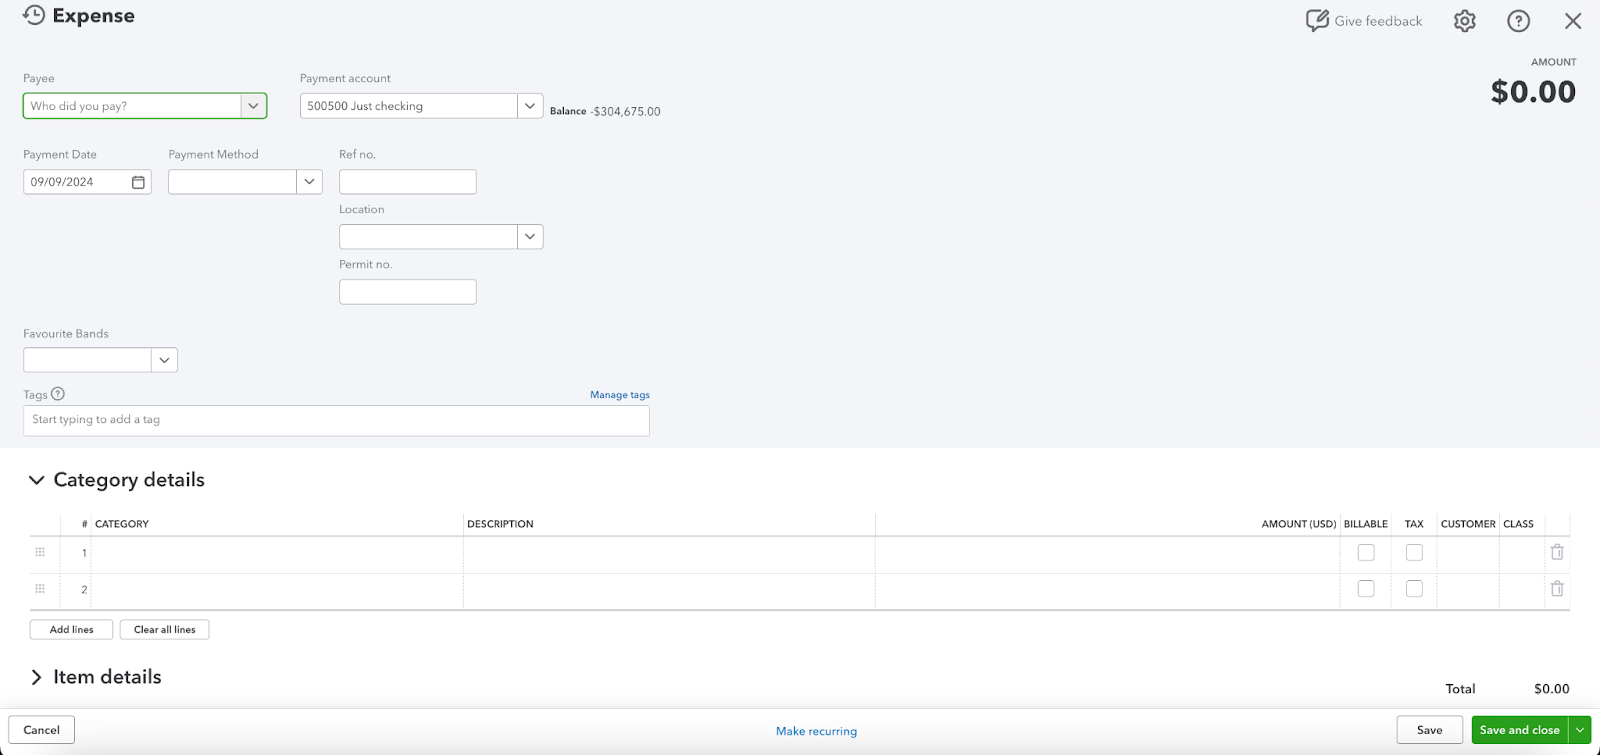
Step 2a. Enter the “Payee” name from the drop-down provided. In QuickBooks, a payee is an individual or entity you pay for a transaction. This could be a vendor, contractor, supplier, or even someone you owe money to.

Here's how payee names appear in the dropdown:
- Manual Entry: When you create a new transaction (like an expense or bill), you can manually enter the payee's name in the designated field. This name will then appear in the dropdown for future transactions.
- Vendor List: If you've previously added the payee as a vendor in QuickBooks, their name will automatically appear in the payee dropdown. This helps streamline your bookkeeping process.
- Recent Payees: QuickBooks maintains a list of recent payees. This means that if you've paid a certain payee recently, their name will appear at the top of the dropdown for easy selection.
To add a new payee:
Go to the "Vendors" menu. Select "New Vendor."
On clicking on "New Vendor" the following form will open. You can enter whatever is relevant to you and then hit “Save.”

Once the payee is added, their name will appear in the payee dropdown for all future transactions.
Step 2b. Enter the “Payment account” from the drop-down provided. Select the credit card used for the transaction from the Payment Account drop-down.
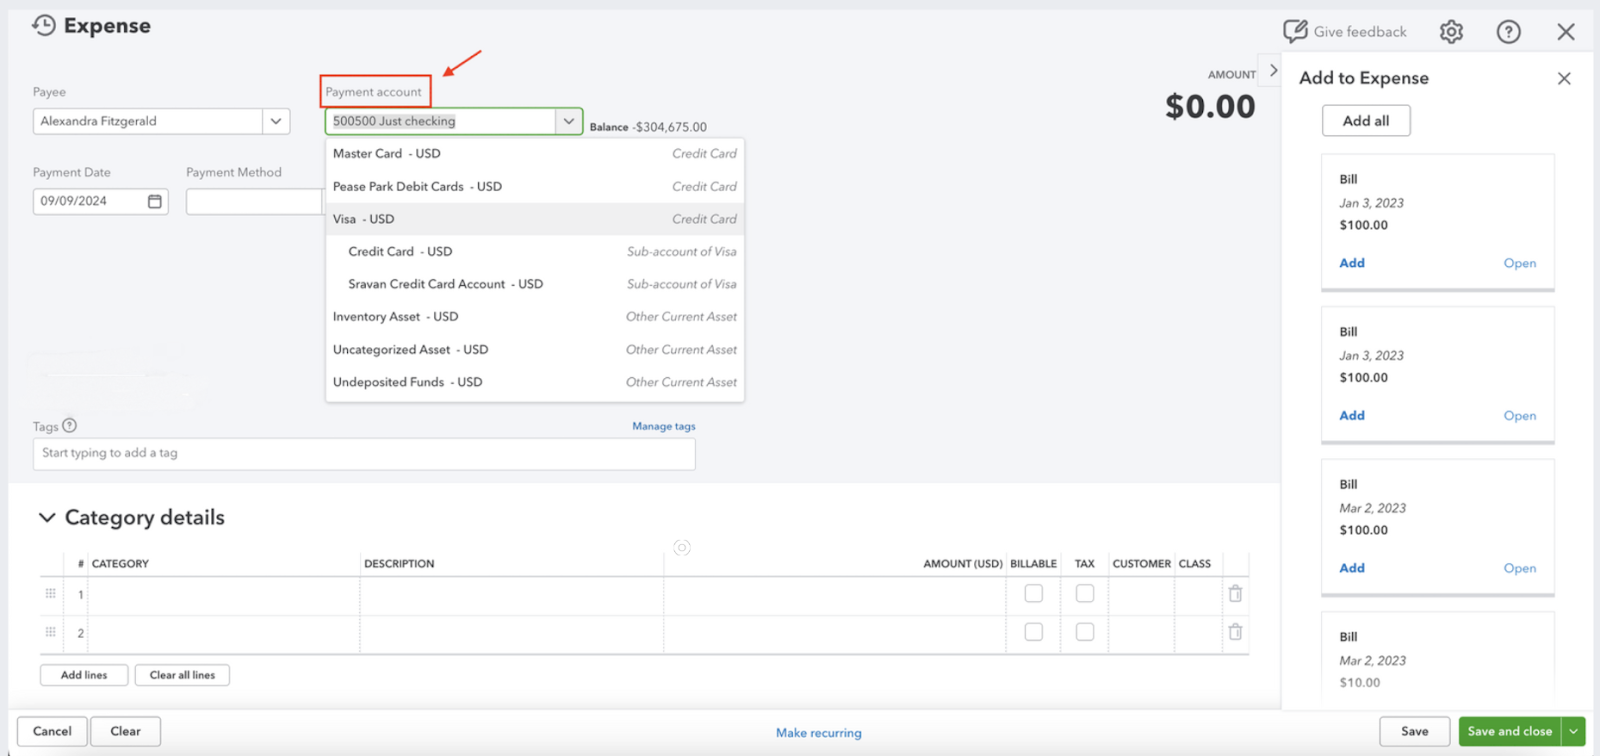
In QuickBooks, a payment account is the account used to record the payment for an expense. It's essentially the source of funds used to cover the cost. This could be:
- Cash: If you paid in cash, you'd select the "Cash" account.
- Bank Account: If you used a bank account, you'd choose the specific bank account from your list.
- Credit Card: If you paid with a credit card, you'd select the corresponding credit card account.
- Other Account: You could also use other accounts, like a liability account if you're paying off a loan or a prepaid expense account if you're using funds from a prepaid expense.
The name of the payment account appears in the dropdown list because it's a chart of accounts category. When you set up your chart of accounts, you'll create accounts for cash, bank accounts, credit cards, and other relevant accounts. These accounts are then listed in the dropdown when you're recording expenses.
The specific payment account you choose will depend on the method you used to pay for the expense. For example, if you paid for a meal with your debit card, you'd select your debit card account.
Step 2c: Enter the transaction date in the “Payment Date” field. Then, enter the “Payment Method” as “Credit card.” You can also enter a reference number if desired.
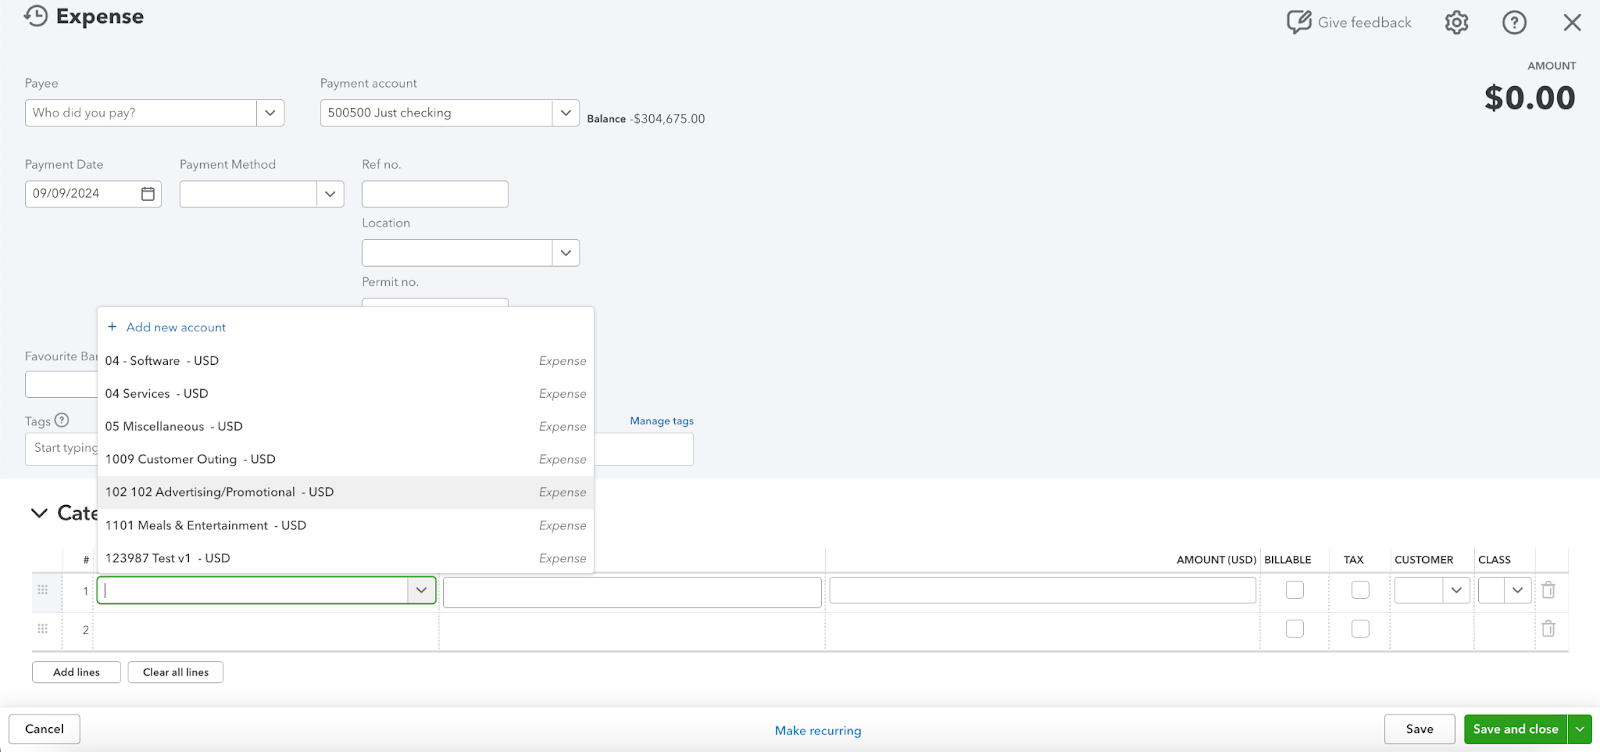
Step 3. Complete the rest of the transaction, entering the category to post it to, providing a description if necessary, and stating the transaction amount.
You can split the transaction between categories (accounts in your chart of accounts) by entering multiple lines. For this example, let's split the $150.00 transaction evenly between Advertising and Office Expenses. Ignore the Billable, Tax and Customer fields in this example.
Step 4a. (Optional) Attach a receipt by dragging and dropping an image into the Attachments box. You can also click on this box and search your computer for the image.
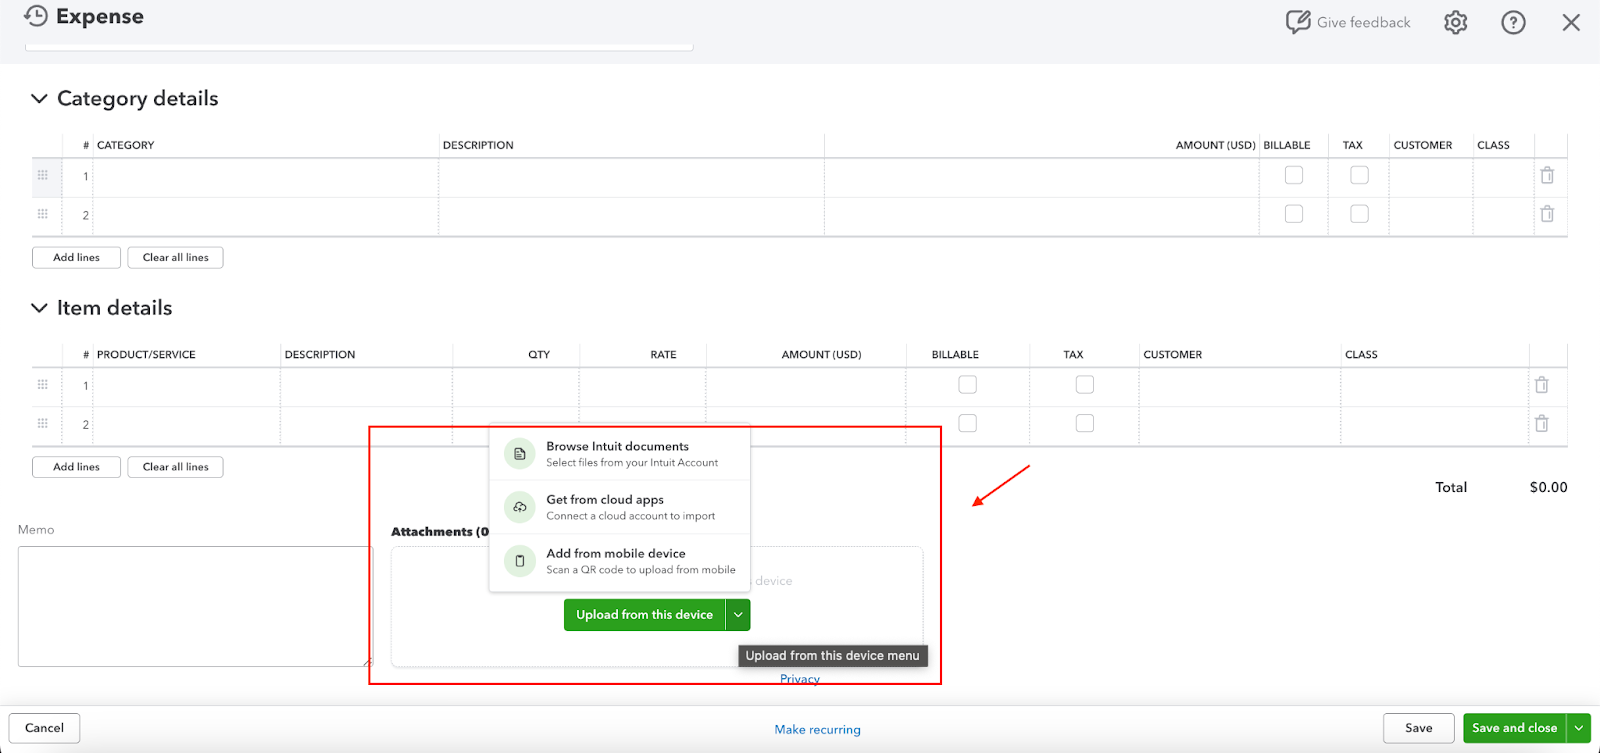
Step 4b. If you have previously uploaded attachments into QuickBooks Online, you can click the “Show Existing” link to open a right sidebar and add that attachment to the expense.

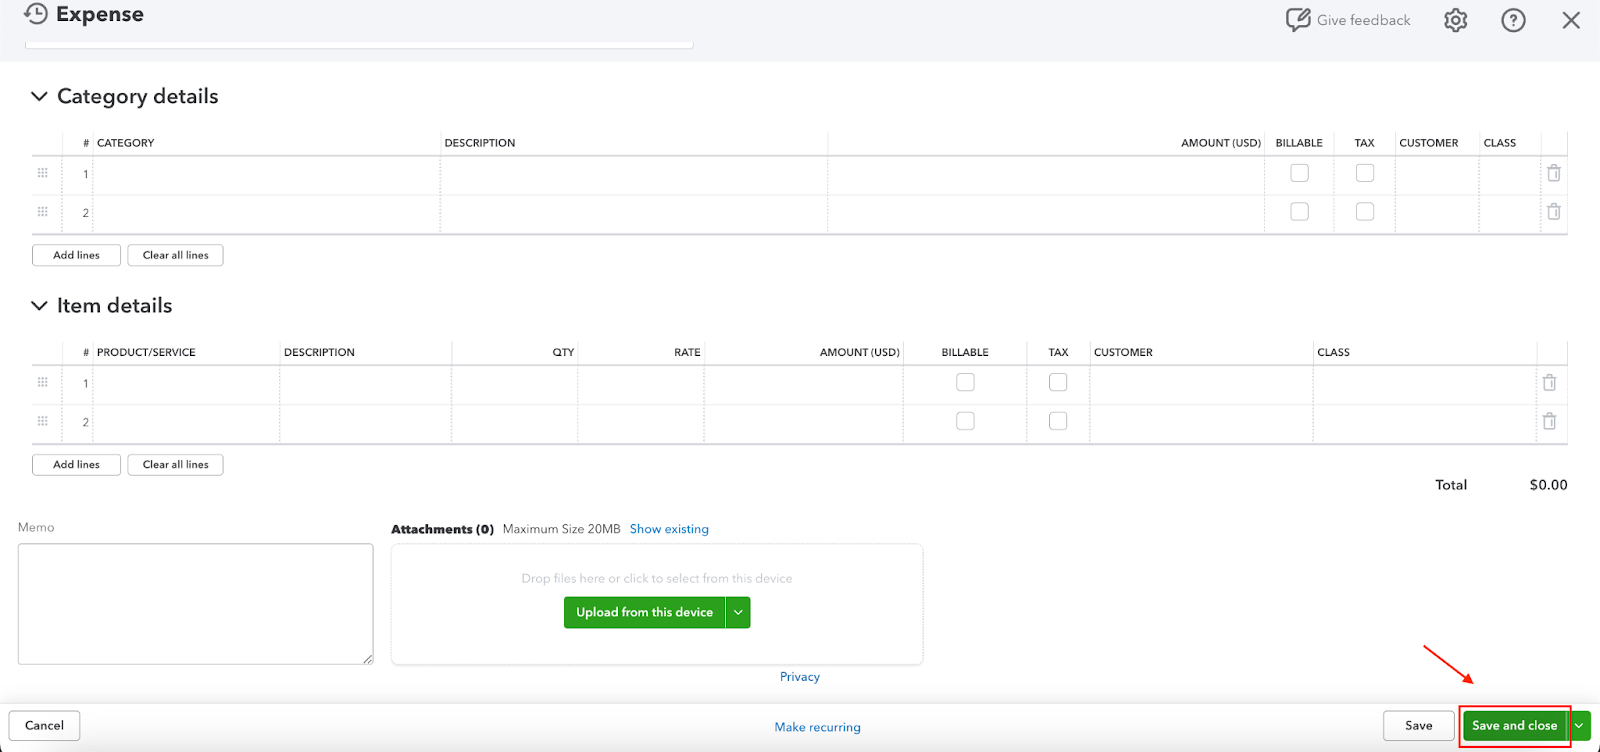
Step 5. When you are done editing the transaction, click the Save and Close button.
Option 2: Uploading Receipts
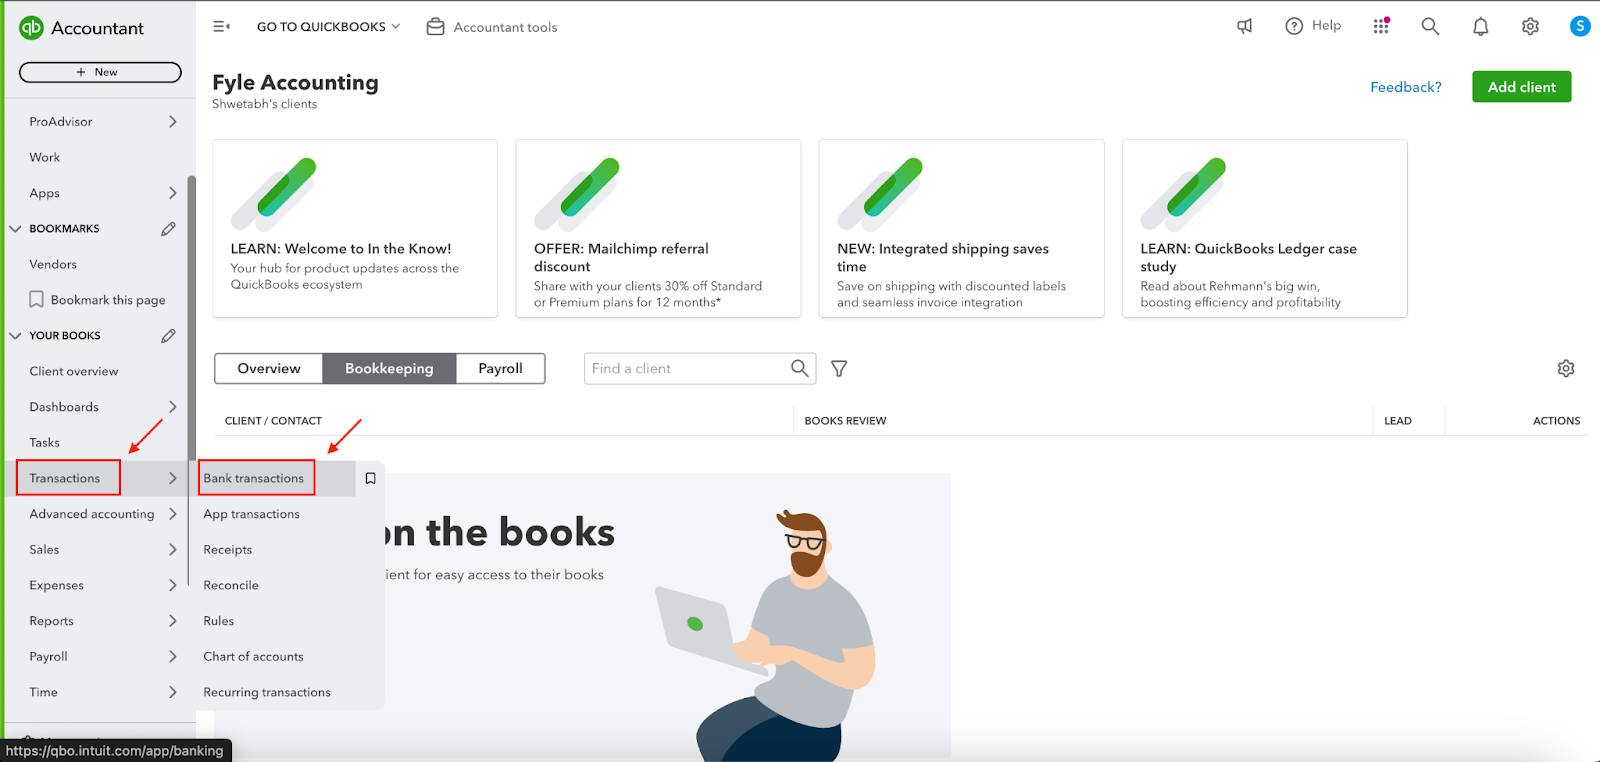
Step 1. From the main menu on the left side, click on “Transactions.” From that drop-down menu, click on “Bank transactions.” This will open on a page that is commonly also known as “Banking.”.
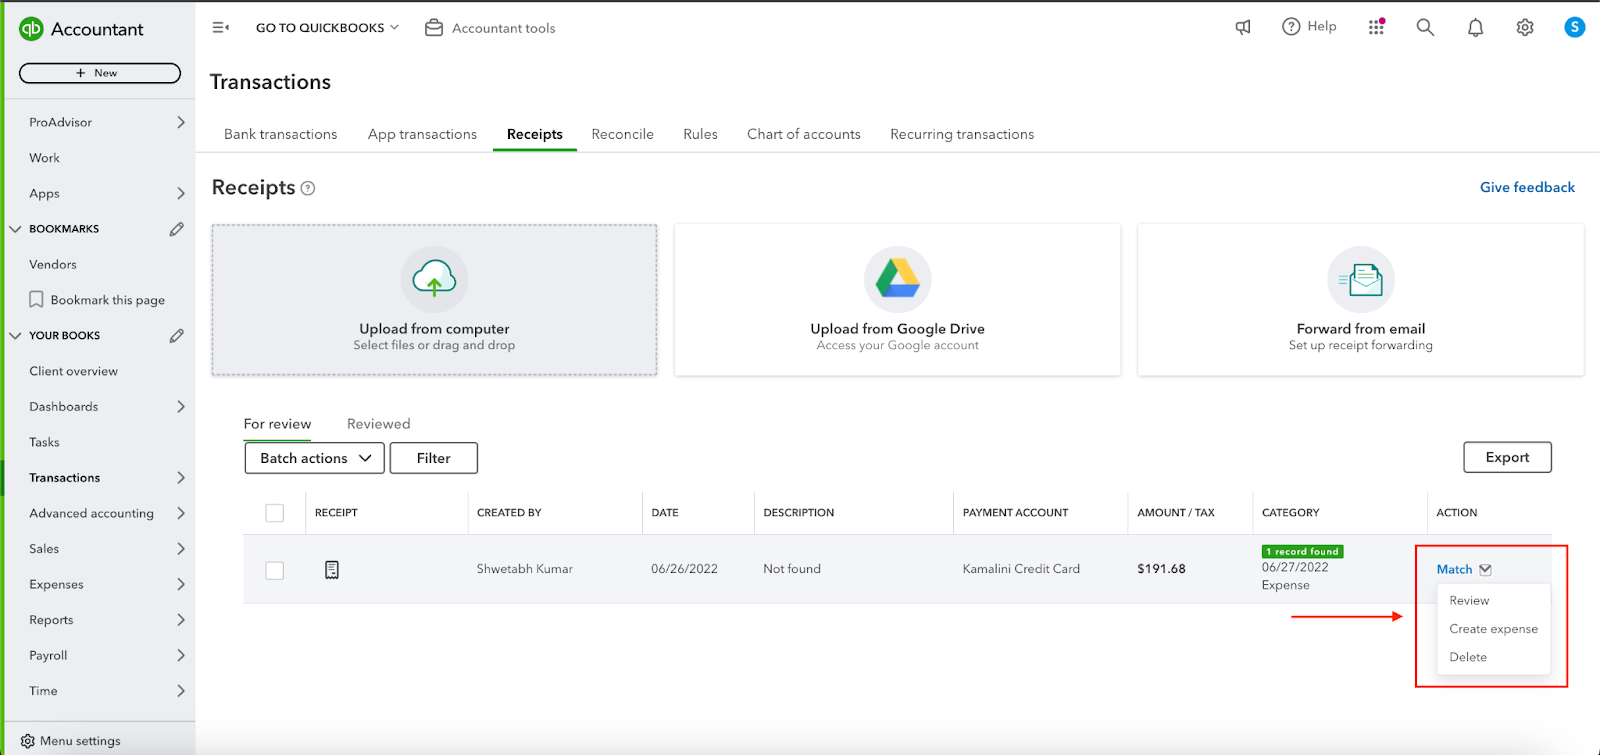
Step 2. On the next screen, click Receipts.

Step 3. Once on the Receipts screen, you can upload receipts. If you’re using the QuickBooks Online app on your smartphone, you can use the app to add photos of receipts, and then access and add them to your books from this screen.

Regardless of whether you use the first or the second method to enter your credit card charges, once entered, you can now match the transaction from the Banking screen.
Note that the date of the transaction in the bank feed will always be a day or two later than the date of the transaction. This is because it takes a little bit of time for the transaction to “settle,” or be finalized before it hits your credit card account.
Option 3: Using Bank Feeds To Enter Transactions Or Importing
Not all business owners will use the first method to record their credit card charges in QuickBooks Online. In fact, many prefer to connect their credit card account directly to QuickBooks Online and enter transactions through the bank feed. Here's how:
- Link your credit card to QuickBooks Online. If a direct bank feed isn't available, or if you need to input older transactions that the feed doesn't cover, you can also import your transactions manually.
- Once your transactions are imported, either through the bank feed or manually, head to the Banking screen to categorize them. You’ll see options to add, view, or match the transactions from the bank feed. If you're using the first method to enter credit card transactions, you'll often rely on the Match feature. Just be sure you're matching the correct transactions.
Here's a step-by-step guide on how to connect a credit card to QuickBooks Online:
1. Create a Credit Card Account:
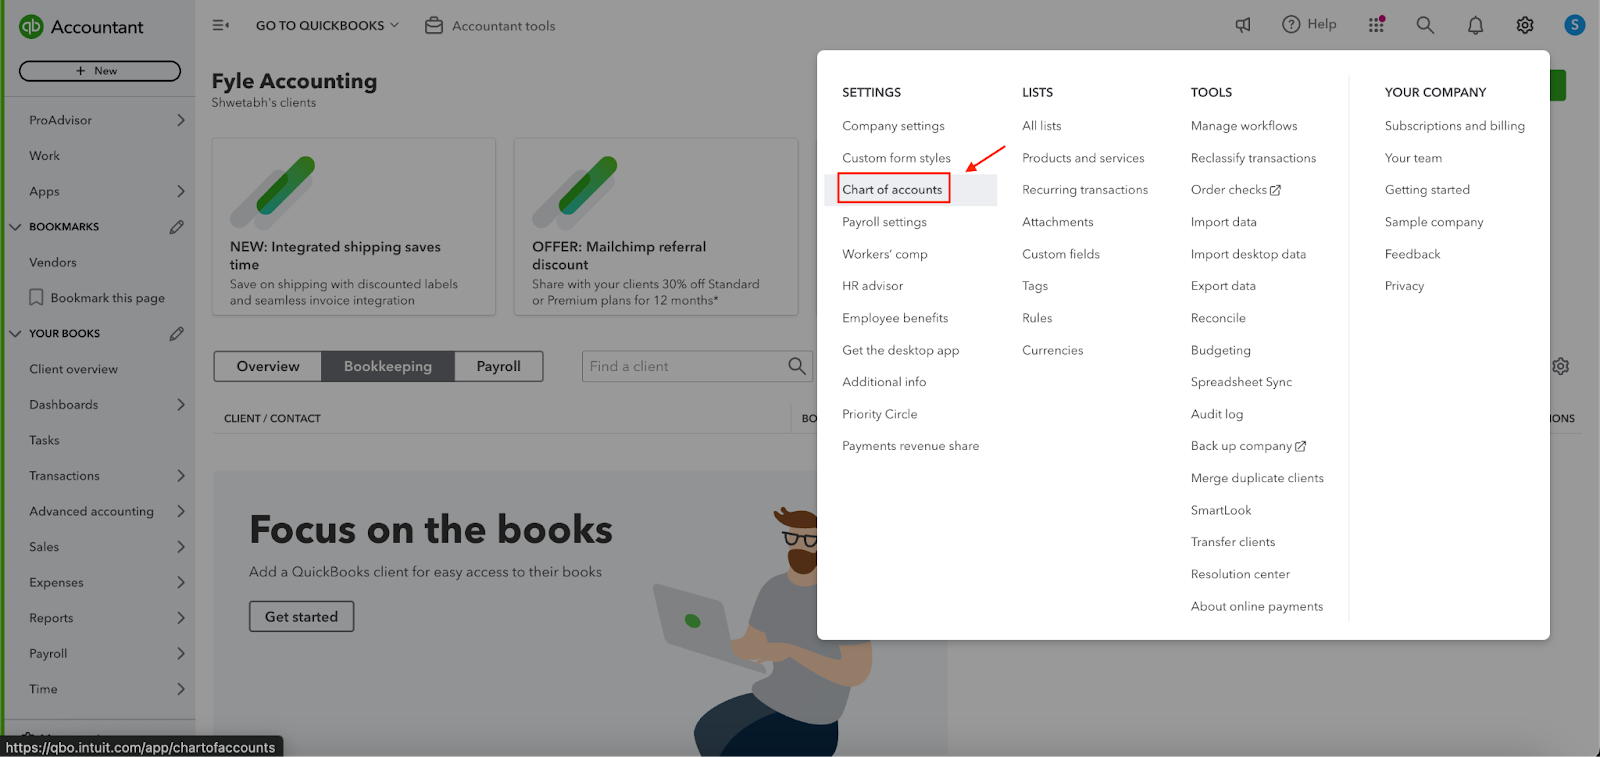
- Go to the Chart of Accounts menu.
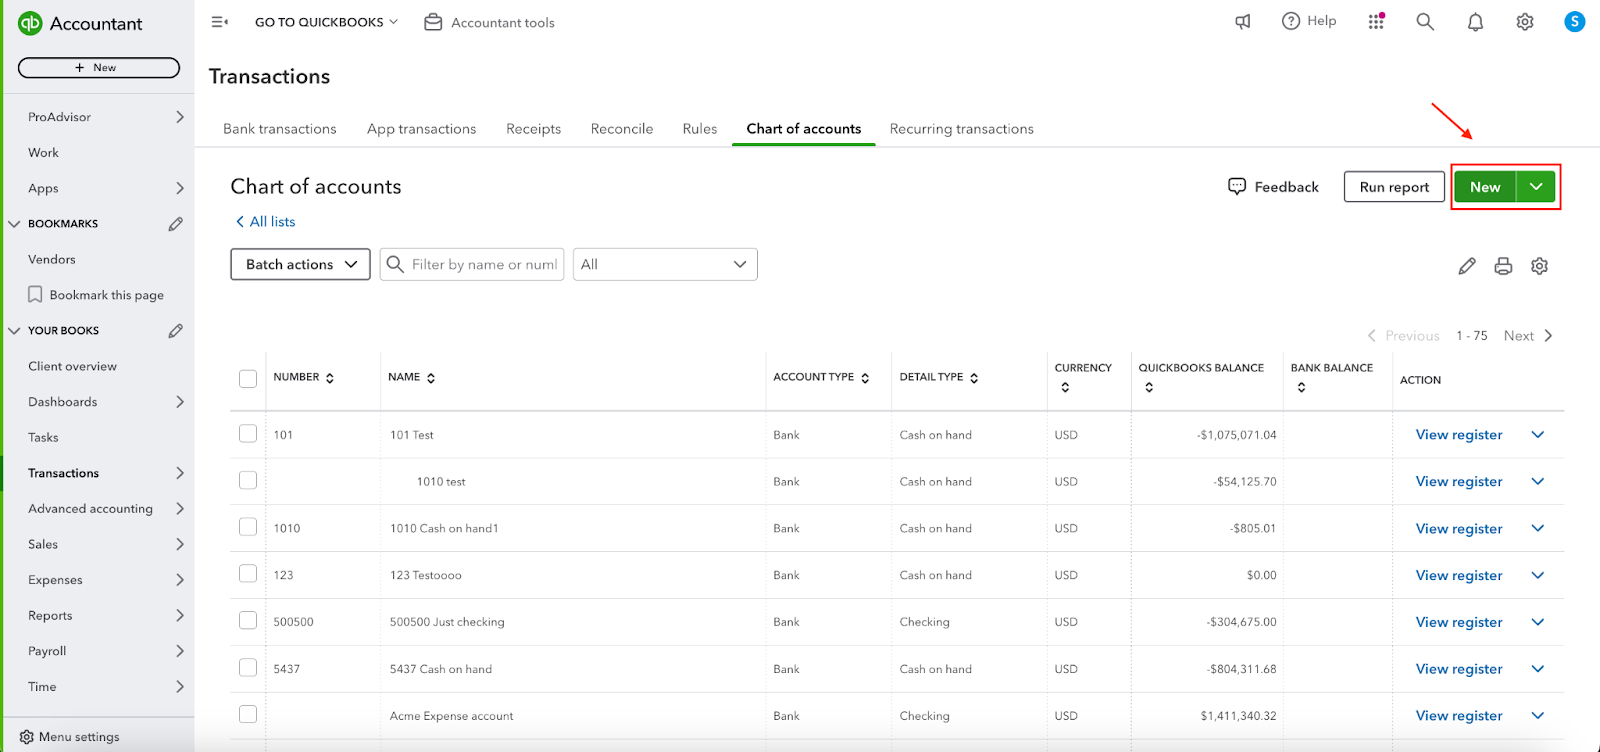
- Click on New to create a new account.
- Select Credit Card as the account type. Enter the name of the credit card (e.g., "Visa Card").
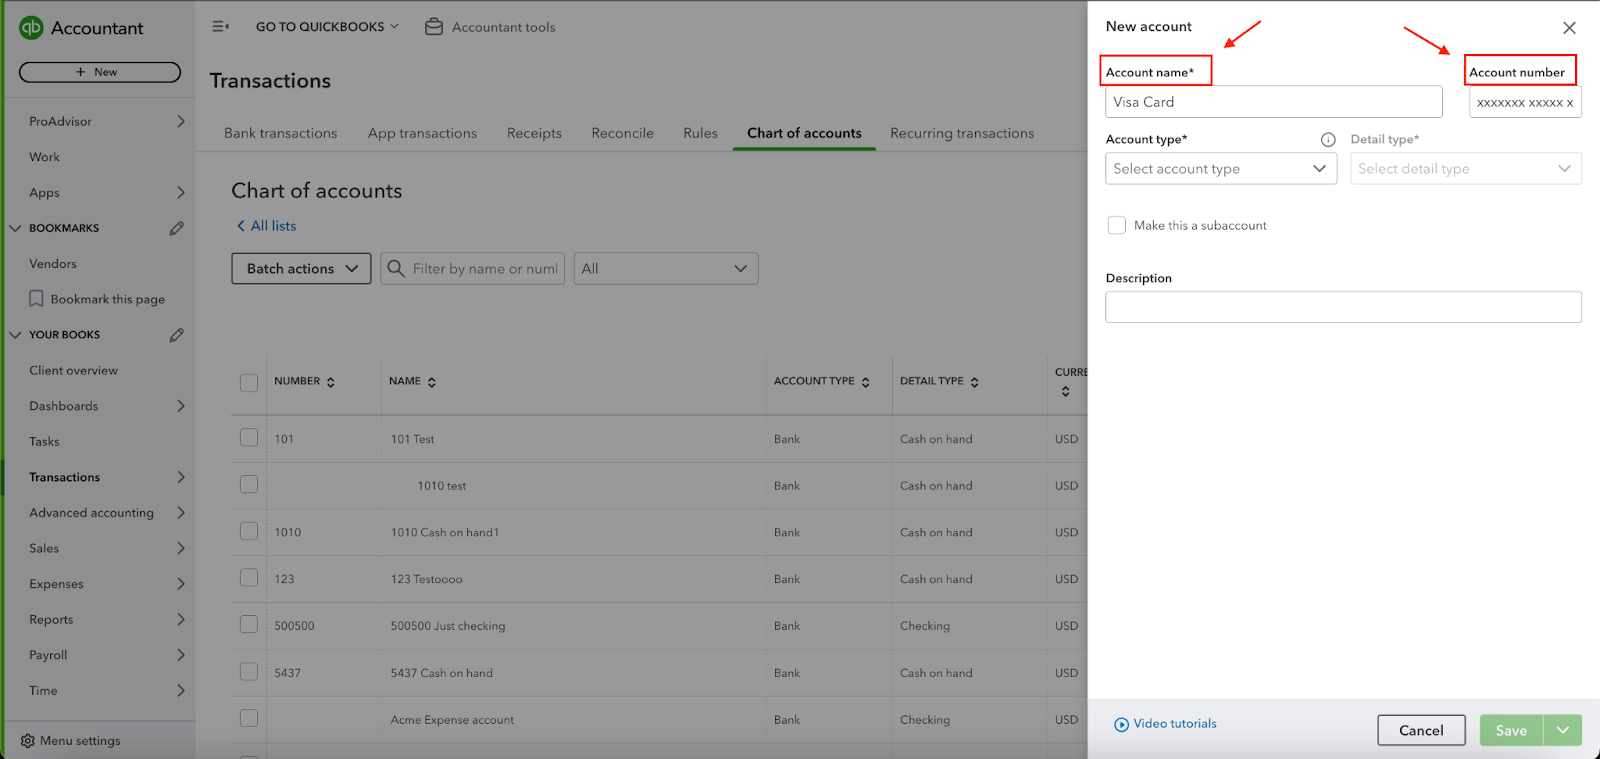
- Set the account number and any other relevant details. Once done, hit save.
2. Link the Credit Card to Your Bank Account:
- Go to the Banking menu.
- Select the bank account that's associated with your credit card.
- Click on Add Credit Card or a similar option.
- Enter the credit card information (number, expiration date, etc.).
- Follow the prompts to complete the linking process.
3. Import Transactions:
- Once your credit card is linked, QuickBooks Online can automatically import transactions from your bank.
- Review the imported transactions to ensure they're accurate.
- If necessary, categorize and reconcile the transactions.
Additional Tips:
- Categorize Transactions: Assign categories to your credit card transactions to track spending and generate reports.
- Set Up Alerts: Create alerts to notify you when your credit card balance reaches a certain threshold or when payments are due.
- Reconcile Regularly: Regularly reconcile your credit card account to ensure accuracy and prevent errors.
By following these steps, you can effectively connect your credit card to QuickBooks Online and manage your finances more efficiently.
Match
Click on the transaction to expand it. You can click anywhere in this line except the “Match” link or the checkbox to the left to expand the transaction.
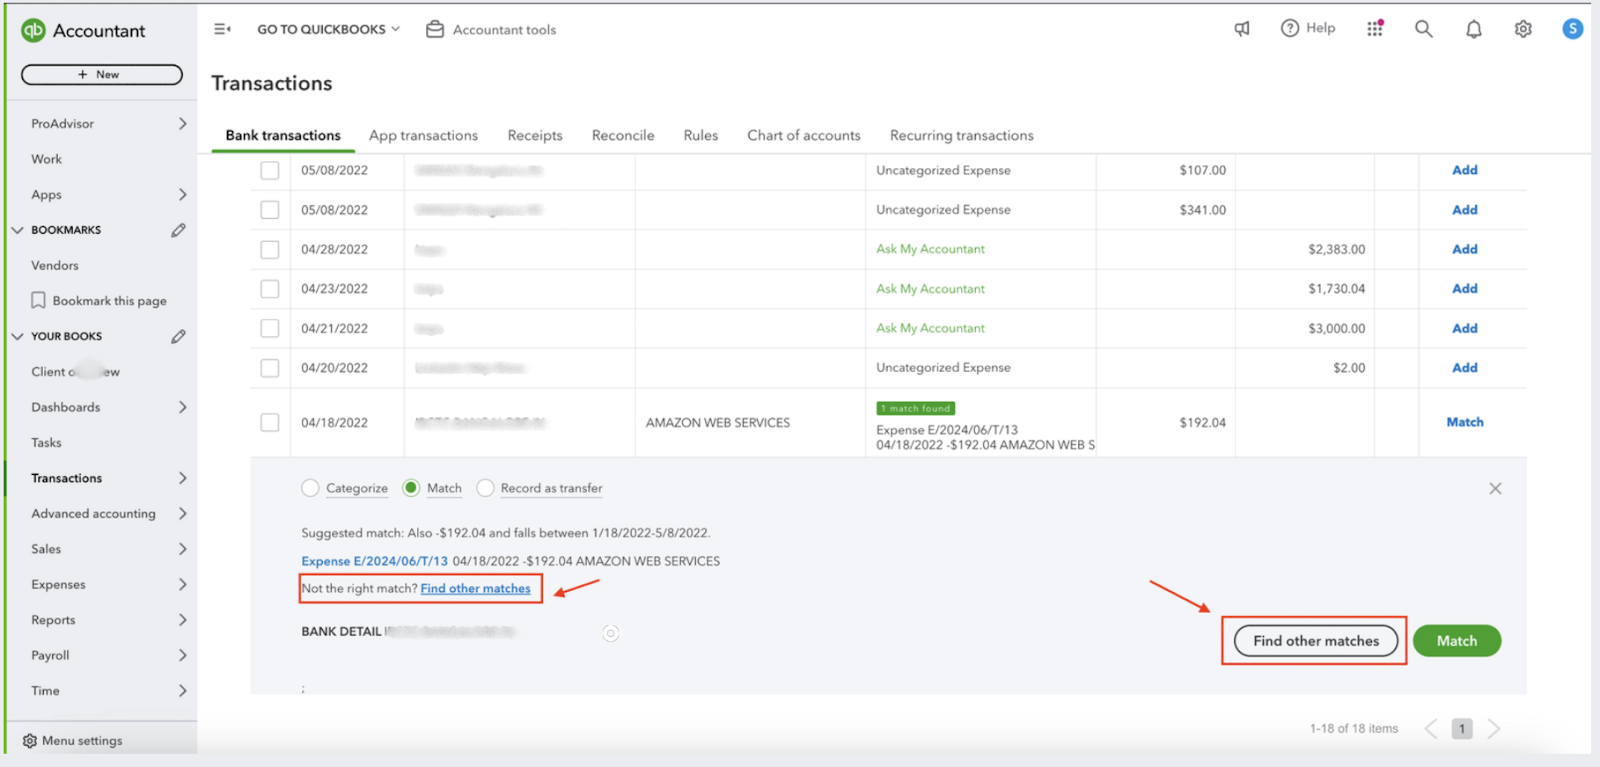
Review the transaction thoroughly. You want to make sure everything makes sense. Does the Bank Detail line coincide with the Payee name? Is the date accurate? If you aren’t sure, you can click on the link — in this case, “CC Expense” — to review the transaction in more detail. You can also click the “Find other records” button to view other possible transactions linked to this one.
It’s important to note you aren’t adding a transaction here. You’re simply matching a transaction you’ve already entered to the transaction in the bank feed — in short, reconciling it.
View
The View function appears when QuickBooks Online identifies more than one previously entered transaction that could be linked to the transaction in the bank feed. To see the transactions, click the “View” link to expand the details.
From the expanded view, choose the radio button next to the correct transaction, then click Match.
Add
If you haven’t previously entered data for credit card transactions in QuickBooks Online, you can add transactions on the fly from the bank feed.
Click into the transaction as shown under the Match section to expand it. You’ll notice more fields and options in this expanded view than those for Match and View. In fact, this is essentially a shorter version of the Expense screen shown in the first method for entering credit card charges we covered.

The red highlighted boxes in the image represent the fields where you need to provide specific information to categorize and record the transaction in QuickBooks Online. Let's break down each box:
- Vendor/Customer: This field is used to specify whether the transaction is related to a vendor (someone you purchase goods or services from) or a customer (someone you sell goods or services to). In this case, you've selected "Amazon" as the vendor.
- Account: This field is where you choose the appropriate account from your chart of accounts to record the transaction. Here, you've selected "Uncategorized Expense," indicating that the expense hasn't been assigned to a specific category yet.
- Customer: This field is relevant if the transaction is related to a customer. Since you've selected "Vendor" earlier, this field is not applicable in this case.
- Location: If your business operates in multiple locations, you can use this field to specify the location associated with the transaction. In this case, you've left it blank, indicating that the location is not relevant or hasn't been specified yet.
- Class: This field allows you to categorize transactions into specific classes for more detailed financial reporting. You can create custom classes to suit your business needs.
- Tags: Tags are keywords or labels that you can add to transactions for easier organization and filtering. You can start typing to create new tags or select existing ones.
- Memo: This field provides a space for you to add additional notes or details about the transaction. You can use this to clarify the purpose of the expense or include any relevant information.
- Bank Detail: This field might display additional information about the transaction, such as the bank reference number or payment method.
By filling in these red highlighted boxes with the appropriate information, you'll be able to accurately categorize and record the transaction in your QuickBooks Online account. This will help you maintain organized financial records and generate meaningful reports.
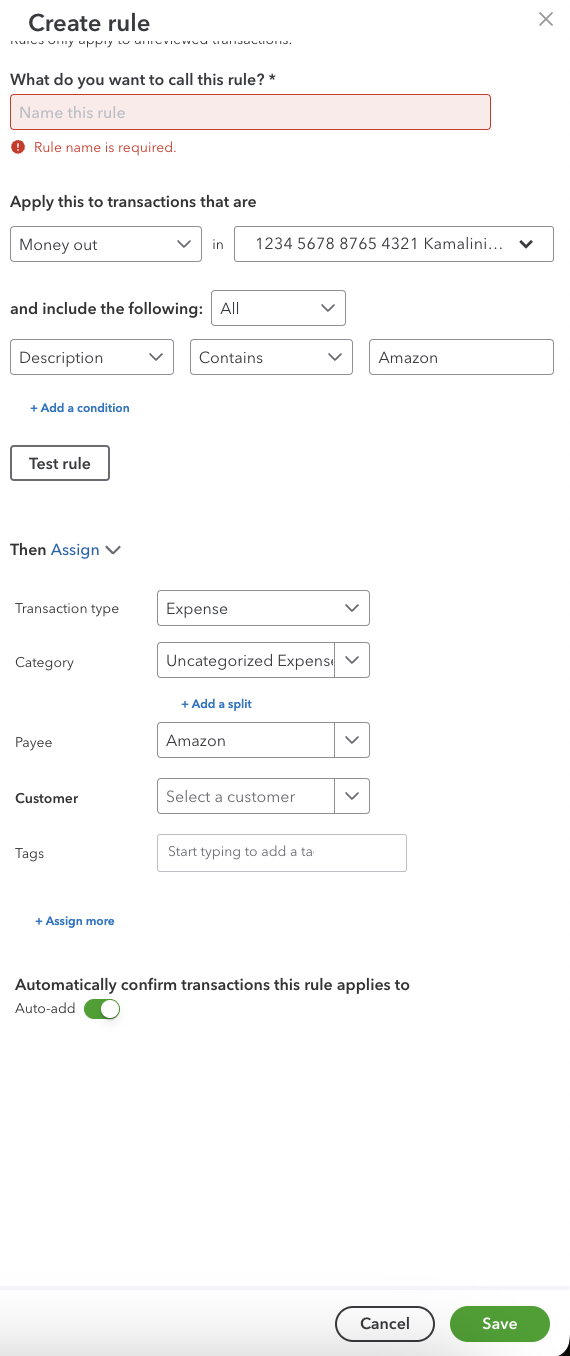
If this is a recurring transaction — say, a rent payment — you can click on the “Create rule from this transaction” link to open the rules screen.
Often, you will need to split a transaction over multiple expense categories, and you can do that here by clicking on the Split button (h). Once you are done, click the Add button (i) to add the transaction to QuickBooks Online.

Option 4: Enter Credit Card Charges Directly Into The Credit Card Register
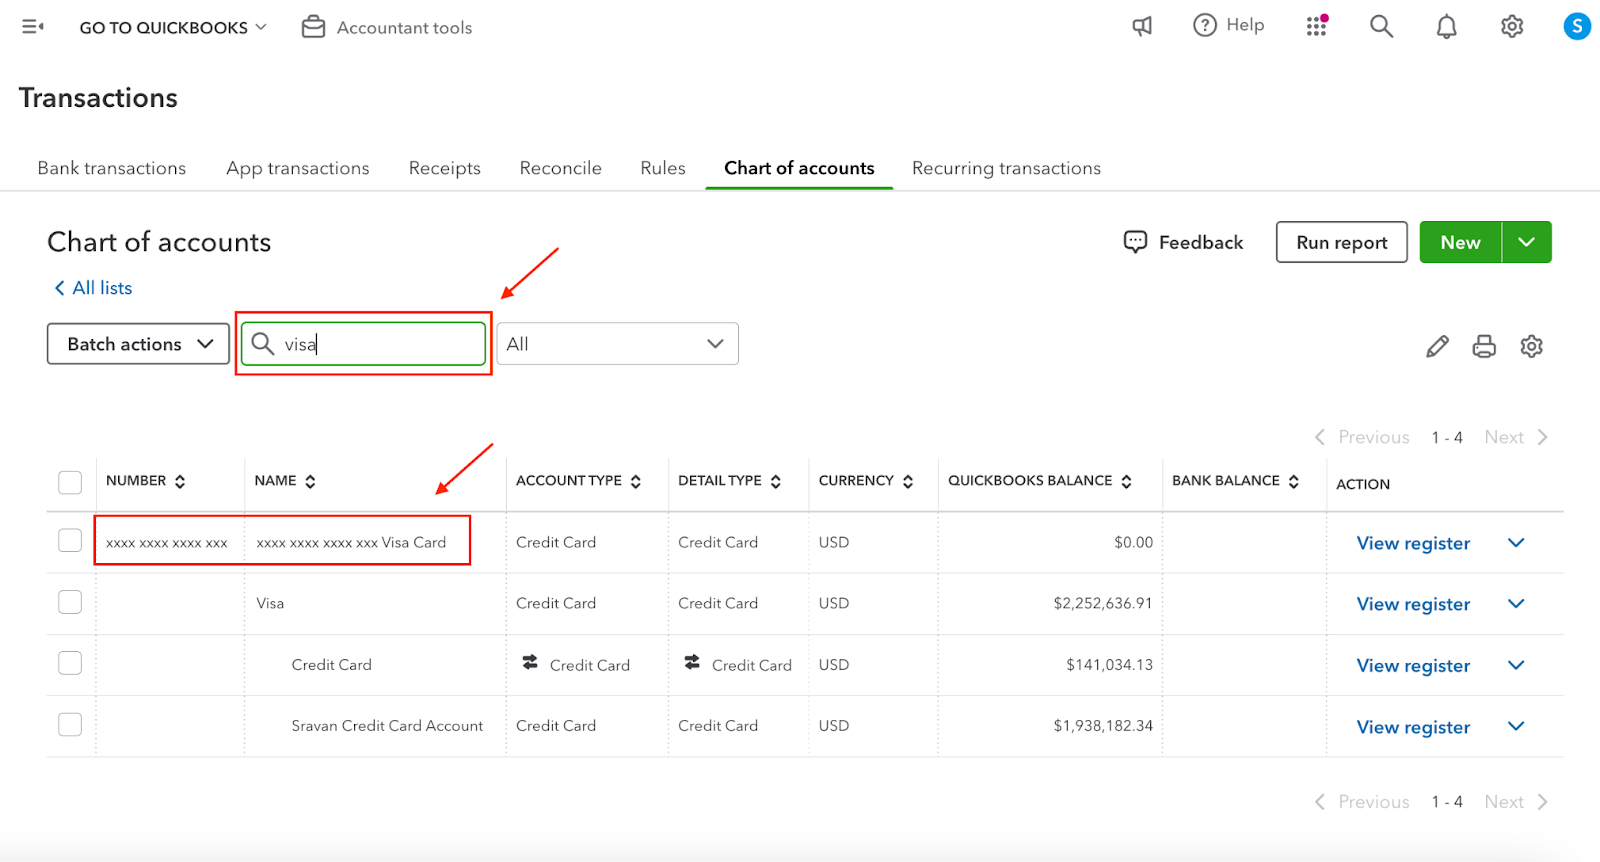
Step 1. From the left side menu, click on “Transactions” and then click on “Chart of accounts”
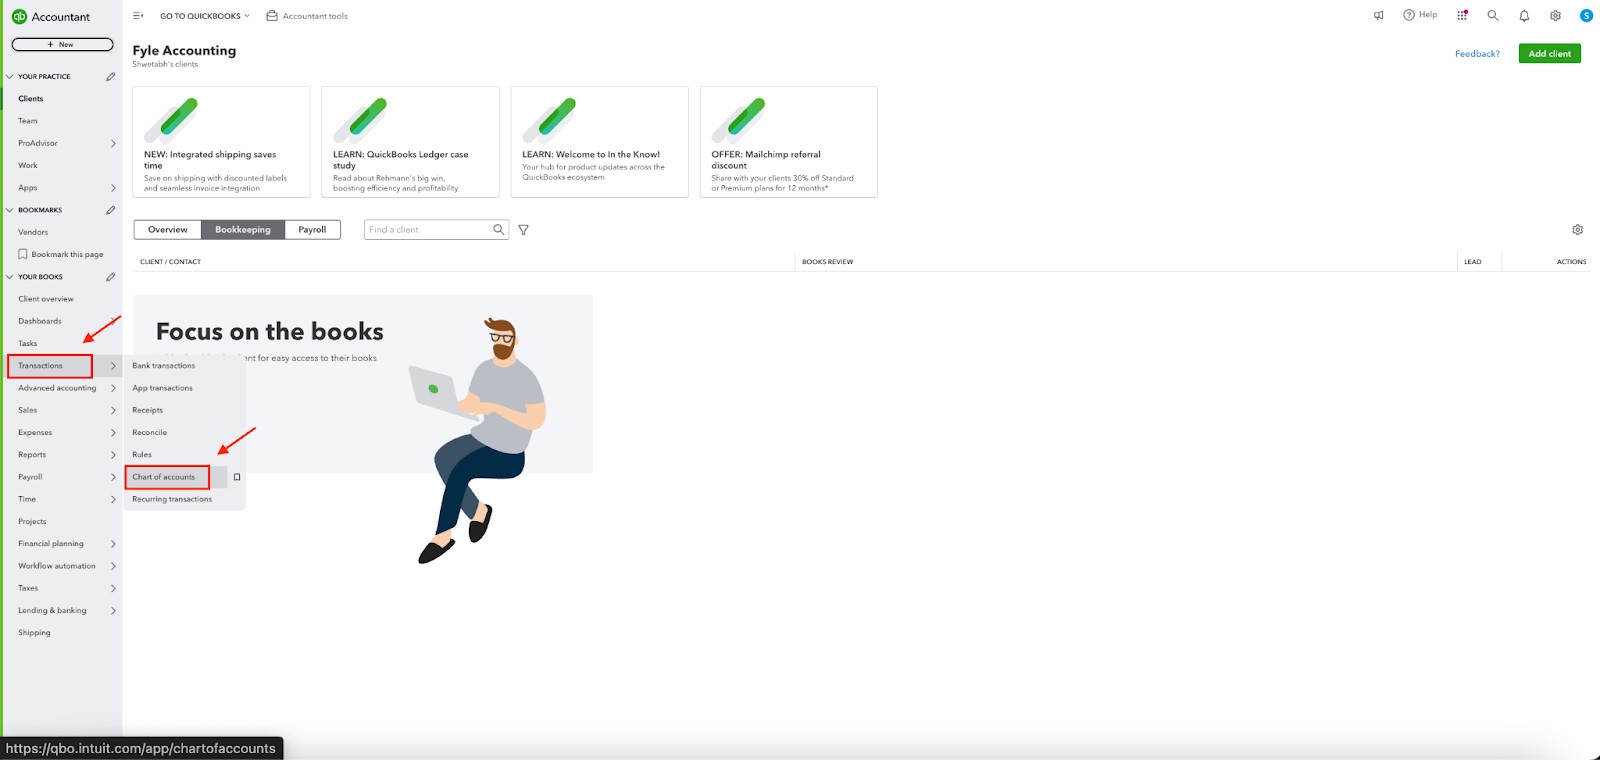
Step 2. Click the “New” button on the next screen.

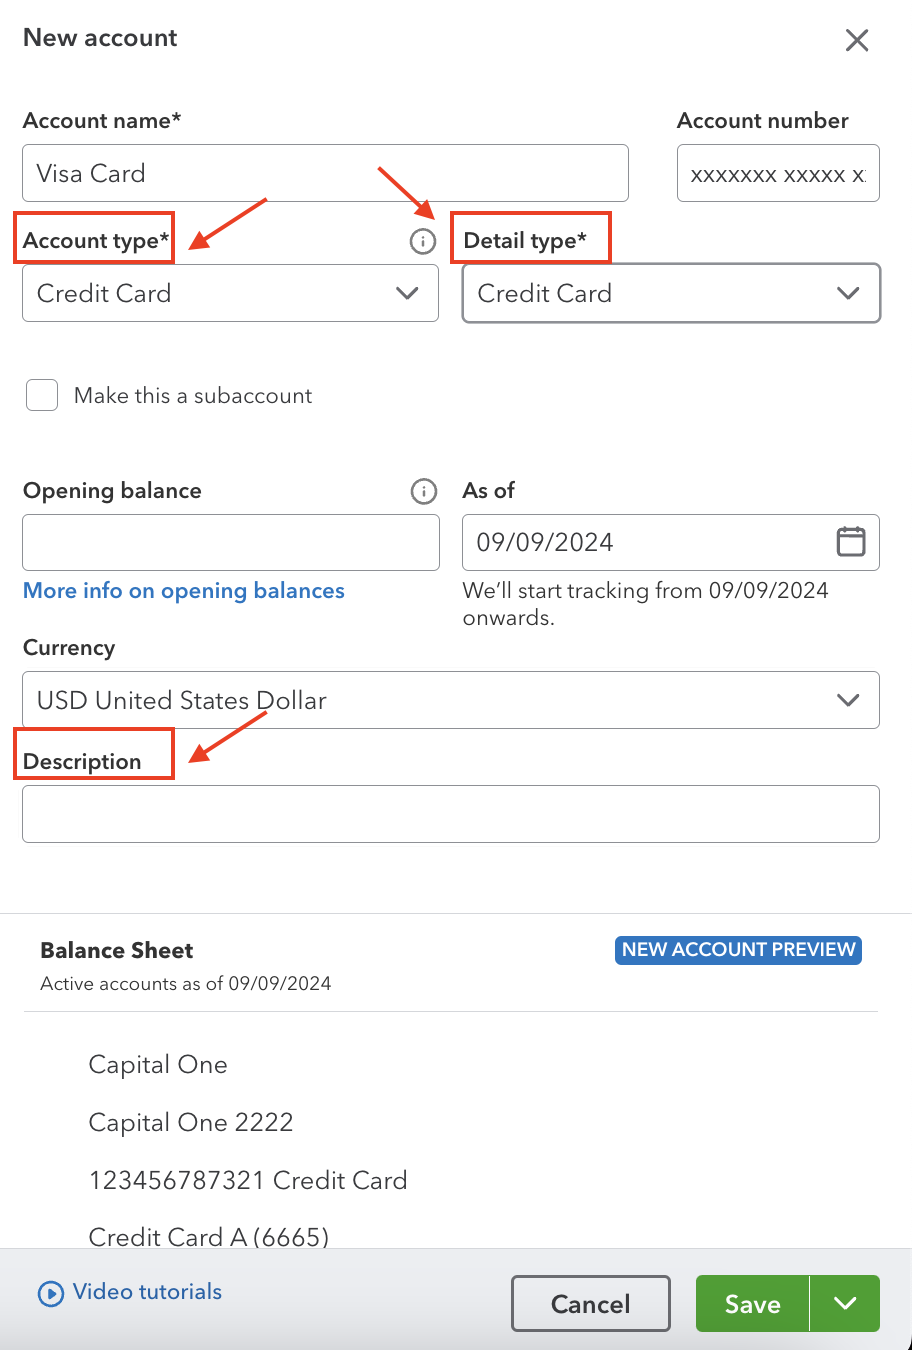
Step 3. You’ll now see a pop-up window. Set the Account Type (a) to credit card. The Detail Type (b) will automatically update, and the name field (c) will default to “Credit Card.” Change the name of the credit card to the account name and the last four digits of the card number.
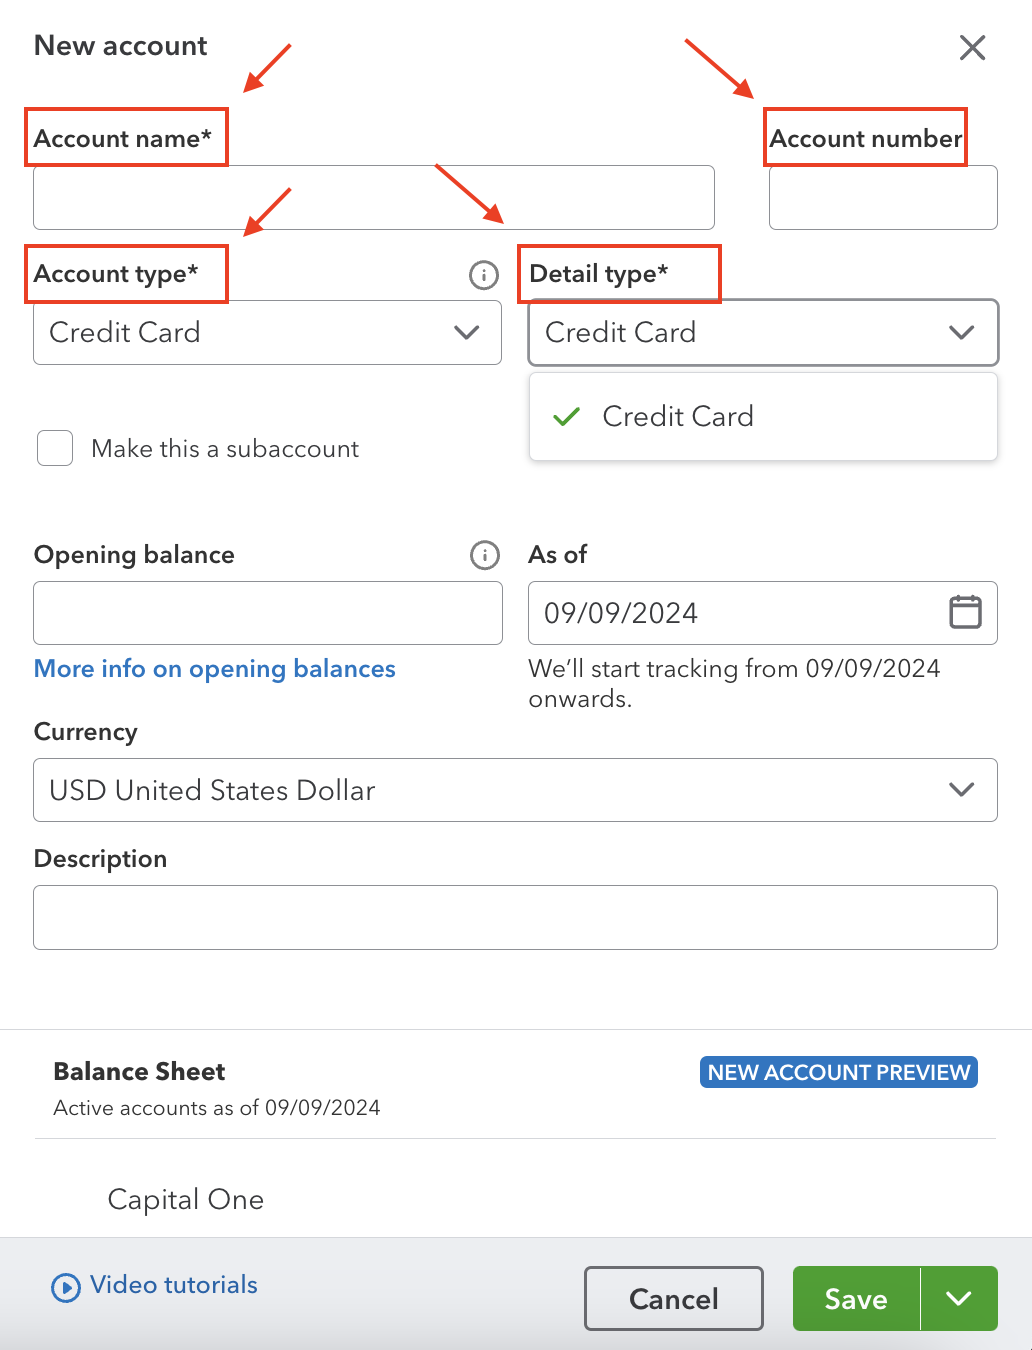
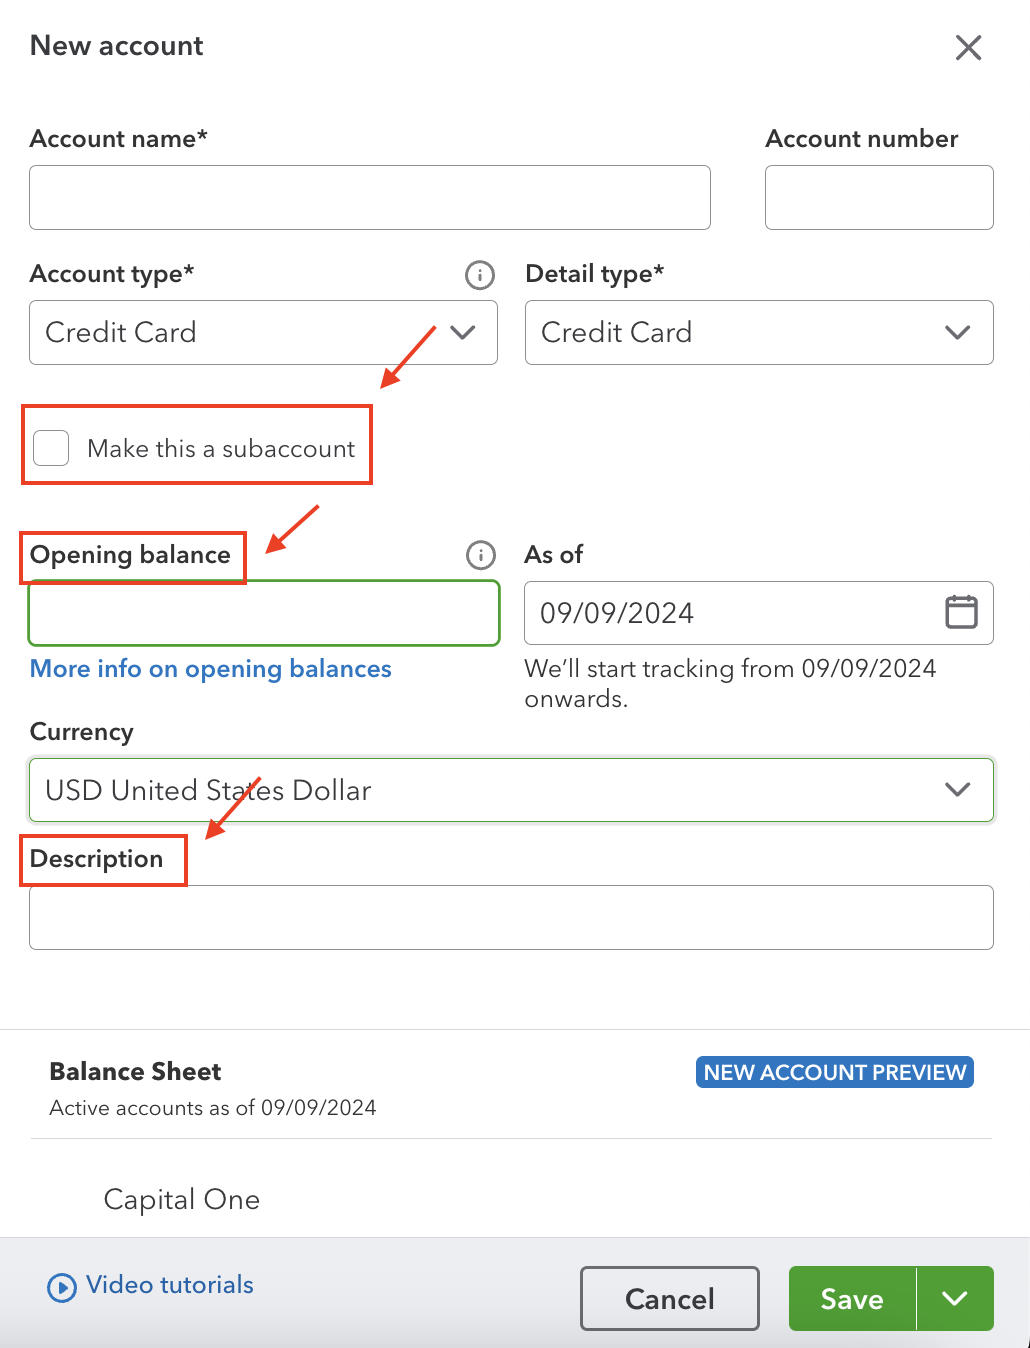
A description (d) isn’t necessary unless you want to enter a note about the card. You’ll typically not use the Sub-Account (e) feature for a credit card, either.
The last field on this screen is the opening balances field (f). Use the drop-down menu to choose the earliest date you used the card.
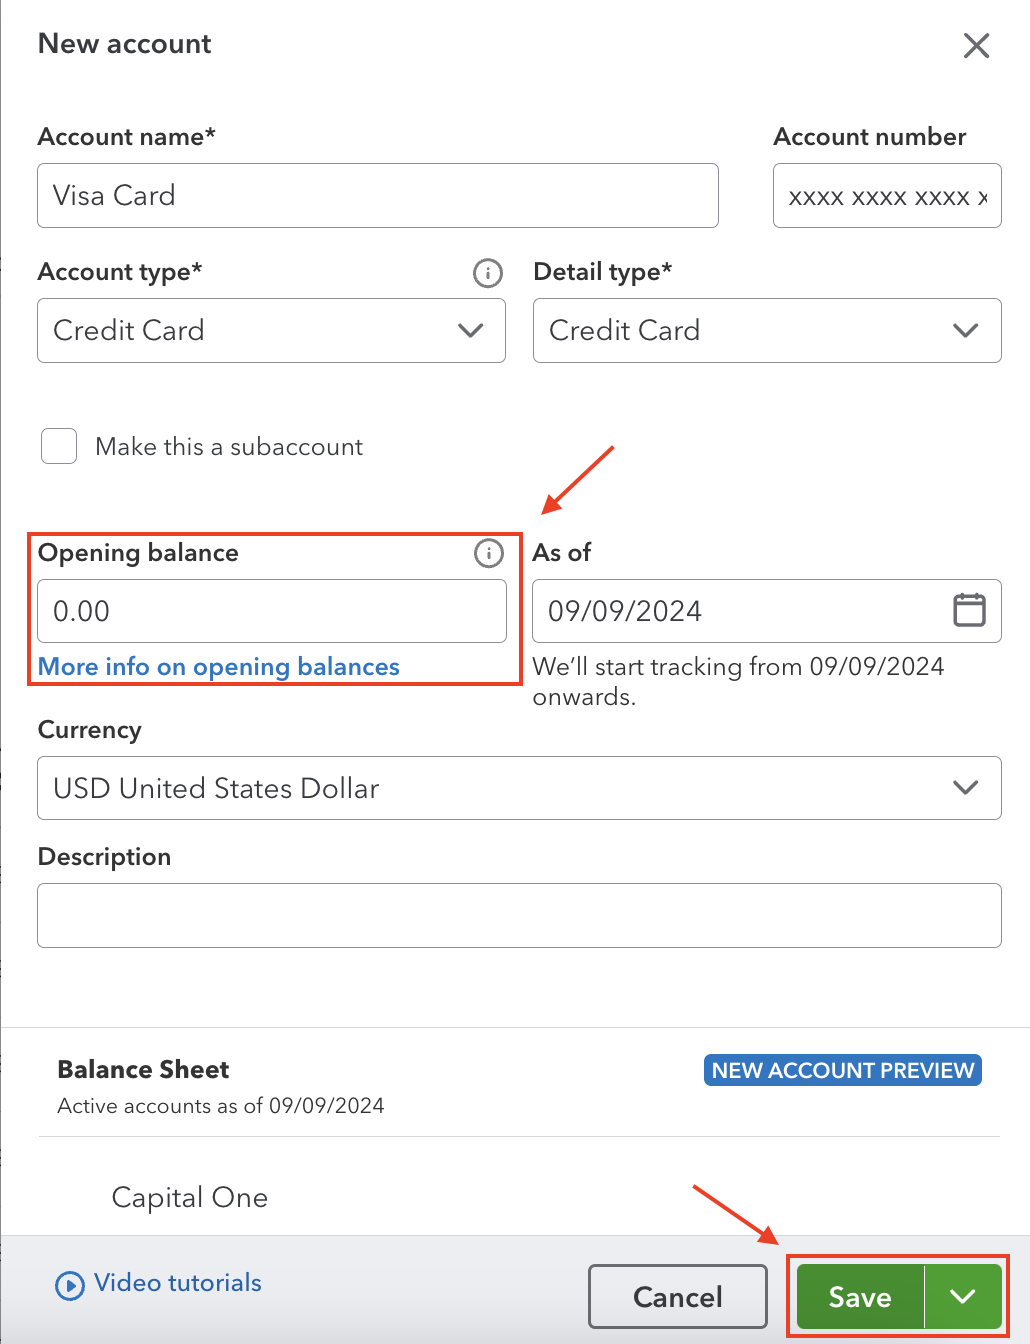
Now, you’ll be asked to enter your account’s balance as of the date you chose. If you are entering a new card, set this field to $0. If the card was in use before the date you started using it for business, consult with your accountant before proceeding to ensure your balance sheet remains accurate. After you’ve entered your beginning balance, click Save and Close.
Step 4. The pop-up window will close, and you will be back at your Chart of Accounts screen. You can type the name of your card in the search bar and your entry wil show up.
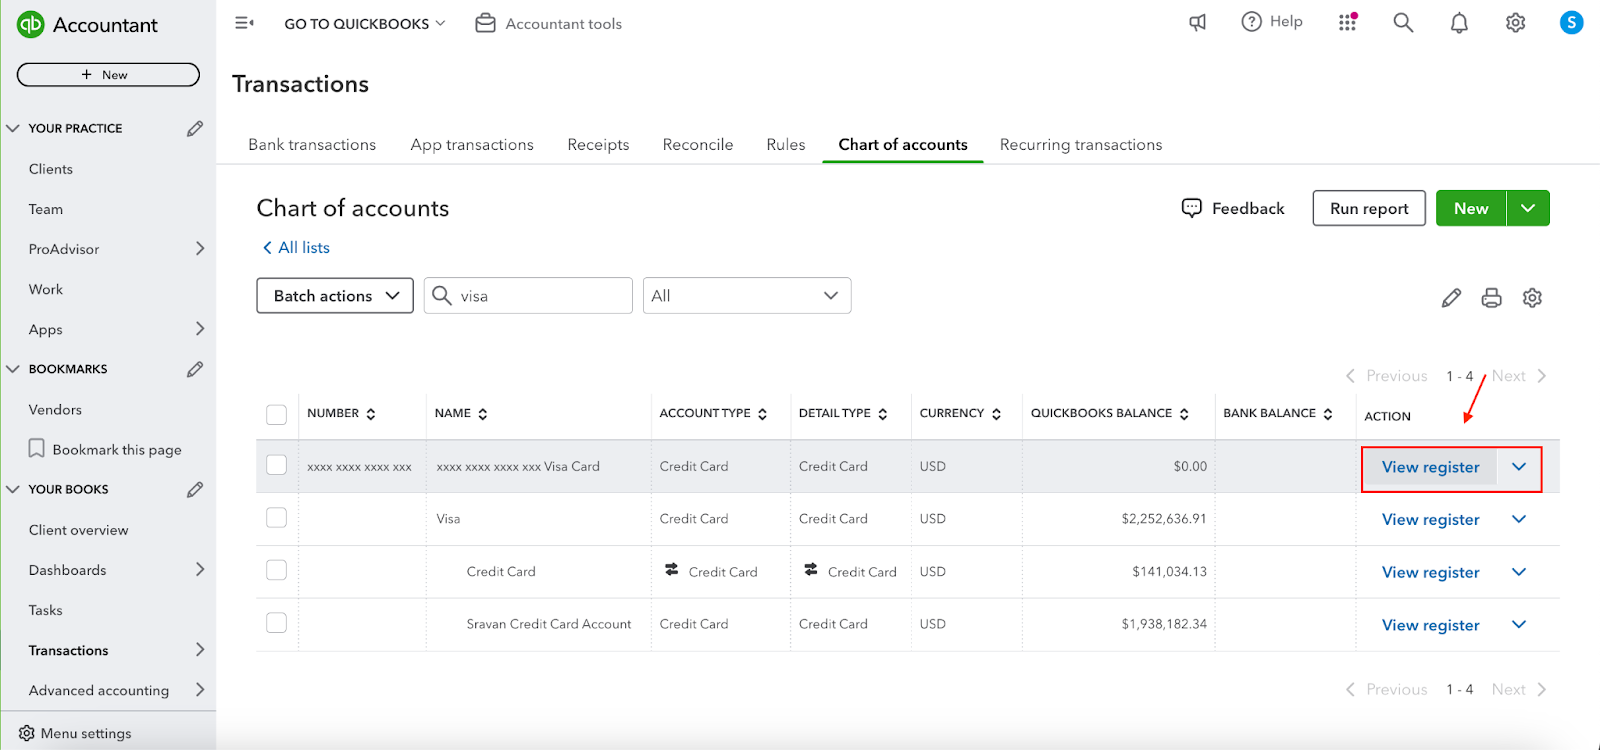
Step 5. Locate the account you just created in the Chart of Accounts list, and click “View Register.”
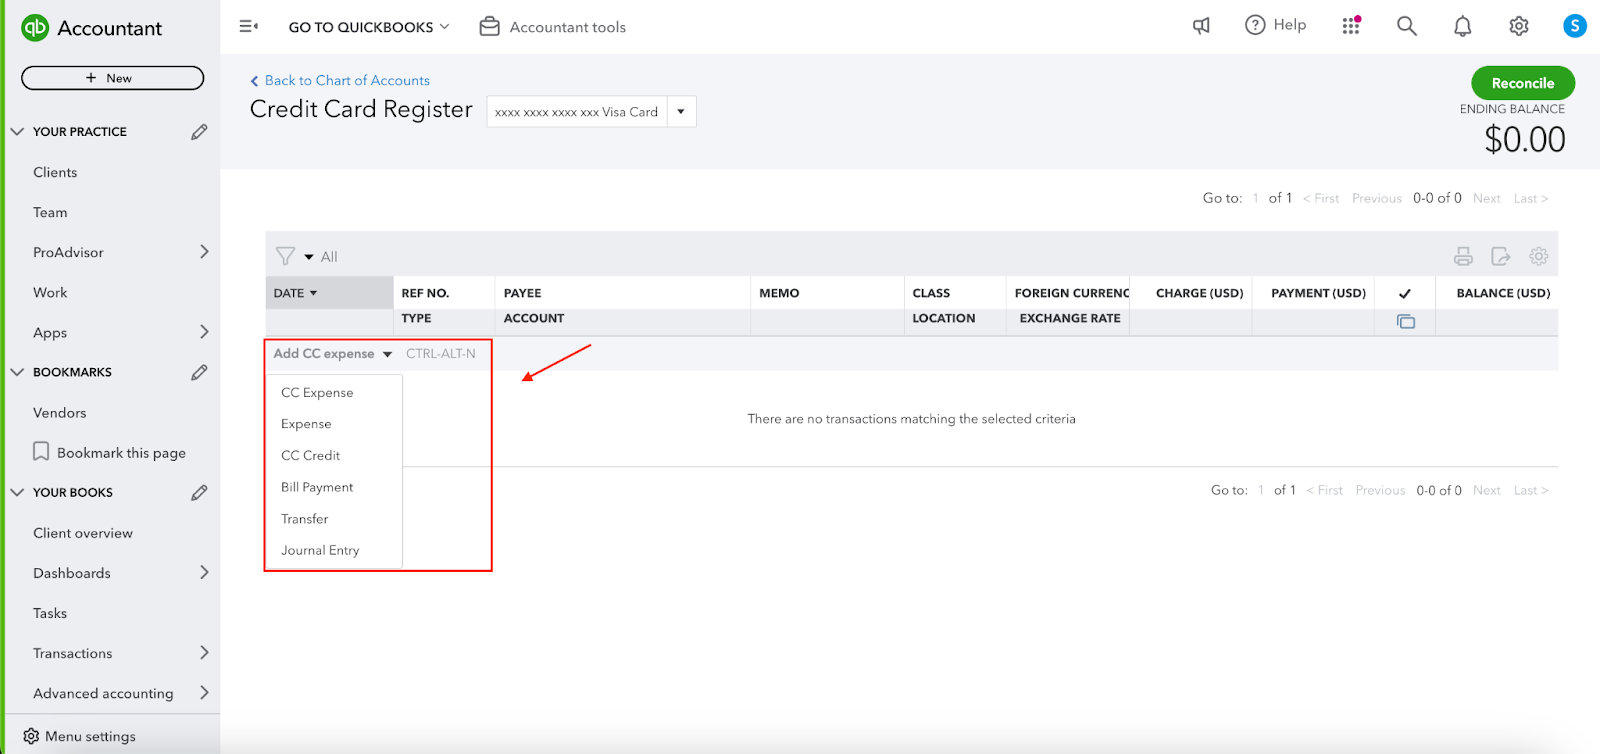
Step 5. You will now be taken to the Credit Card Register screen for the credit card you just created. Click on the “Add CC Expense” link to expand your first data entry line.
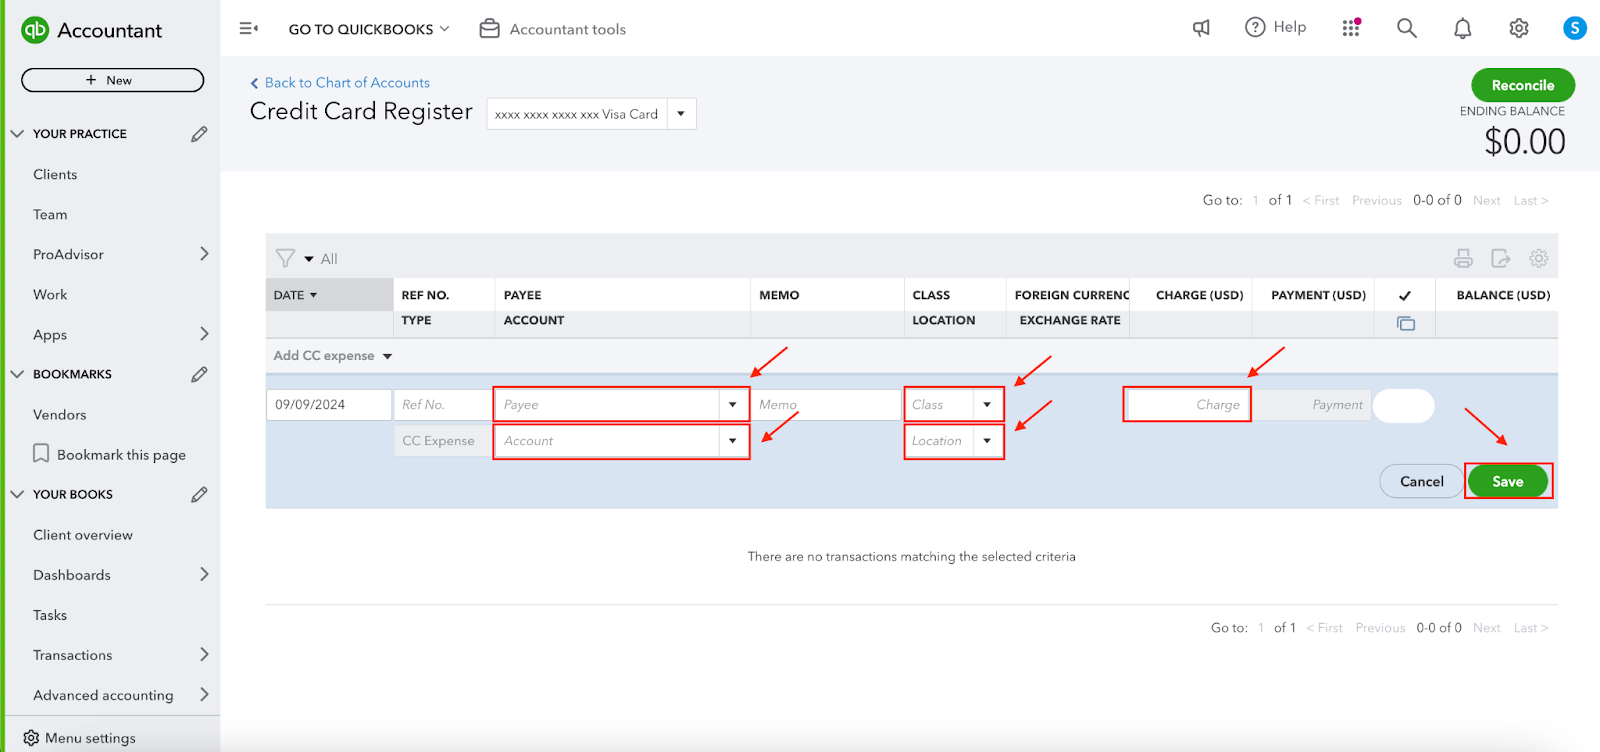
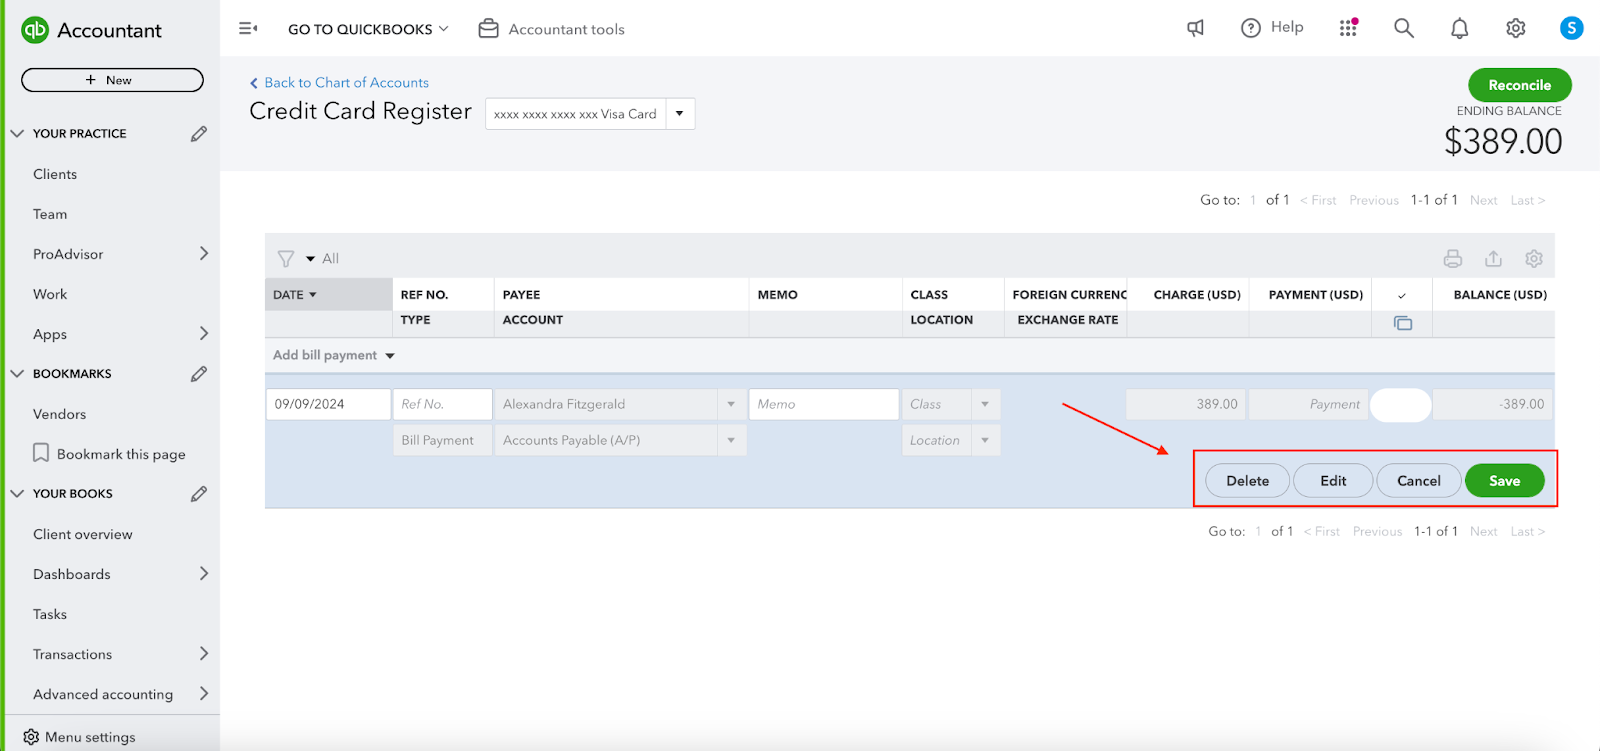
Step 6. Complete each field, making sure the date field is accurate. The only optional fields are the “Ref No.” field and the “Memo” field — every other field should be completed. Once done, click the Save button.
Step 7. Continue entering your credit card transactions until they have all been entered. If you discover you’ve made a data entry error, click back into the line with the error and then click on Edit to change it. You can also delete a transaction if you enter it in error.
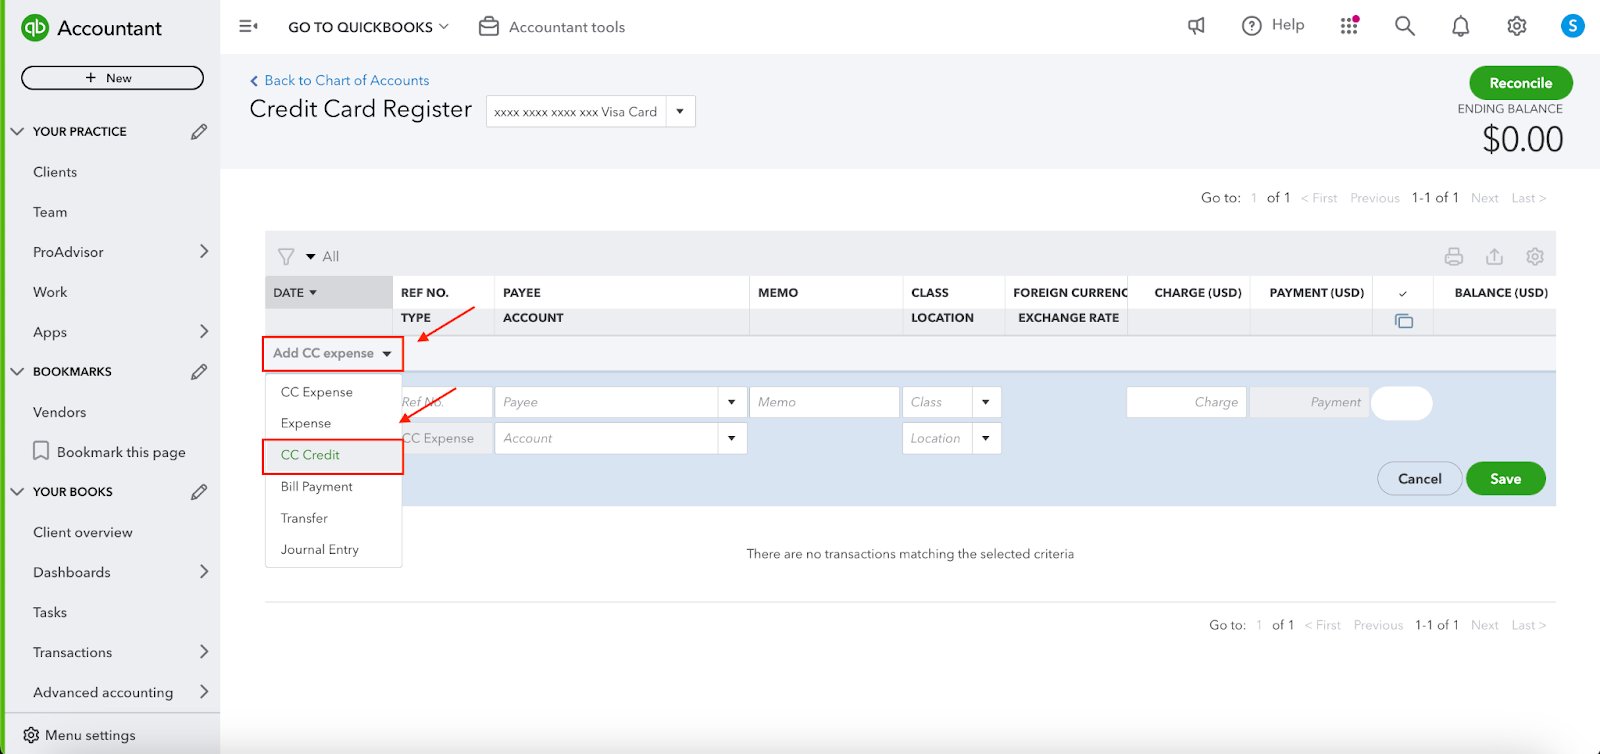
Step 8. If you need to enter a credit card payment, click on the down arrow by the “Add CC expense” option and change the option to “CC Credit.” It’s very important to make sure you are using the correct transaction type: CC Expense is for purchases with your card, and CC Credit is for payments on the card’s balance.
Note: When you enter a credit card payment, enter the bank account from which the payment was made in the Account field.
Step 9. Once you have entered all your credit card charges and payments, click the Reconcile button to reconcile your account. This helps you ensure you haven’t made a data entry error.

How Fyle can Help
Fyle simplifies managing corporate credit card charges in QuickBooks Online by automating the process of recording and syncing expenses. Here’s how Fyle helps with credit card charges:
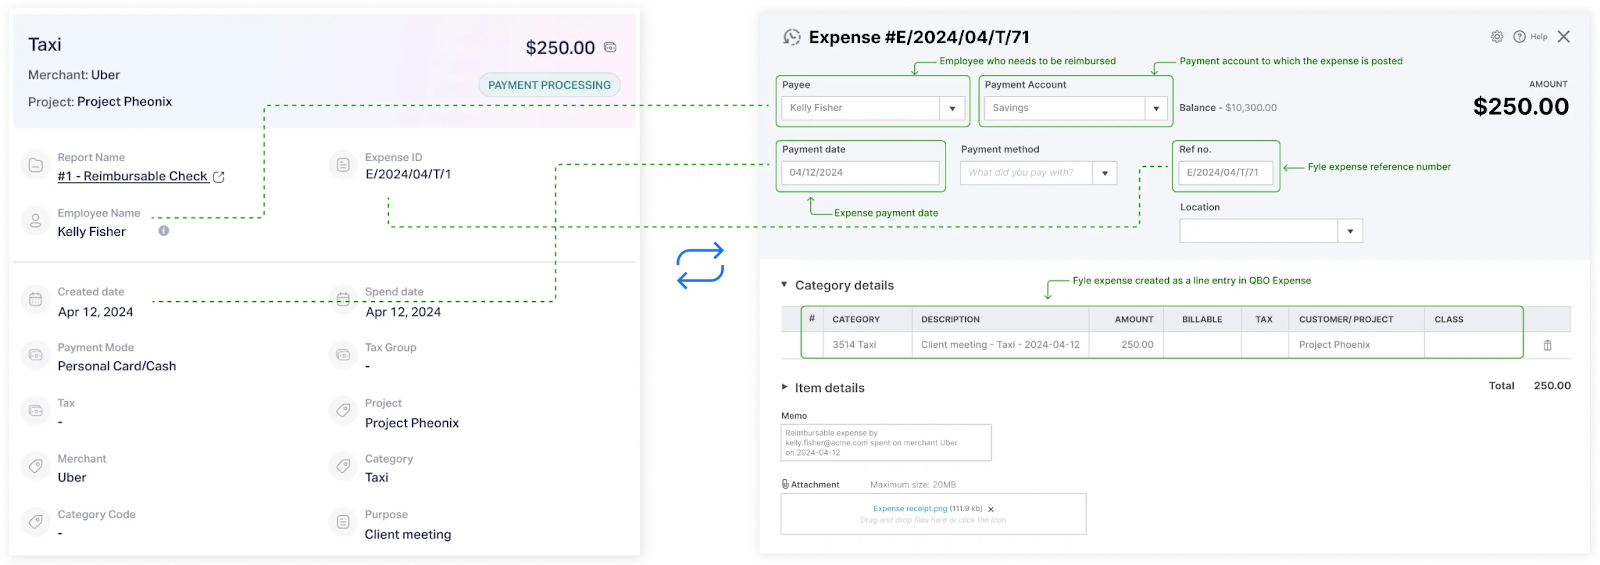
- Automatic Expense Export: Fyle can automatically export credit card charges as expenses to QuickBooks Online without any manual intervention. These charges can be mapped to specific accounts in QuickBooks, ensuring that your expense data flows seamlessly into your accounting system.
- Flexible Export Options: You have control over how credit card expenses are exported into QuickBooks Online. They can be mapped and exported as:some text
- Credit Card Purchase
- Bill
- Journal Entry
- Debit Card Expense
- Employee Coding: Instead of a single administrator manually coding every corporate credit card charge, Fyle allows employees to record and categorize their own expenses. Once submitted, these expenses are automatically synced to QuickBooks Online, reducing the time and effort involved in manual data entry.
- Real-Time Syncing: Fyle ensures that all coded expenses are pushed into QuickBooks Online in real-time, keeping your accounting up to date with minimal lag. The two-way integration keeps the data synchronized without manual updates.
- Error-Free Data Import: Since expenses are automatically categorized and mapped to the correct accounts, there's less room for error, resulting in cleaner data entry and fewer issues during reconciliation.
This automation significantly reduces the workload involved in processing credit card charges, helping you save time and ensuring accurate records in QuickBooks Online.


%20Expenses%20-%20main.webp)


